
Pimp My Mic
on

Now that Skype is no longer a foreign term, and Zoom and Teams have entered the vernacular, ever more of us have been subjected to the poor experience and frustration that these video-conferencing services present. In addition to the operating errors of some participants, the limited bandwidth of the Internet connections, the poor quality of the video images (due to bad cameras and/or bad lighting), it is the poor quality of the audio transmission which adds to the list of annoyances. This is especially true for those who travel with a laptop. Unlike with a desktop PC where you can choose your hardware, you're likely to be stuck with a poor quality webcam.
Laptop frustrations
Due to many of my friends, acquaintances and relatives being scattered all over the world, I have been using ‘video telephony’ quite frequently for a long time. Since I also use portable computers when ‘on the road’, I have already cursed a lot with regard to the quality of the video quality they offer.
After I exchanged my older MacBook Pro for a new MacBook Air last year, I could hardly believe what an unbelievably noisy and underexposed image the camera provided; Apple dares to sell this for a lot of money. I could have just bought an extra webcam and plugged it in via USB, but you buy something portable precisely because you don’t want to carry a load of extra equipment around with you, right? In addition, the MacBook Air only has USB-C interfaces. These may be very advanced but webcams with USB-C are scarce and having to carrying around an extra USB-C/USB-A adapter for regular webcams exceeded my capacity to suffer. So, the new laptop was sold and I regretfully returned to the older, previous model.
The problem of inferior cameras (and microphones) in folding computers is not limited to Apple by the way. Even Windows 10 users can be affected. I know at least one (expensive) Samsung notebook where the picture noise is obvious and the sound is terrible. But there are also portable computers with mediocre video quality. It’s a pity that exactly these aspects are neglected in the tests of relevant magazines. By now the relevance of the cameras should have become clear to the manufacturers. By the way, it is difficult to comprehend why every cheap smartphone has a much better front camera and a halfway usable microphone, but laptops still don’t!
Remedy
The easiest way to solve all these image and sound problems is to buy a webcam. This is,of course, obligatory for a PC but it is also worth considering after the purchase of a laptop for your home office. It is unlikely that anyone will be satisfied with an extremely inexpensive, no-name webcam from a Chinese supplier. However, both Logitech, Microsoft and other known-brand manufacturers are offering webcams starting from as little as 35 €. The built-in microphones are not perfect, but they are good enough and usually sufficient for voice transmission.
Should the quality of the camera be sufficient, but the sound quality not, you might consider buying an external microphone. The industry has recognised this market and offers several models with USB instead of the more typical jack plug. Thanks to the integrated A/D converter and the integration of the necessary drivers in all common operating systems, the connection of such devices to a PC running Windows, MacOS or Linux is completely problem-free. Of course you could also use ‘normal’ microphones with an analog output - at least on most desktop PCs. However, modern laptops are increasingly removing the microphone input. As a replacement, a cheap USB audio converter would be a good choice that offers such an input and, usually, an audio output too. But this leaves you with another small part to lose...not the solution for me.
USB Microphone
Having never really been satisfied with various inexpensive microphones over recent years, I recently ordered a large diaphragm microphone with a USB plug. These condenser microphones are also used in recording studios and should, therefore, be quite useful. Wikipedia provides insights on the characteristics of microphones under the keyword “Mikrofonierung” (English: to mic up), the situation-specific selection and placement of microphones for recording sound sources.
Furthermore, due to the enormous growth of social media, many (younger generation) people produce podcasts or actively run their own video channel. This requires not only a good video camera but also a good microphone. It is precisely for such purposes that ‘podcast kits’, consisting of a large diaphragm microphone (sometimes even with a spider), stand, boom mount, and pop filter are on offer today.
So, I wanted to try my luck in this sector. Two phenomena are particularly apparent in audio technology: firstly, not every argument put forward is necessarily rational and, secondly, quality quickly becomes really expensive. Unfortunately, the price/performance ratio is not a gently rising straight line but, instead, has an exponential curve. And, since a better sound was only worth a limited amount of money to me, I Googled inexpensive large-diaphragm USB microphones...and found what I was looking for.
CAD Audio U29
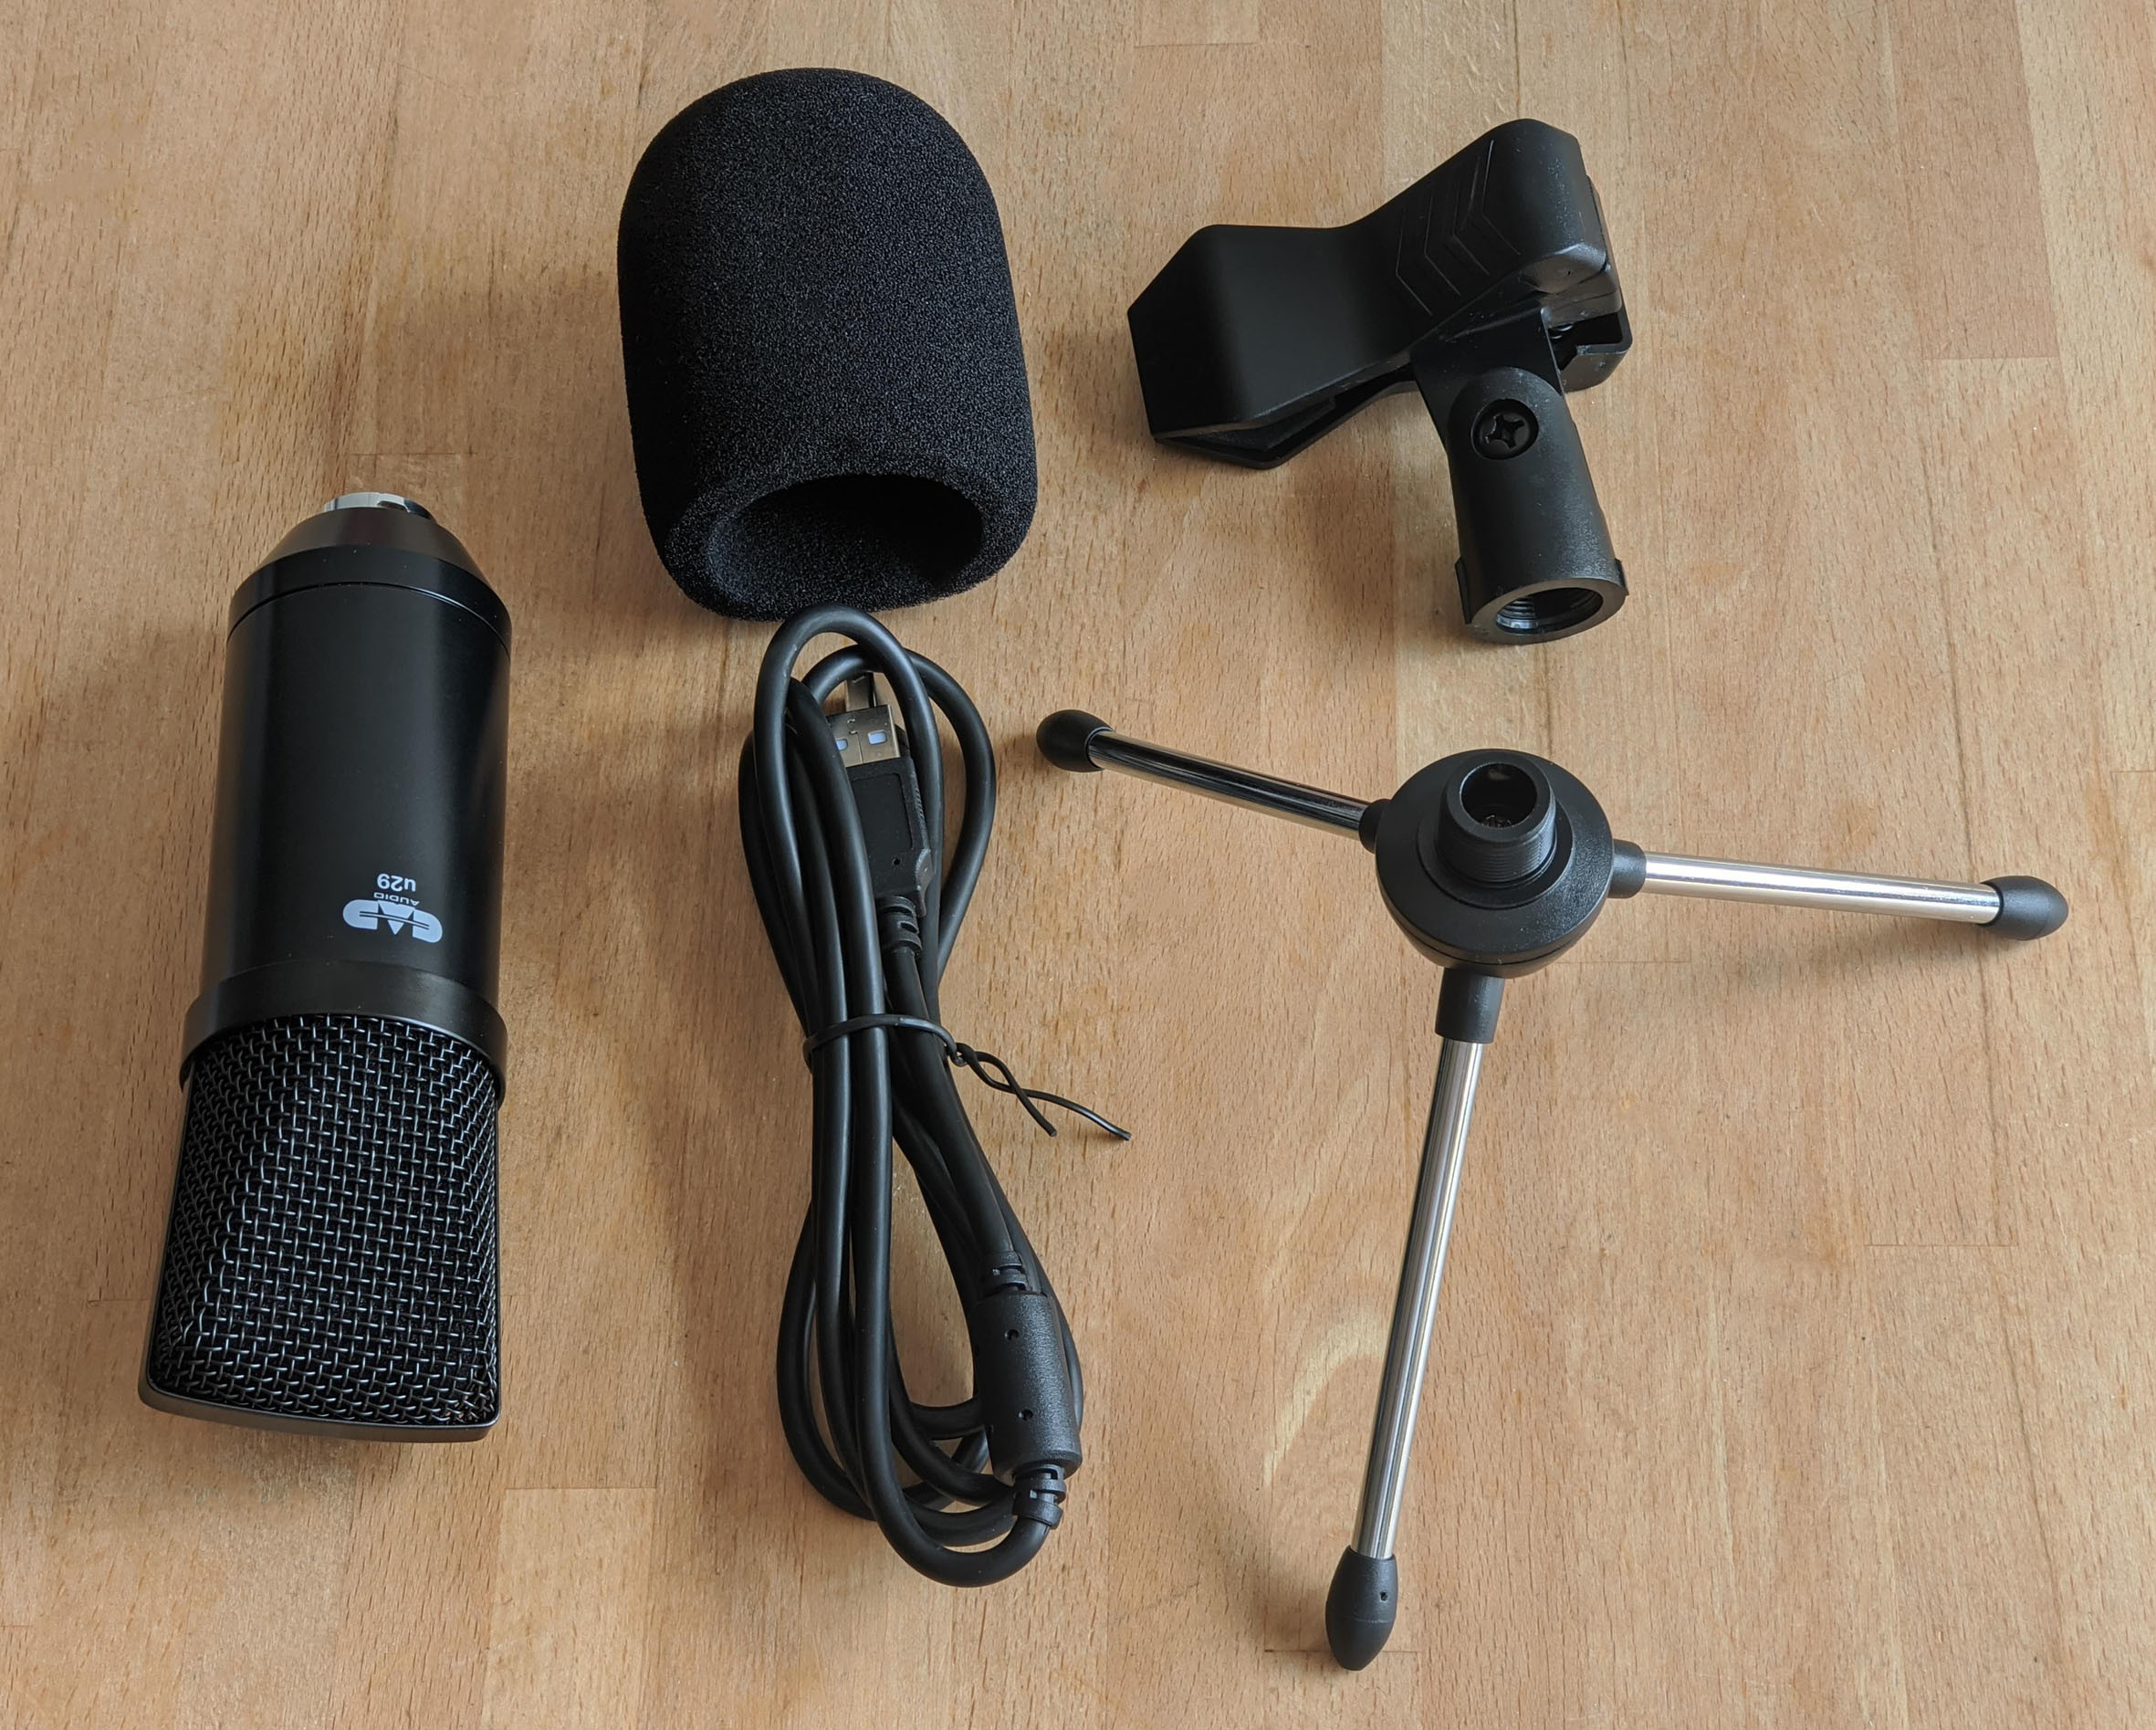
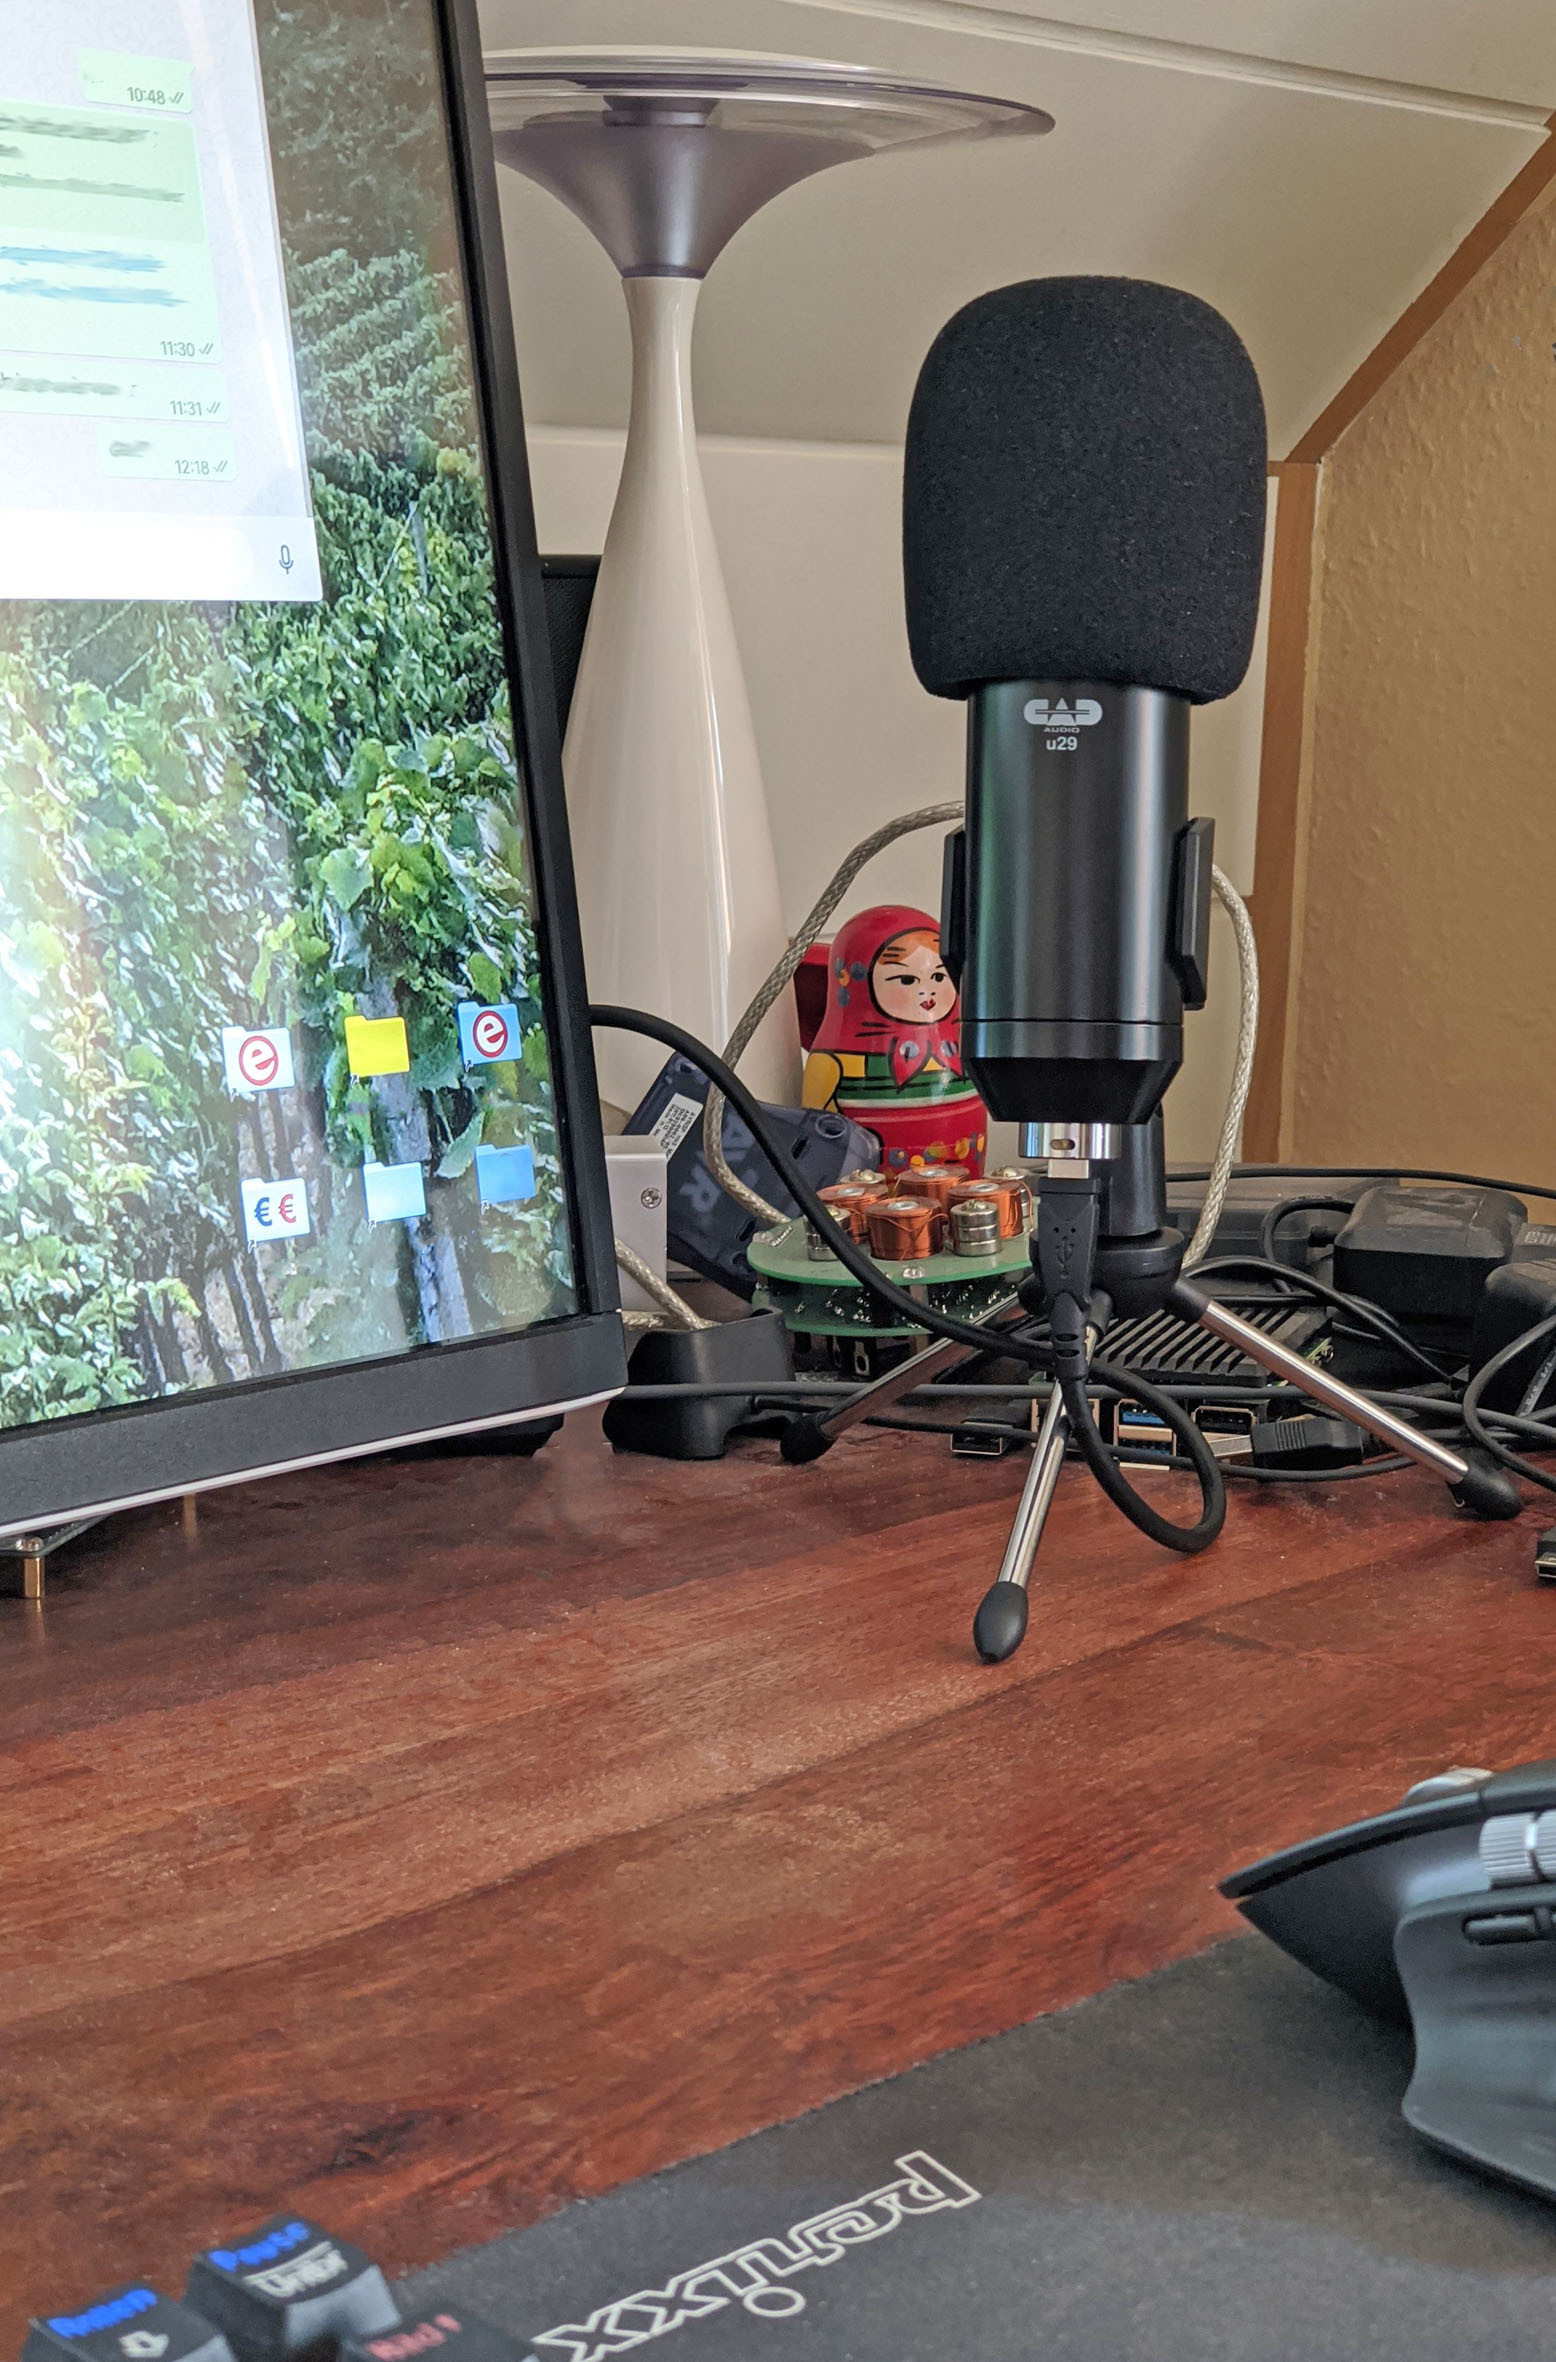
This microphone comes with a tripod and pop filter, and costs only 34 €. I could not do much wrong in purchasing it, I thought. So I ordered it and, two days later and, after unpacking it, I had the view shown in Figure 1. Visually, the microphone makes a good impression: no plastic - all metal.
I immediately connected it to my PC, started the freeware Audacity and made a recording for comparison with the microphone of my webcam (Logitech C525). I was not disappointed. I could clearly hear the sound improvement and, so clear was it, that further measurement was not deemed necessary. Not bad!
I was curious if my Skype conversation partners would also notice a difference. And, yes, the difference was noticed here, too. Two test subjects could hear quite clearly which of the two microphones was active when I switched. The difference? The CAD Audio microphone was not quite as bass-heavy and had a much clearer treble.
Levels and implications
The story could have ended here. However, during the recordings I noticed that the level of the CAD Audio microphone was more than 5 dB lower than that of the webcam, so the microphone was quieter. The video conferencing programs offer a level increase, but then the slider would have had to be ‘turned up to 11’.
It wasn’t the first time I had encountered low levels in microphones. But, being an electronics engineer we know how to fix things, which is why I have already retrofitted amplifiers in microphones or increased the gain of existing electronics by changing components. This should also be possible with this microphone, right?
With the thought barely formed in my mind, the microphone was already disassembled as Figure 2 proves.
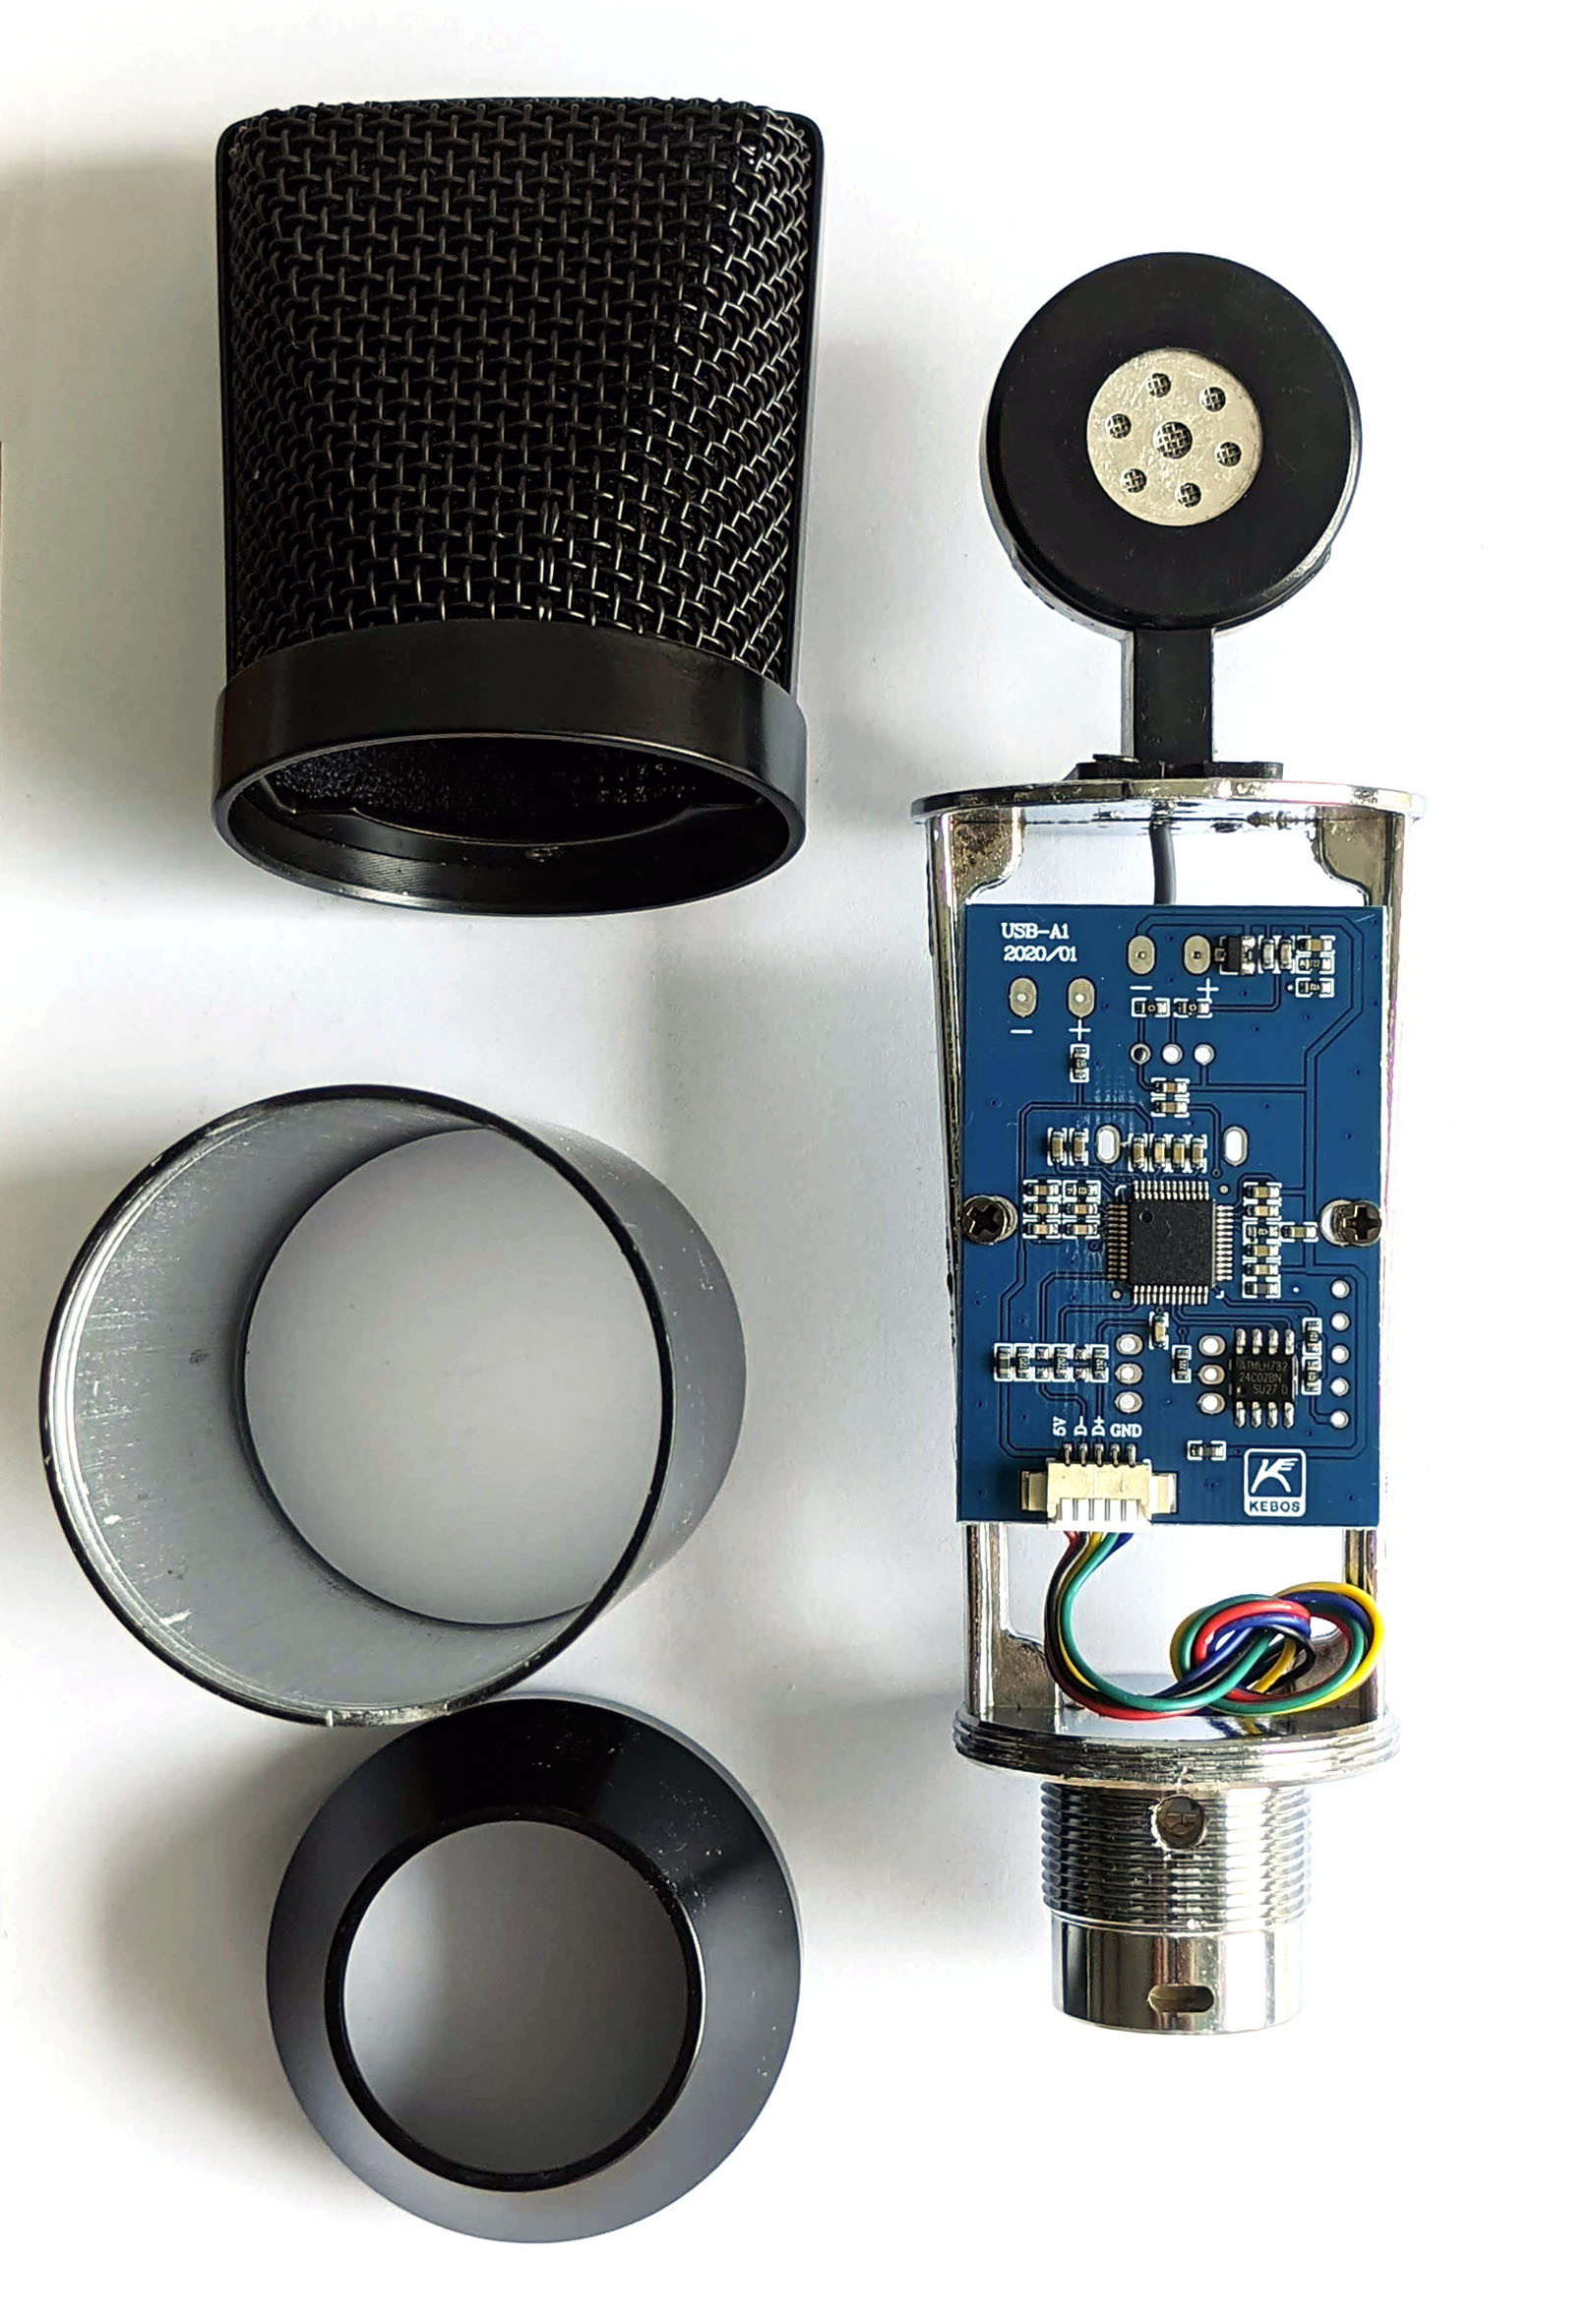
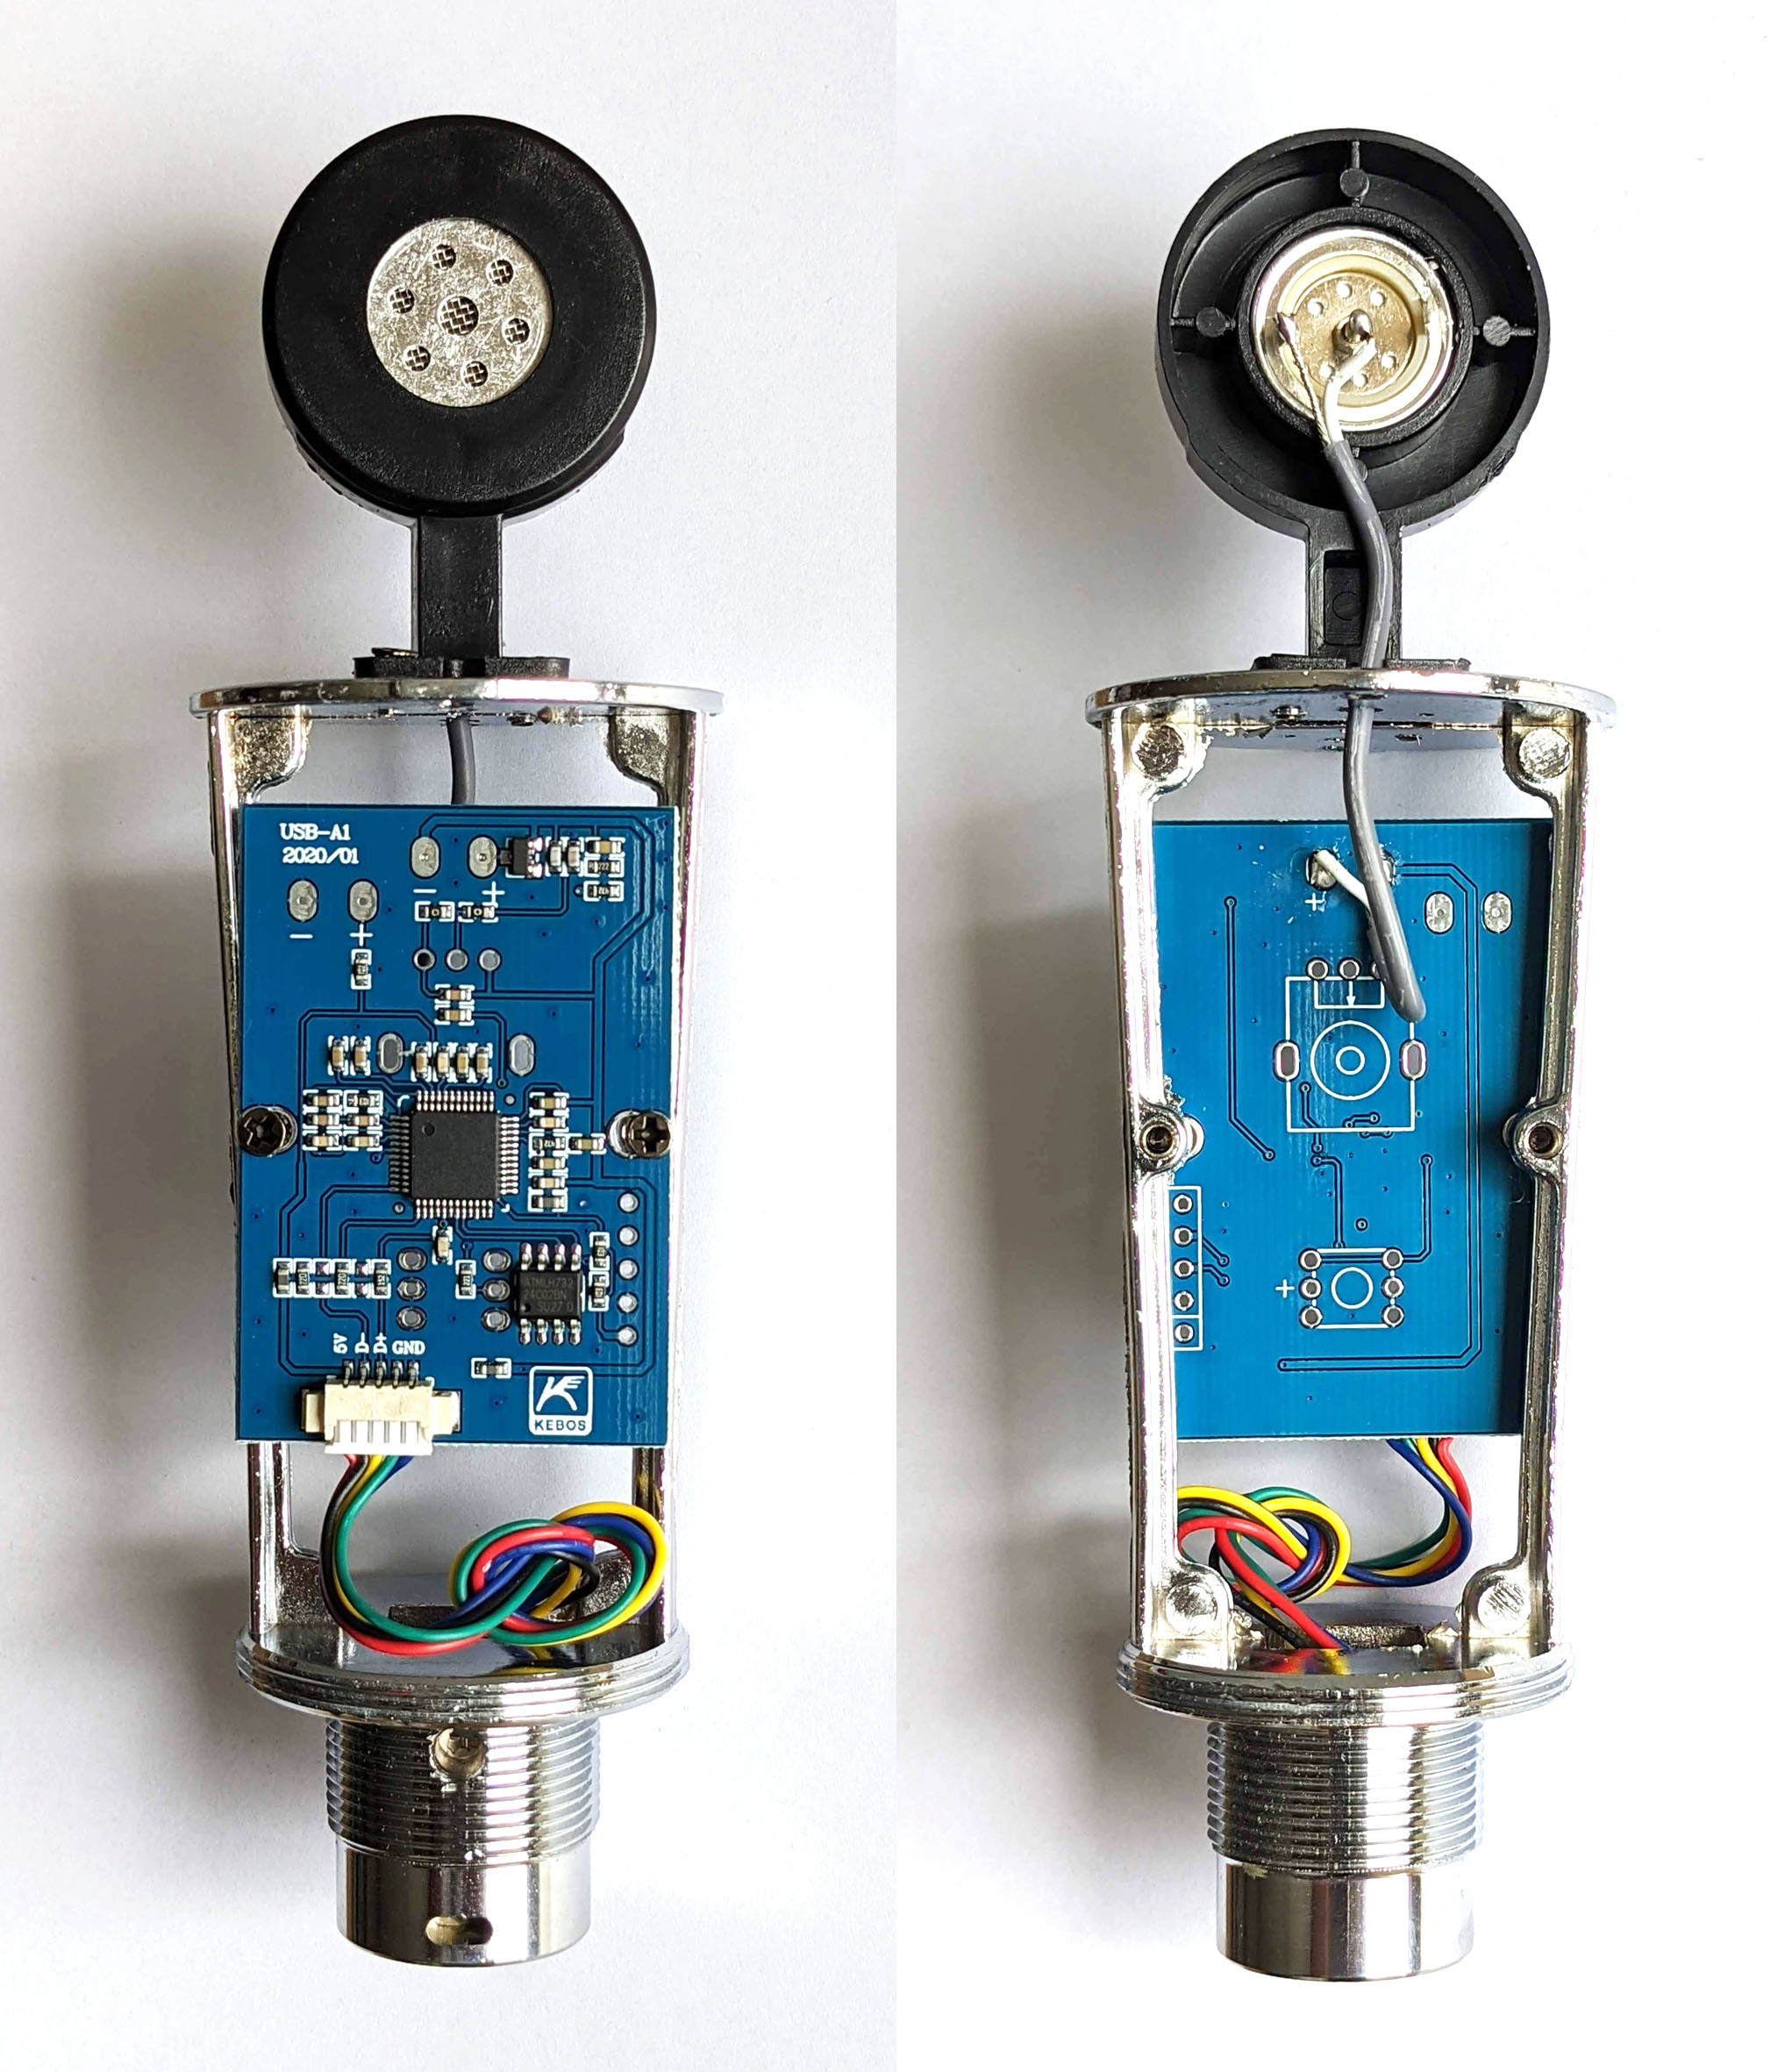
Above, you can see the actual microphone capsule whose diaphragm, with a diameter of about 1/2", is a bit small for my understanding of the term 'large diaphragm'. Figure 3 shows the capsule, which is also too small, also from behind.
Of more interest is the circuit board. The chip in the middle is an SoC with audio input and USB interface. In contrast to the serial EEPROM on the bottom right, the SoC is probably not labelled due to secrecy - a pity! The little three-legged black SMD device at the top is the actual preamplifier.
A first measurement on the two pads “-” and “+” in the upper middle showed that exactly 0.0 V is applied to the microphone membrane. So, no bias voltage. Thus it must be an electret condenser microphone. I was a bit disappointed, despite the good sound. The SMD device turned out to be a ‘J35’, an N-channel JFET of type 2SK1109 with a drain current of about 200 µA with gate shorted.
Impedance converter
Figure 4 shows a section of the circuit board around this JFET.
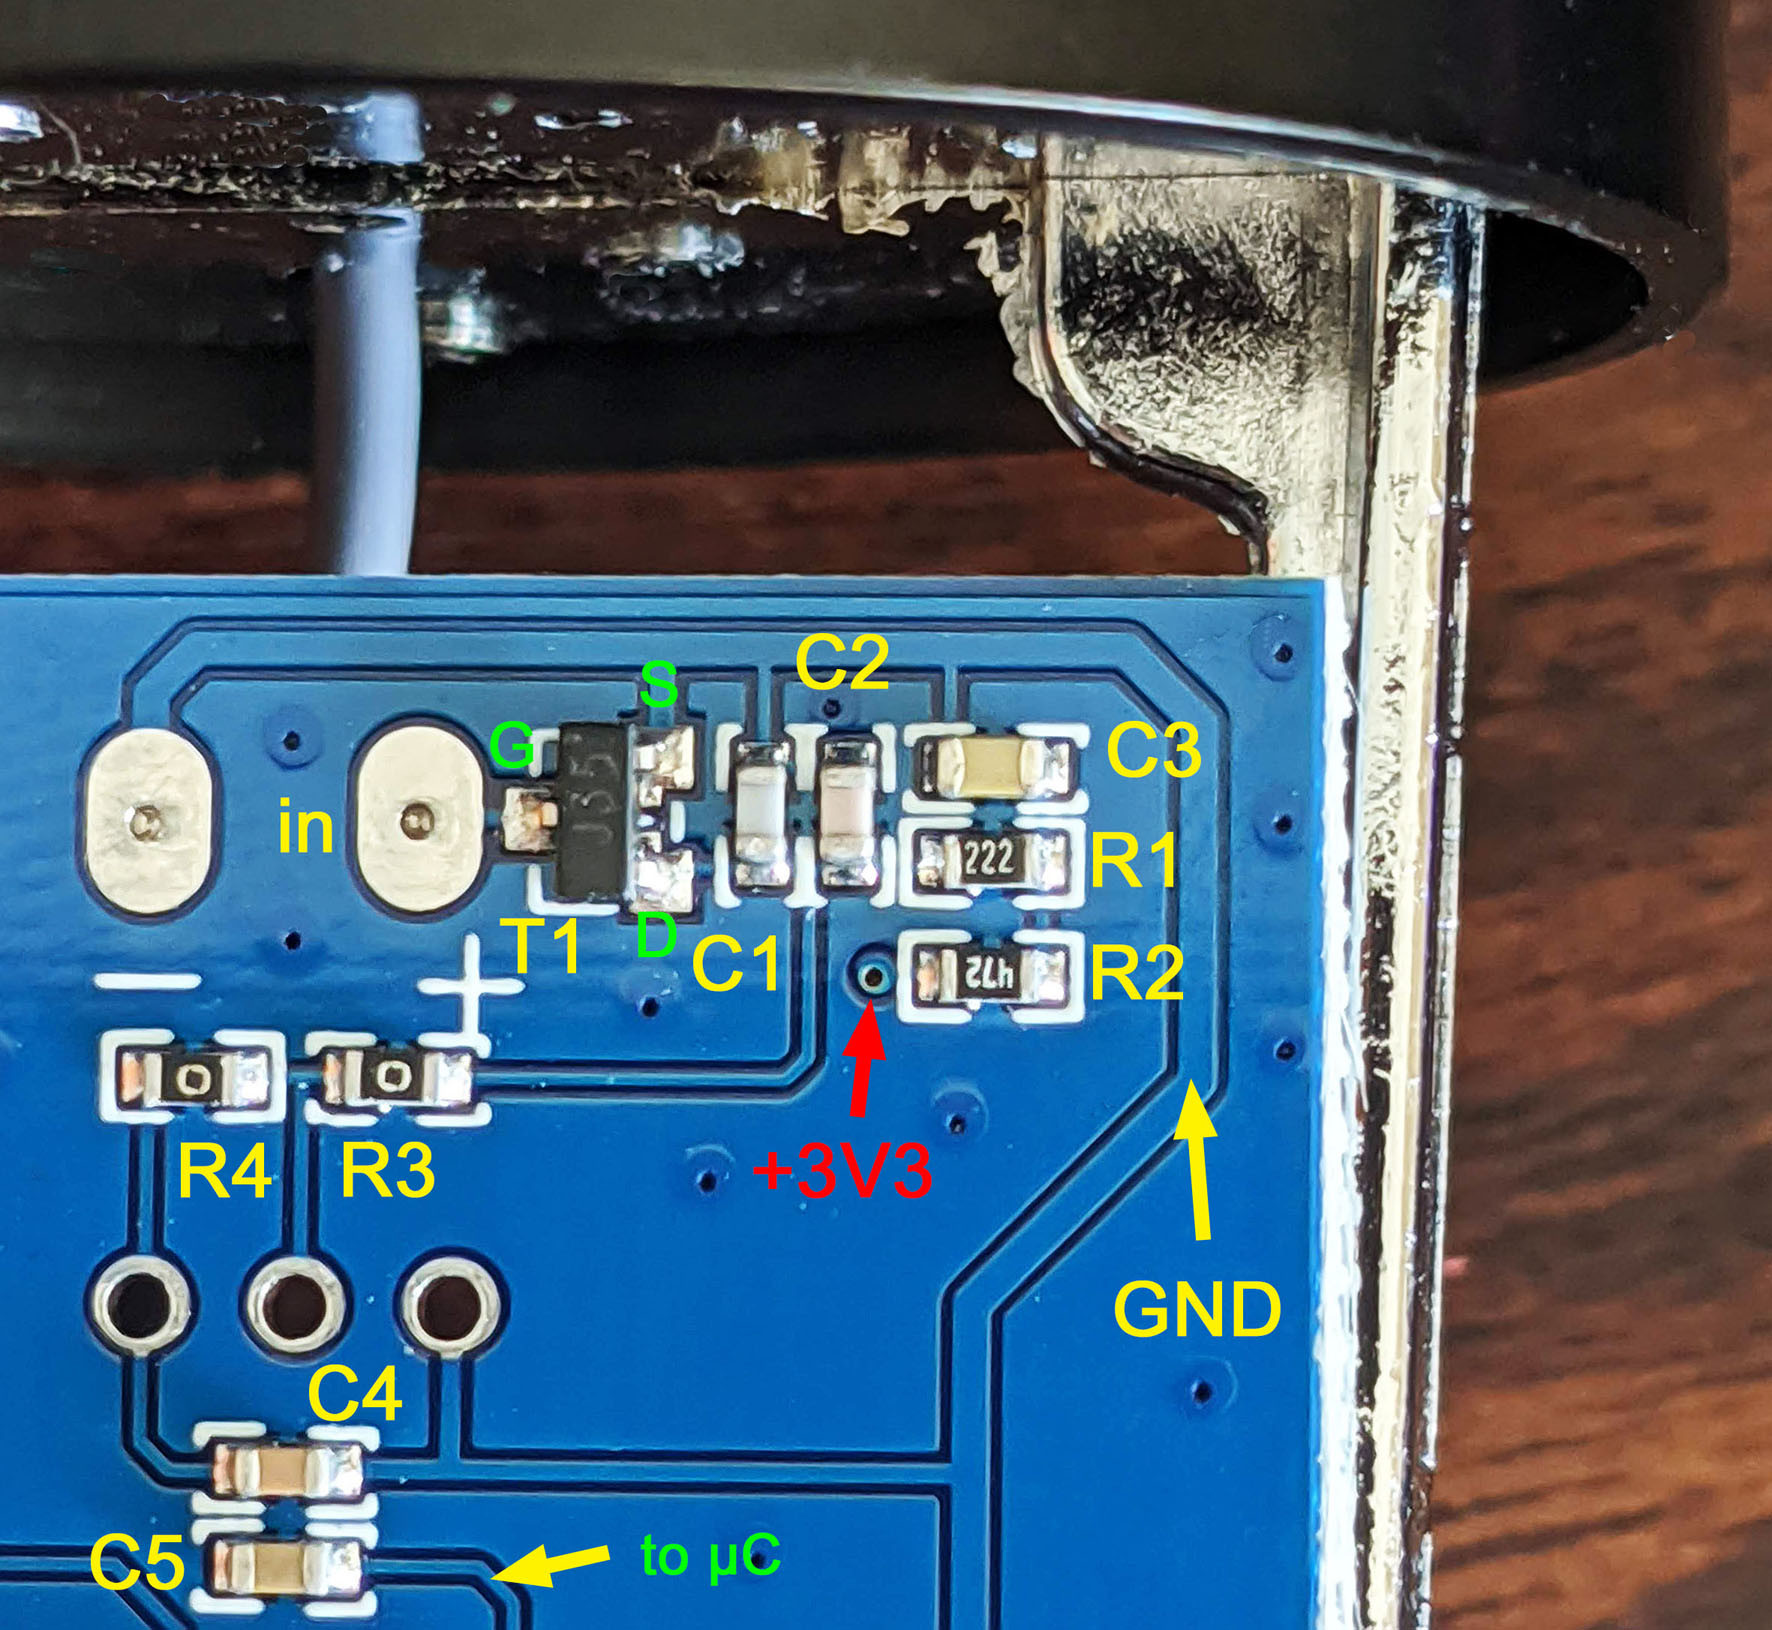
An impedance conversion is necessary because the capacitance of the microphone membrane is very low and its impedance for audio signals is very high. Connected to the source input, T1 provides amplification - the foundation for a higher output level. In Figure 5 you can see the circuit of the components from Figure 4. R2 is used together with C3 to filter the supply voltage. R1 and R2 together drop about 1.7 V; the drain current is therefore about 245 µA.
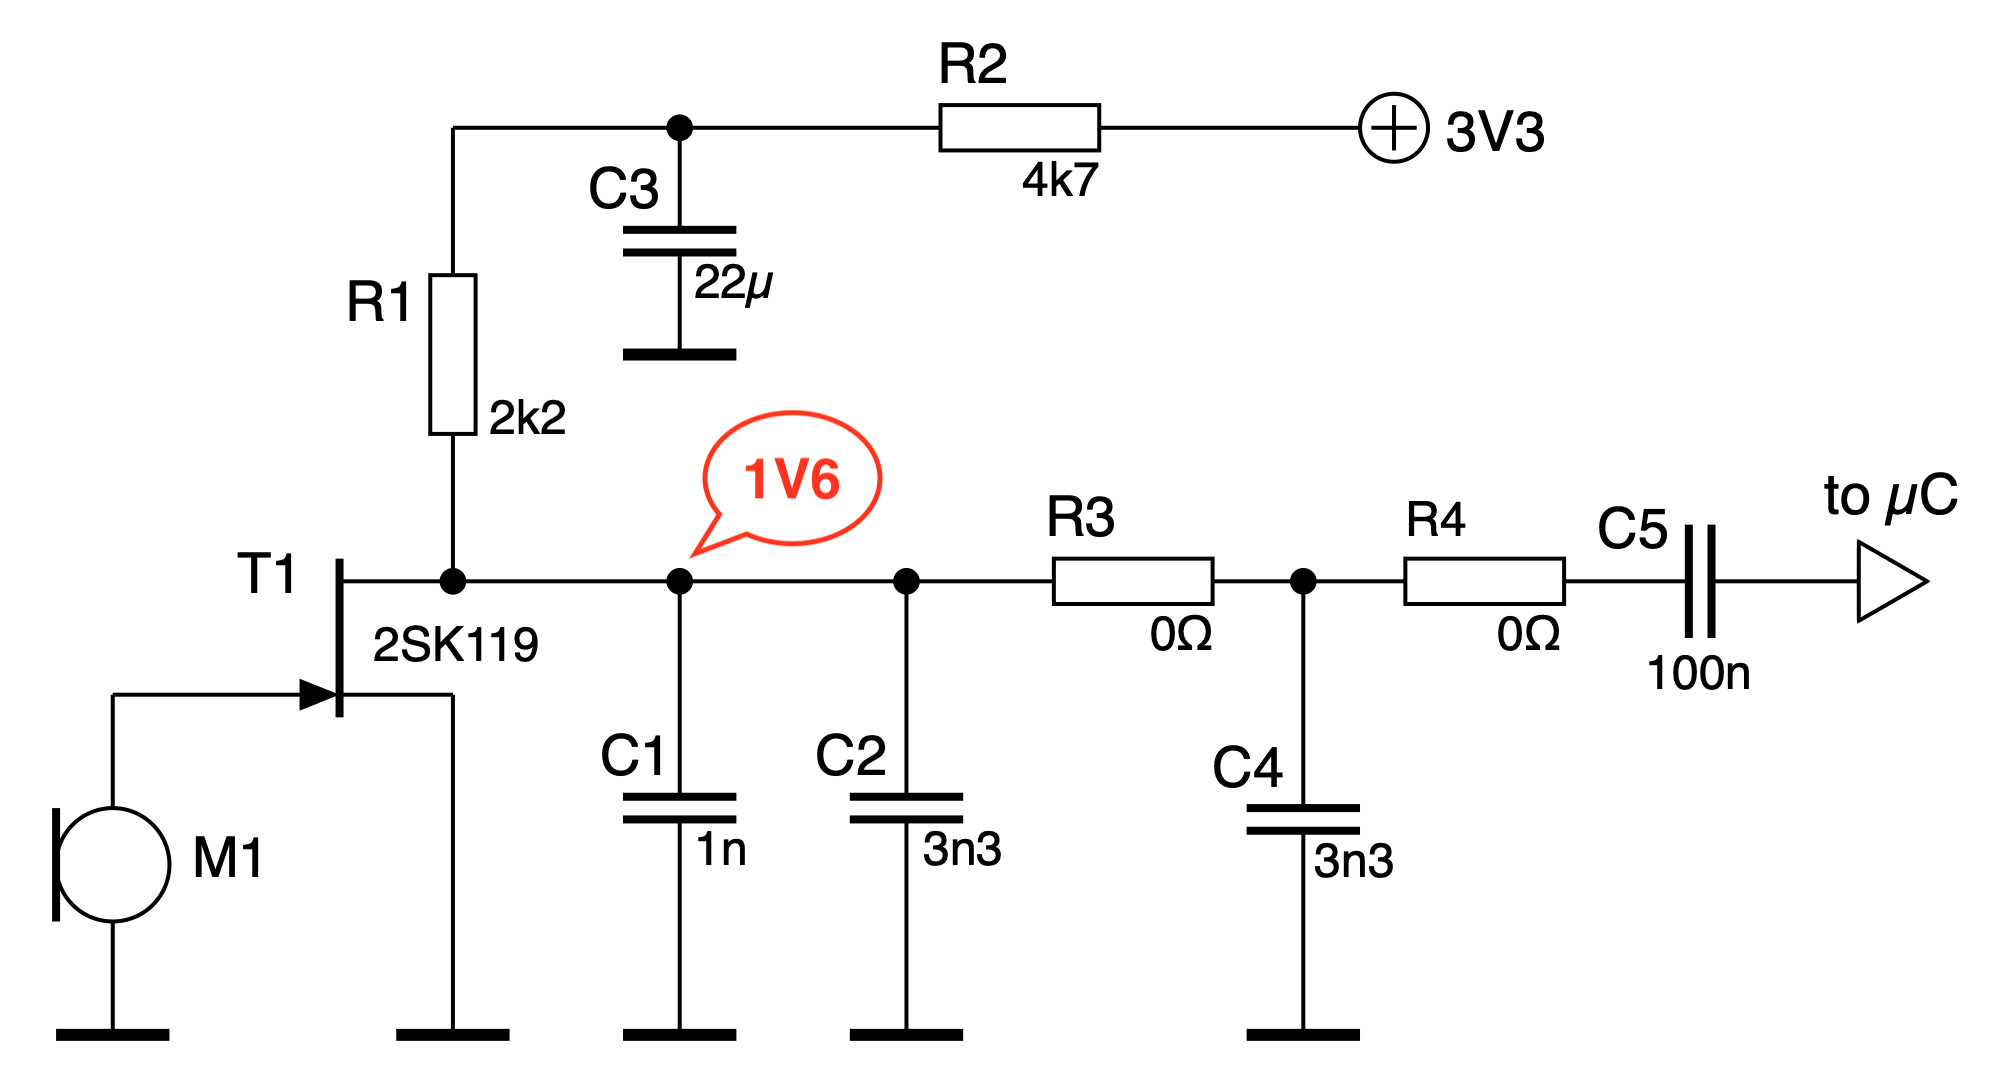
What is noticeable is that you can simply swap R1 and R2 without endangering the DC current setting and the gain doubles (≈ +6 dB). This doesn't cause any issues since the low-pass filter formed by the 2.2 kΩ resistor and 22 µF capacitor lies at a respectable 3.2 Hz. However, the low-pass formed by R1 = 4.7 kΩ and C1 + C2 + C4 then lies under 5 kHz. This can be changed by removing C2 or C4.
Results
After modification the level was now slightly higher than my webcam and the sound was unchanged. So, the modification went well.
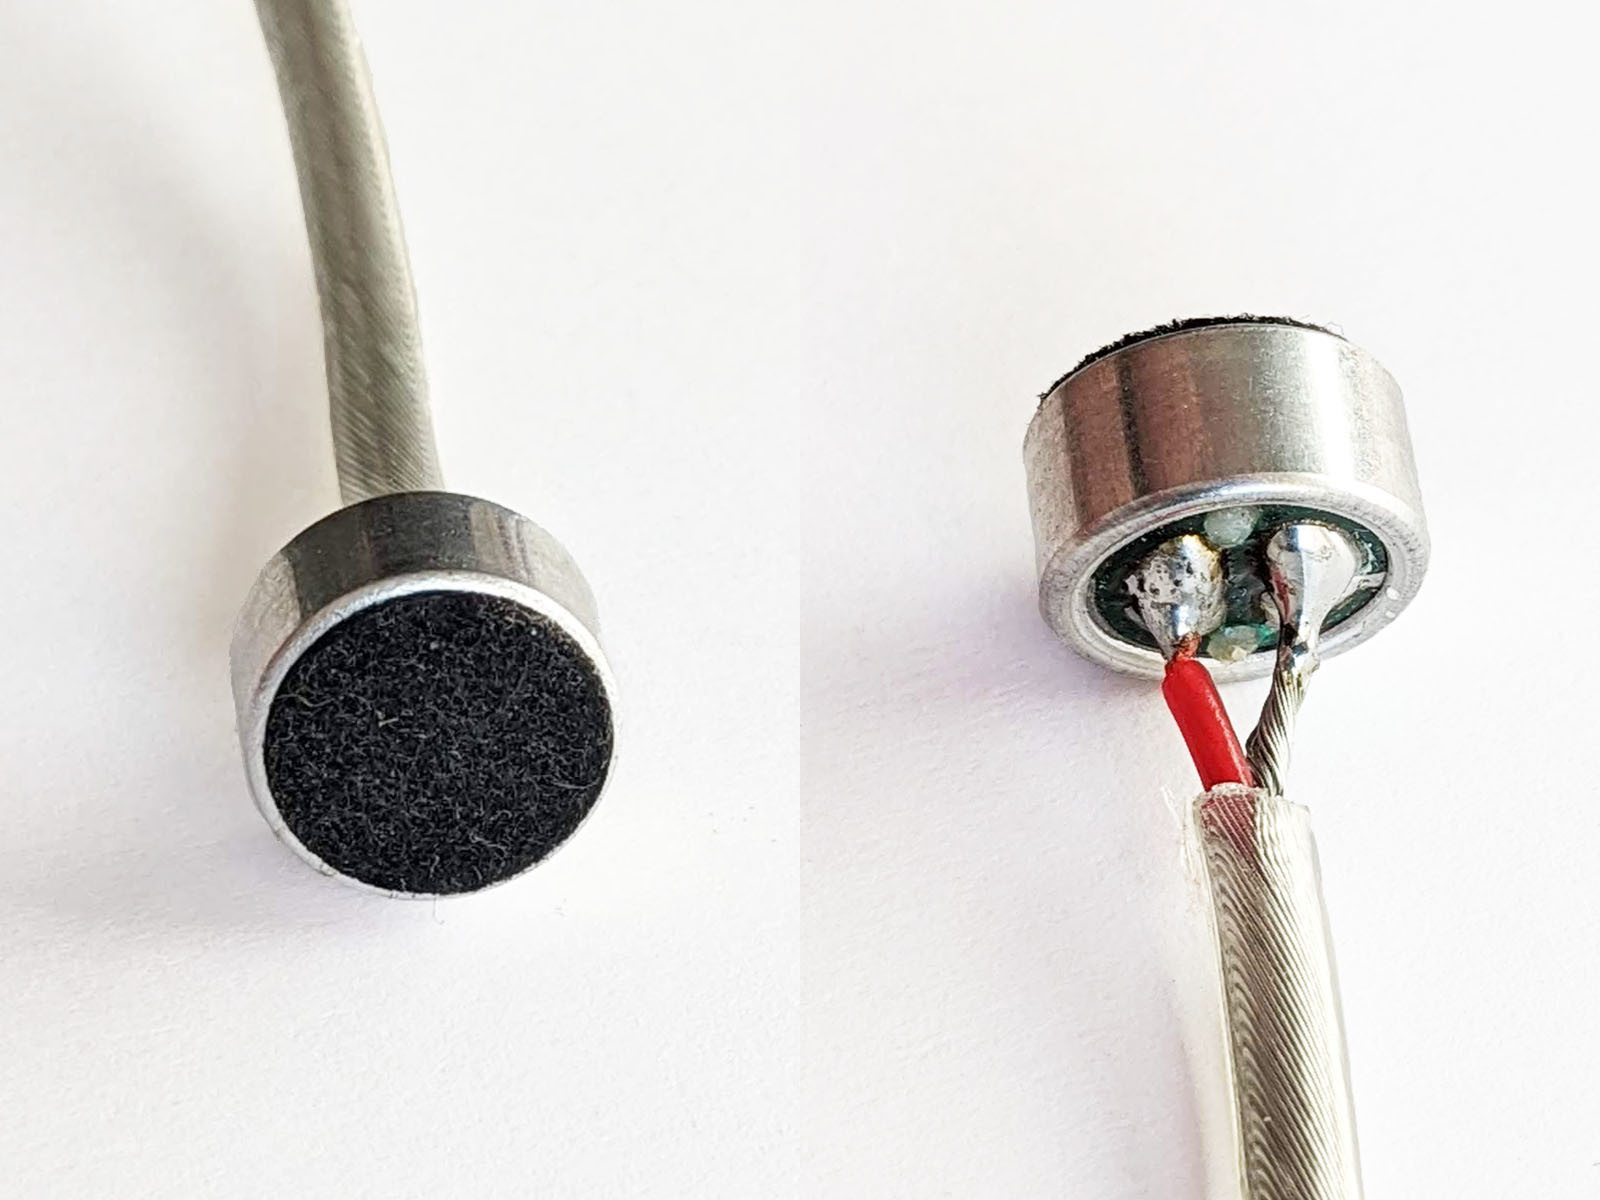
Now I was interested in how the modified CAD microphone sounded compared to other microphones. So, I made recordings of it, my webcam, my MacBook Pro, as well as of an old cheap microphone (Figure 6) and a cheap, naked electret microphone capsule (Figure 7).
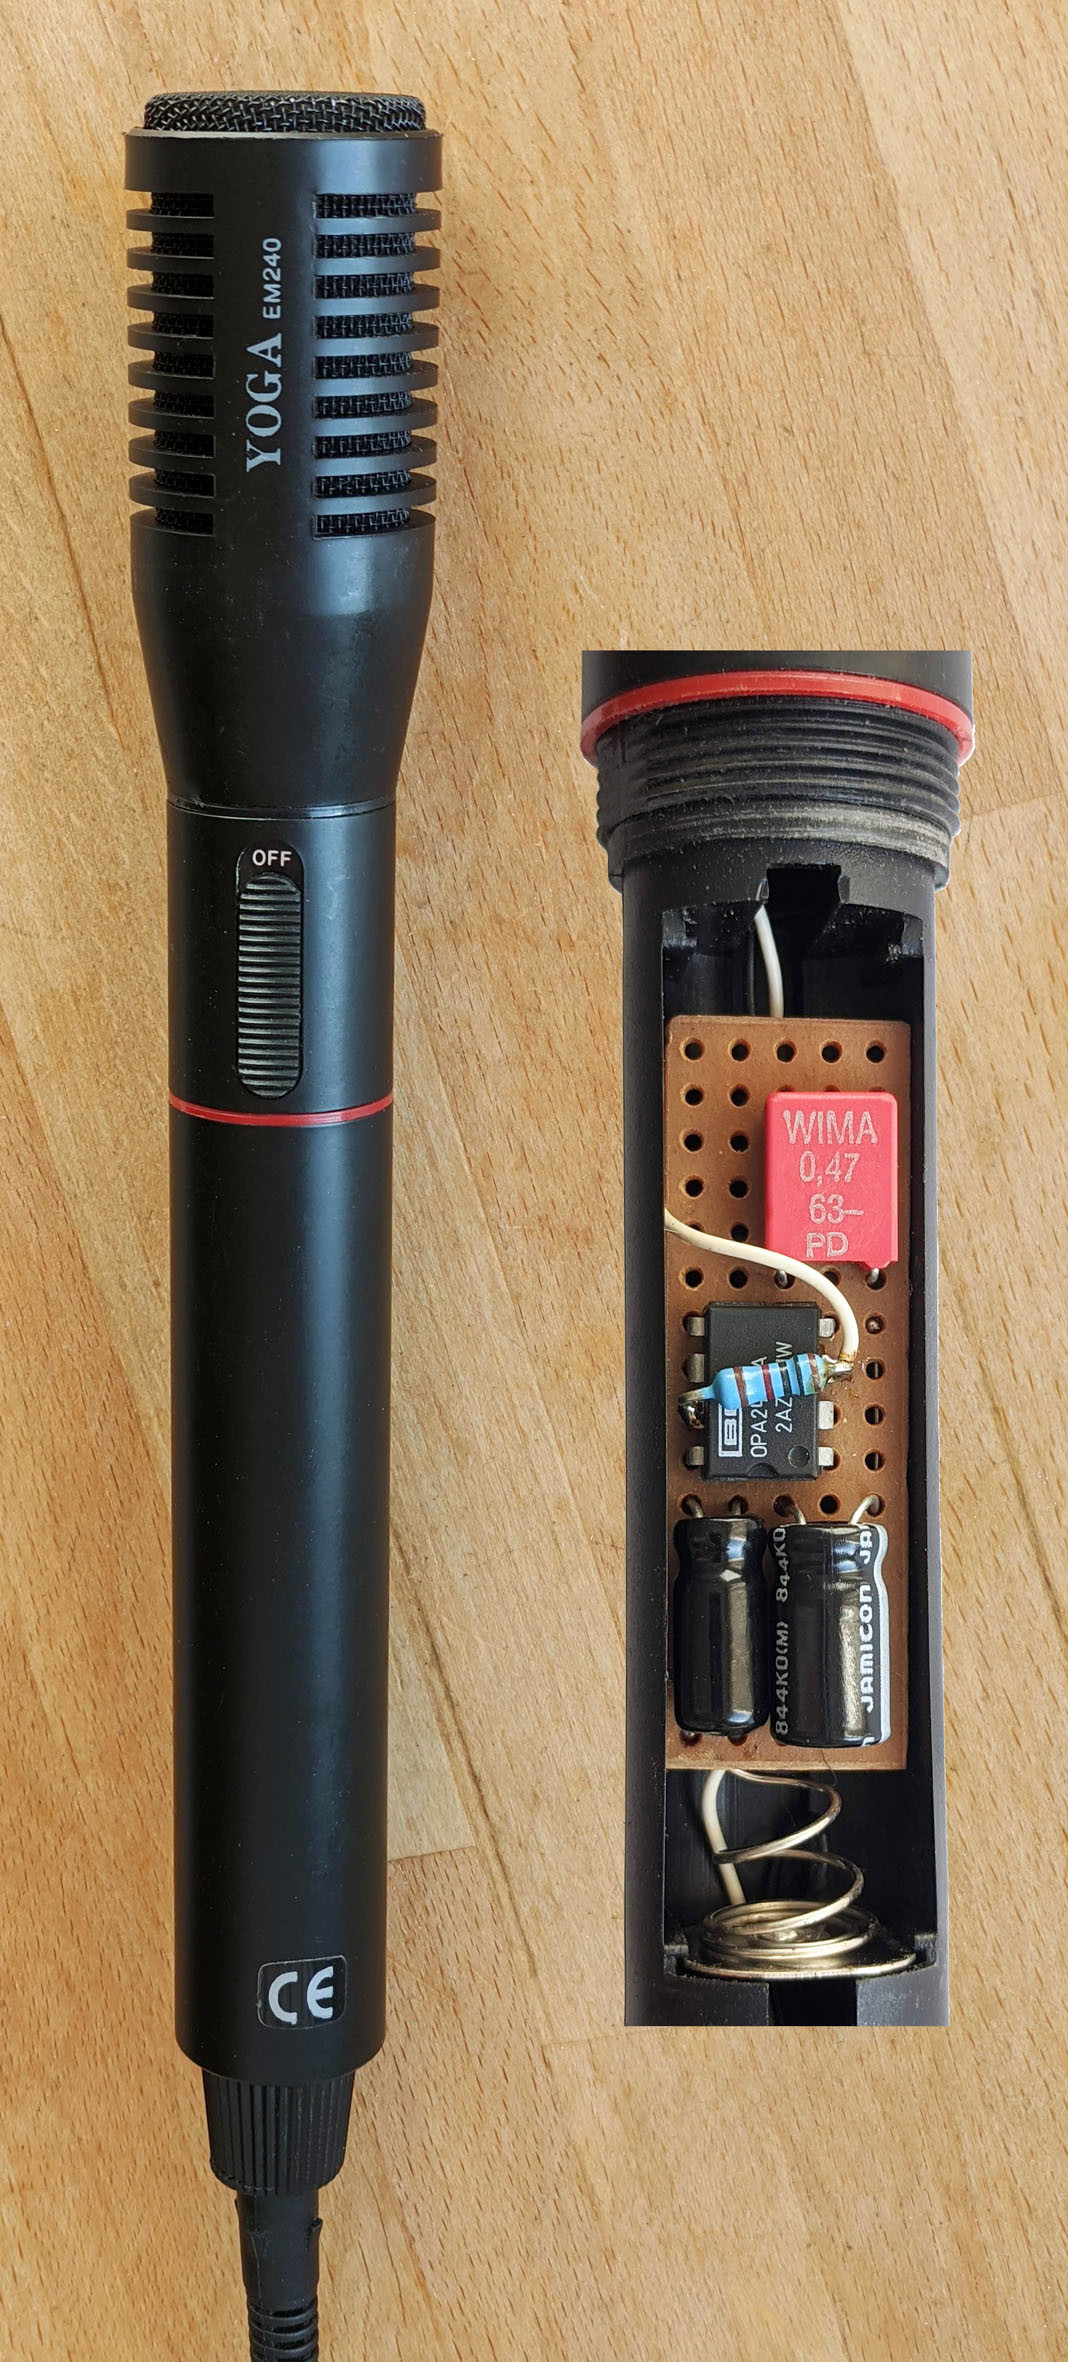
Not surprisingly, the MacBook pro (subjectively) sounded the worst. The lack of bass turned my sonorous voice into a rather tinny one. Years ago I built a low-noise preamp into a ‘Yoga’ microphone because, in its original state, it was too noisy despite its low output level.
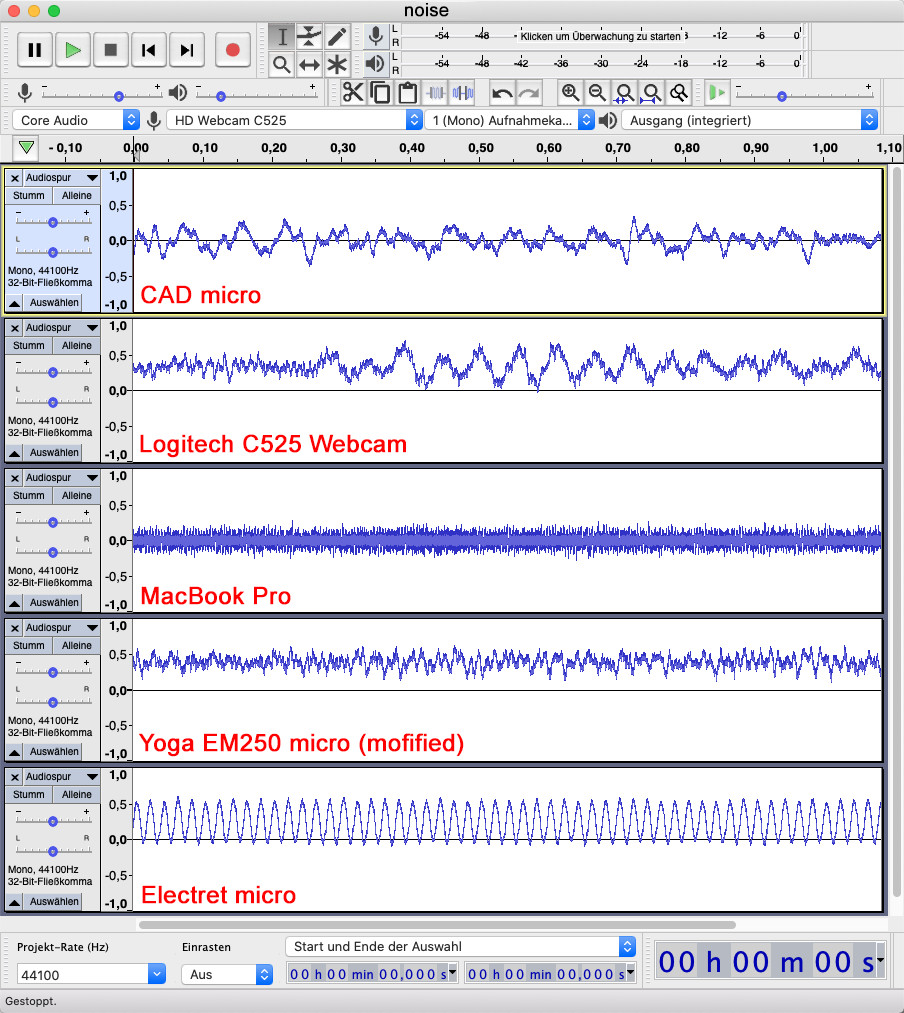
To provide you with an impression of the results, I have generated short MP3 files which can be downloaded from the Elektor website for this article. Each file contains a short sentence together with about one second of noise. These are all set to the same level so only the sound differs. Figure 8 shows the five different noise levels, each amplified by 30-40 dB. Only the microphones from CAD Audio, Logitech and Yoga show ‘real’ noise. With the Logitech you can also hear a superimposed buzzing, with the MacBook Pro high-frequency noise, and the electret capsule a mains hum.
Conclusion
Am I satisfied with the sound of the CAD Audio microphone? My answer could be from Radio Yerevan: In principle yes, but...
On the one hand, I was sold a small membrane microphone as a large one. On the other, it was cheap and actually better than the webcam's microphone, and that's something.
By the way, such a microphone is not spoken into from the front but, because of its directional characteristic, from the side as shown in Figure 9.
----------------------------------------------------------------------------------------------------------------------
Want more great Elektor content like this?
--> Take out an Elektor membership today and never miss an article, project, or tutorial.
----------------------------------------------------------------------------------------------------------------------
Discussion (4 comments)