
Elektor Soldering Station Review
April 03, 2024
on
on
The Elektor AE970D is a versatile soldering station designed for a wide range of applications in an electronics lab. Elektor has partnered with the manufacturer Atetool to offer this soldering station. Positioned as a mid-range option, it is priced at approximately €100, making it significantly more budget-friendly than soldering stations from leading brands like JBC, Metcal, Weller, Pace, and others. It features the “active tip” technology for enhanced performance. This station is known for its rapid heating capabilities, reaching the melting point of solder in under 9 seconds, and maintains exceptional temperature stability through PID control. Let’s have a closer look at the soldering station.
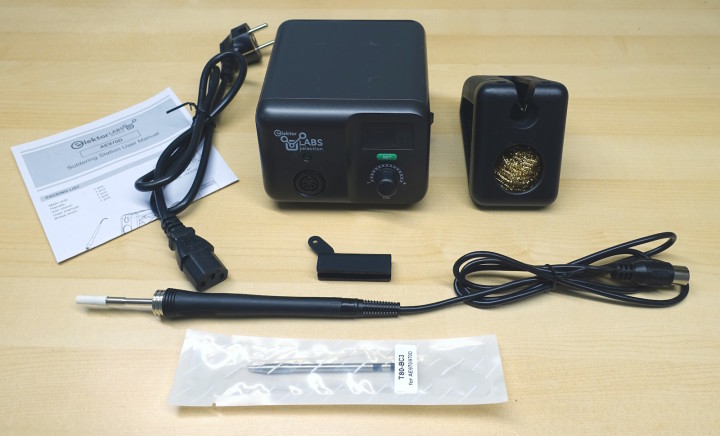
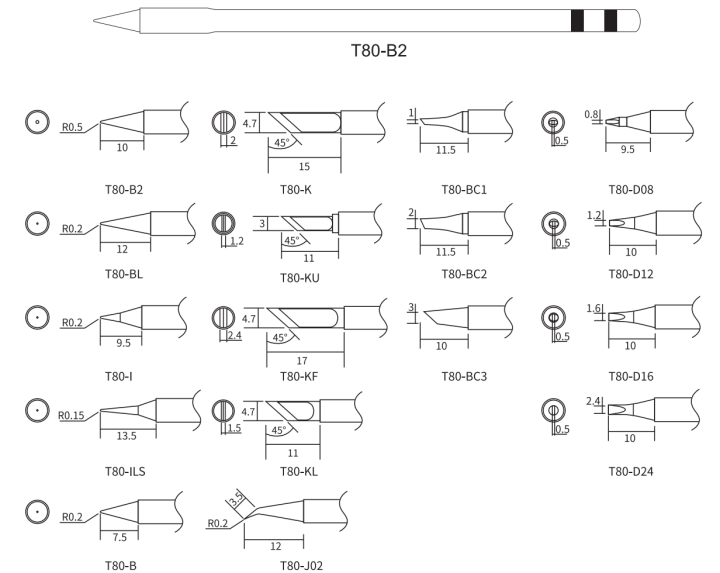
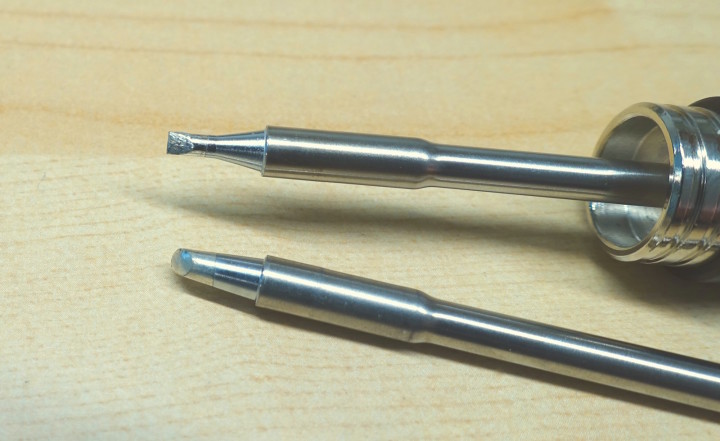
The box contains the main unit, the soldering iron (fitted with a flat 2.4 mm tip) with its companion stand, an additional T80-BC3 tip, as well as an IEC mains cable and the user manual. Furthermore, a piece of brass wool/sponge is also included, as well as a piece of silicone rubber which helps to change tips while they are hot. The tips directly in stock on the Elektor site at the time of writing are: B, C, D, K, I. According to the user manual, the complete assortment of tips is :
Note that the On/Off button is not in front of the station, but on its side. You'll need to leave a few centimeters of space on the right-hand side to allow your fingers to reach it. In any case, it is advisable to leave a little space around the device, so as not to obstruct the ventilation slots on the two side panels and the rear panel.
Mains is connected via an IEC connector on the rear panel, similar to those used on desktop computers. The detachable cable is a good thing, allowing the user to replace the supplied cable with a longer or shorter custom cable if required, and thus having the best possible flexibility in terms of installation, without needing to cut the original cable. The rear panel connector includes a 1 A fuse.

The iron itself is nicely designed and fits comfortably in the hand. It feels extremely lightweight! With a kitchen scale, I measured it at approx. 30 grams (not including the cable), which makes it by far the lightest of all my irons. The cable is made of silicone, with a diameter of 4 mm and a length of 1.1 meters; the small diameter provides excellent flexibility. The iron’s tip-to-grip distance is approximately 60 mm. This can be important to some, as it is generally accepted that the shorter this distance, the better the control of tip movements for precision soldering. By way of comparison, the tip-to-grip distance of the Hakko 888D is around 90 mm, that of the Fnirsi HS-01 is around 70 mm.
The iron stand is made of a metallic front piece and a plastic back. There is a receptacle for brass wool (or brass sponge) that you can use to clean the tip. The rear piece has six holes that may be used to store additional tips. Overall, the stand looks clean and functional, although depending on your desk surface you may find it slips a little too much; I may add “stickier” rubber feet later.
This is pretty good! If you happen to find that your unit has drifted with age, you may recalibrate it using the small trim pot accessible through the front panel, but I’m not going to attempt this for now, considering the unit is spot on.
The station also features an automatic sleep function, which can be activated or deactivated according to preference. This takes place in two stages: after ten minutes, the station switches to Standby mode and the iron's temperature is maintained at 250 °C, resuming almost instantaneously when the iron is picked up again, thanks to the sensor integrated into the handle. After a further ten minutes, the station switches to Sleep mode and the iron returns to room temperature. These functions are activated by default; to deactivate them, follow the same procedure as for changing the brightness: press and hold the Set button until the display shows “Slp”. Finally, it is also possible to lock the temperature at a given level if needed. The procedure is the same as above, with a long press on Set until “Loc” appears.
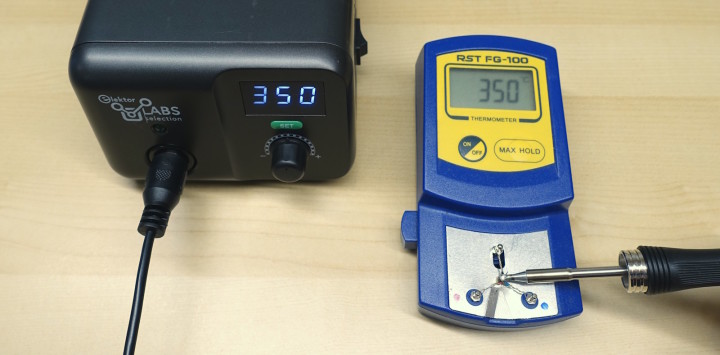
As it's not always easy to get good contact between the tip of the iron and an ordinary thermocouple, I used the thermocouples from my FG-100 soldering iron thermometer; thanks to their third wire and spring mount, they are much better suited for this purpose. I used the FG-100 as a support, disconnecting its internal electronics and connecting the MAX6675 instead. The final setup is as follows:

I compared the Elektor AE970D with my current soldering iron which is a Metcal PS-900, and with a KSGER T12 station I used previously. The irons were tested one after the other, re-syncing the curves afterwards. For this test, the AE970D and T12 were set to 350°C. The temperature of the PS-900 is defined by the tip used, in this case an STV tip (330°C). The result is as follows:
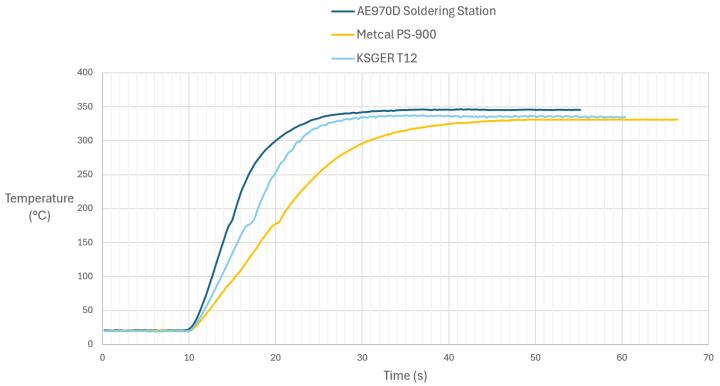
As we can see, the Elektor AE970D is very fast indeed. Interestingly, the small blip at around 183°C corresponds to the melting of the small amount of solder on the tip. The transition from solid to liquid suddenly absorbs a certain amount of heat, slightly delaying the increase in temperature. The melting point is reached in less than 9 seconds, in line with the figure announced by the documentation. Nevertheless, to proceed with soldering, the iron must have a temperature well above the melting point of solder. Here, the working temperature is reached in around 15 seconds, which is an excellent result, and the best of the three stations compared!
The whole unit is well built, and connections are insulated properly. I measured 26 V AC at the output of the transformer, and using a 50-milliohm measuring shunt in series with the heating element, I measured an RMS current of 3.1 A when the station is heating at full blast, just after power on. This complies with the 80 W stated in the documentation.
Intended Users
This soldering station is aimed at those who use a non-temperature-controlled iron and are looking for an upgrade. Also, for those who use a traditional temperature-regulated station (where the tip and heating element are separate) and are considering switching to a cartridge system but are put off by the prices charged by the major brands, the Elektor AE970D promises excellent performance at an affordable price. Finally, if you already own a higher-end iron, this station can also be used as a secondary iron, to equip a second workbench or for specific desoldering jobs. Subscribe
Tag alert: Subscribe to the tag Soldering and you will receive an e-mail as soon as a new item about it is published on our website! Active Tip
This name was first used by Weller, and other manufacturers often use the name “cartridge system". The heating element, temperature sensor and iron tip are combined in a single element, called the active tip or cartridge. This ensures optimum heat transfer and temperature measurement accuracy, compared with the traditional system where the iron tip is a separate part that can be replaced independently of the heating element.Unboxing the Elektor AE970D Soldering Station
The box contains the main unit, the soldering iron (fitted with a flat 2.4 mm tip) with its companion stand, an additional T80-BC3 tip, as well as an IEC mains cable and the user manual. Furthermore, a piece of brass wool/sponge is also included, as well as a piece of silicone rubber which helps to change tips while they are hot. The tips directly in stock on the Elektor site at the time of writing are: B, C, D, K, I. According to the user manual, the complete assortment of tips is :
First Thoughts
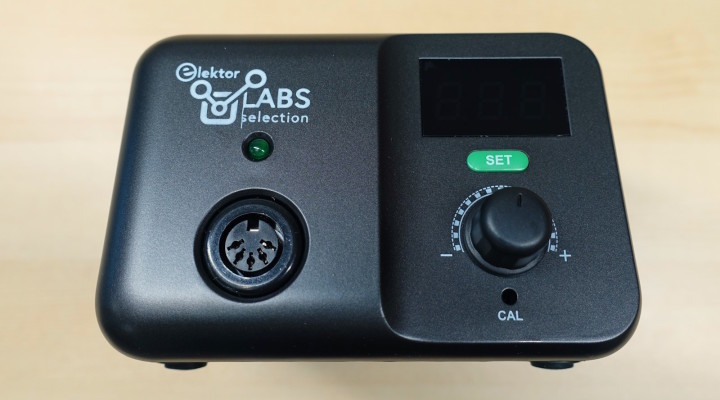
The base station has a dark satin-finish plastic casing which looks nice. It's heavy, which gives it good stability on the workbench. The front panel is streamlined, which is much to be appreciated. The main features are the cable outlet for the iron in a DIN 5-pin connector, a 7-segment display, a temperature adjustment knob and a Set button. I like sleek front panels like this one; when it comes to user interface, simpler is often better. A tiny hole gives access to an additional smaller potentiometer for temperature calibration.Note that the On/Off button is not in front of the station, but on its side. You'll need to leave a few centimeters of space on the right-hand side to allow your fingers to reach it. In any case, it is advisable to leave a little space around the device, so as not to obstruct the ventilation slots on the two side panels and the rear panel.
Mains is connected via an IEC connector on the rear panel, similar to those used on desktop computers. The detachable cable is a good thing, allowing the user to replace the supplied cable with a longer or shorter custom cable if required, and thus having the best possible flexibility in terms of installation, without needing to cut the original cable. The rear panel connector includes a 1 A fuse.
The iron itself is nicely designed and fits comfortably in the hand. It feels extremely lightweight! With a kitchen scale, I measured it at approx. 30 grams (not including the cable), which makes it by far the lightest of all my irons. The cable is made of silicone, with a diameter of 4 mm and a length of 1.1 meters; the small diameter provides excellent flexibility. The iron’s tip-to-grip distance is approximately 60 mm. This can be important to some, as it is generally accepted that the shorter this distance, the better the control of tip movements for precision soldering. By way of comparison, the tip-to-grip distance of the Hakko 888D is around 90 mm, that of the Fnirsi HS-01 is around 70 mm.
The iron stand is made of a metallic front piece and a plastic back. There is a receptacle for brass wool (or brass sponge) that you can use to clean the tip. The rear piece has six holes that may be used to store additional tips. Overall, the stand looks clean and functional, although depending on your desk surface you may find it slips a little too much; I may add “stickier” rubber feet later.
Subscribe
Tag alert: Subscribe to the tag Prototyping & Production and you will receive an e-mail as soon as a new item about it is published on our website! Soldering Station: Initial Testing
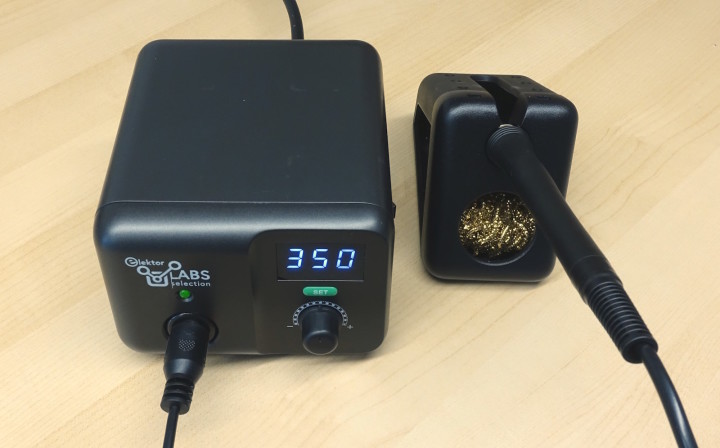
On power-up, the display shows “888” to test the segments, then “C” or “F”, which indicates the temperature unit currently in use, then “SLP” if the standby function is activated, and finally the temperature. First, the set temperature is displayed briefly, then the display switches to the actual temperature, which can be seen rising very quickly. For this first test, I set the station to 350 °C. The green LED flashes in sync with the heating of the iron. Let’s check the accuracy of the factory calibration:This is pretty good! If you happen to find that your unit has drifted with age, you may recalibrate it using the small trim pot accessible through the front panel, but I’m not going to attempt this for now, considering the unit is spot on.
Changing Temperature Units, and Other Features
Note that to switch between degrees C and degrees F (in either direction), simply switch the device off, press the Set button, hold it and switch it on again, keeping the button pressed until the display shows 888. Additionally, the brightness level of the display can be changed according to six preset levels. To do this, press the Set button until the display shows “Led”, then release the button. The level from 1 to 6 is then displayed, and can be changed by turning the main knob. A brief press (or a 10-second wait) validates the setting.The station also features an automatic sleep function, which can be activated or deactivated according to preference. This takes place in two stages: after ten minutes, the station switches to Standby mode and the iron's temperature is maintained at 250 °C, resuming almost instantaneously when the iron is picked up again, thanks to the sensor integrated into the handle. After a further ten minutes, the station switches to Sleep mode and the iron returns to room temperature. These functions are activated by default; to deactivate them, follow the same procedure as for changing the brightness: press and hold the Set button until the display shows “Slp”. Finally, it is also possible to lock the temperature at a given level if needed. The procedure is the same as above, with a long press on Set until “Loc” appears.
AE970D is Heating Fast
One of the strong points of this product is its heating speed. To verify this, I needed a device with a thermocouple and a PC interface, with a relatively fast sampling rate. As mentioned in the previous Lab Notes, I used a MAX6675 module and an Arduino Pro Mini to send the temperature every 250 ms to the serial port. I then used RealTerm in capture mode, and Excel to plot the data.As it's not always easy to get good contact between the tip of the iron and an ordinary thermocouple, I used the thermocouples from my FG-100 soldering iron thermometer; thanks to their third wire and spring mount, they are much better suited for this purpose. I used the FG-100 as a support, disconnecting its internal electronics and connecting the MAX6675 instead. The final setup is as follows:
I compared the Elektor AE970D with my current soldering iron which is a Metcal PS-900, and with a KSGER T12 station I used previously. The irons were tested one after the other, re-syncing the curves afterwards. For this test, the AE970D and T12 were set to 350°C. The temperature of the PS-900 is defined by the tip used, in this case an STV tip (330°C). The result is as follows:
As we can see, the Elektor AE970D is very fast indeed. Interestingly, the small blip at around 183°C corresponds to the melting of the small amount of solder on the tip. The transition from solid to liquid suddenly absorbs a certain amount of heat, slightly delaying the increase in temperature. The melting point is reached in less than 9 seconds, in line with the figure announced by the documentation. Nevertheless, to proceed with soldering, the iron must have a temperature well above the melting point of solder. Here, the working temperature is reached in around 15 seconds, which is an excellent result, and the best of the three stations compared!
Build Quality and Output Current
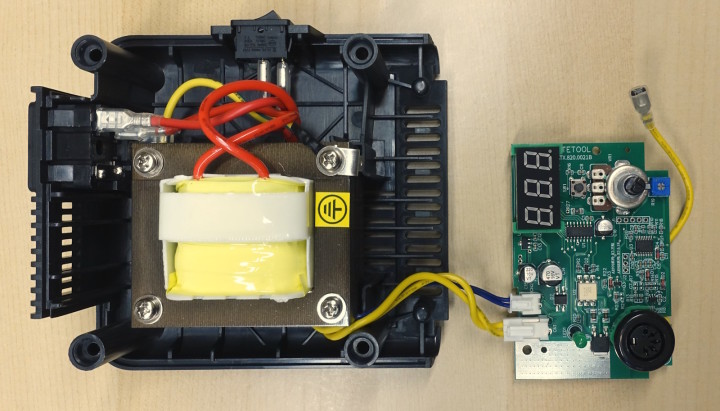
The case is held by six screws, four of which are under the adhesive feet. These are self-tapping plastic screws, so care must be taken to avoid damaging the threads in the plastic during reassembly. Inside, you'll find a transformer marked 24 V, 5 A which looks reasonably sized for this power rating. Note that there is no possibility of rewiring the primary: as a consequence, this station is compatible with 230 V only. Iron temperature control is accomplished by a small front panel board. The PCB features a HC32F005C6PA microcontroller, an AiP650 LED driver and a JST137K triac, itself driven by a 3021 series opto-triac. The onboard 32 MHz ARM Cortex-M0+, at first glance, seems to be powerful enough for this kind of application, and must have been helpful during the design process to implement the fast PID loop.The whole unit is well built, and connections are insulated properly. I measured 26 V AC at the output of the transformer, and using a 50-milliohm measuring shunt in series with the heating element, I measured an RMS current of 3.1 A when the station is heating at full blast, just after power on. This complies with the 80 W stated in the documentation.
More Testing
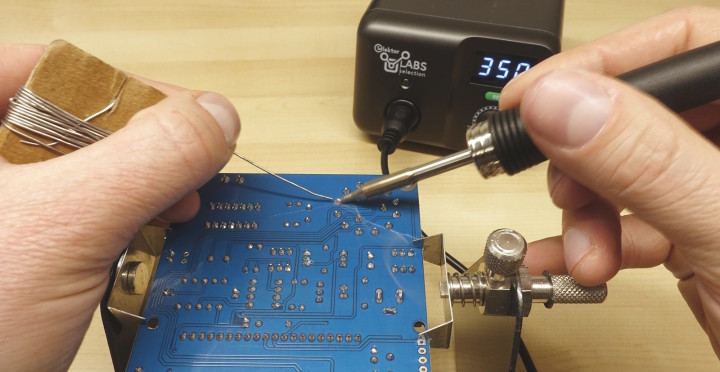
I used this iron as my main soldering iron for a few days. For most soldering operations, it proved quite suitable. As the iron is very light, it is comfortable to use. The angle at which the iron is inserted in its stand is slightly different from my other irons, so it takes a little time to get used to it, as is the case with any new tool. The Standby/Sleep timer comes in very handy when in use, to make the tips last longer.Advantages of the Elektor AE970D
I appreciated the iron's light weight and maneuverability, as well as its rapid heating. Its power output is excellent for all the usual electronics work. I also liked the fact that this model offers the benefits of active tip technology, also known as the cartridge system, at an affordable price. The AE970D offers a simple, practical user interface, and should be able to last for a long time to come, thanks to its simple, robust transformer-based electronics. In conclusion, this soldering station was a pleasant discovery for me. Subscribe
Tag alert: Subscribe to the tag Review and you will receive an e-mail as soon as a new item about it is published on our website! Read full article
Hide full article


Discussion (1 comment)