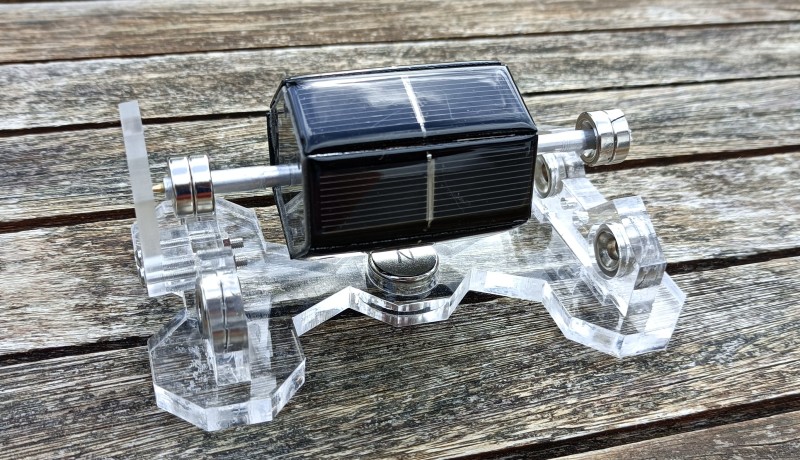
The Mendocino motor is a solar-powered, magnetically levitating electric motor. It is a cool gadget to amaze your friends and family with. The kit contains all the parts you need: a laser-cut acrylic frame, magnets, a shaft, nuts and bolts and a barrel clad with solar cells.
The Mendocino motor is a solar-powered, magnetically levitating electric motor. It is a cool gadget to amaze your friends and family with. The kit contains all the parts you need: a laser-cut acrylic frame, magnets, a shaft, nuts and bolts and a barrel clad with solar cells.
As it is always good to understand what you are working on, let's start with some theory.
What Is a Mendocino Motor?
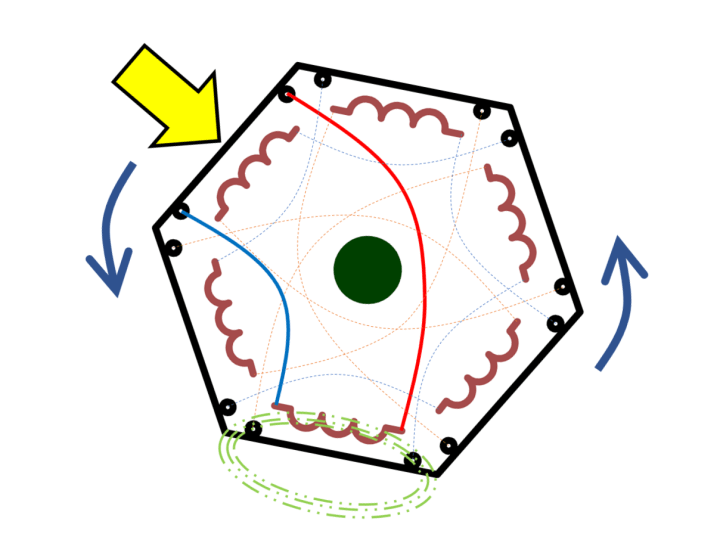
A Mendocino motor is, like a normal electric motor, a rotor spinning in a magnetic field created by the stator. In the case of this kit, the stator consists of a large magnet placed under the rotor.
The rotor of our motor is a shaft with six coils on it, spaced 60° apart. Each coil is powered by a solar cell placed at 60° from the coil. The six solar cells together form a hexagonal barrel around the coils, with the rotor shaft through the center. The number of coils and solar panels doesn’t have to be six, but it is for this kit.
The Mendocino Motor is Solar Powered
Basically, when light falls on a solar cell, a current starts to flow through the coil connected to it, and a magnetic field develops around the coil. Depending on the orientation of the field, this will either pull the coil towards the stator magnet, or, on the other hand, push it away. In both cases, the rotor starts to spin. The other coils follow the same principle, as they are all wired in the same way. They sustain the rotation and may even accelerate it. The motor continues spinning. Every coil is controlled by a solar cell placed at an angle of 60 degrees.
Magnetic Bearings
Because the rotor doesn’t have a lot of force, it needs super-light-running bearings to spin. The Mendocino motor solves this by making the rotor float on a magnetic field instead of using mechanical bearings. This way, the rotor can spin almost completely without friction.
Therefore, the Mendocino motor combines two systems: a magnetic bearing and an electric motor. This is good to know because it allows us to separate the two and make assembling the kit even easier.
Subscribe
Tag alert: Subscribe to the tag solar and you will receive an e-mail as soon as a new item about it is published on our website!
Assembling the Mendocino Motor Kit
You will also need some transparent adhesive tape and liquid superglue. These two items are not included.
Start the assembly by placing the biggest magnet at a safe distance, so it won’t interfere with the other magnets. Be careful with the ring magnets. They are a bit fragile and may break if they fly out of your hand and hit the large magnet or another magnetic object.
Remove the protective film from all the acrylic parts, including the film on the sides of the solar cell barrel. Now you can see the coils inside. Don’t forget to remove the protective film from the solar cells.
Bearing Magnet Orientation
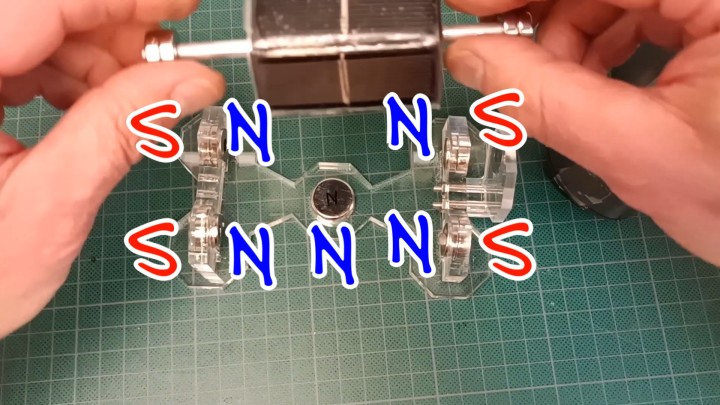
The magnetic bearings consist each of six magnets, grouped as three double magnets. For each bearing, the magnets must all be oriented in the same way. This is easy to see as the magnets are chamfered on one side. Two double magnets go into the bearing support, the third is to be mounted on the shaft. All the magnets should repel each other.
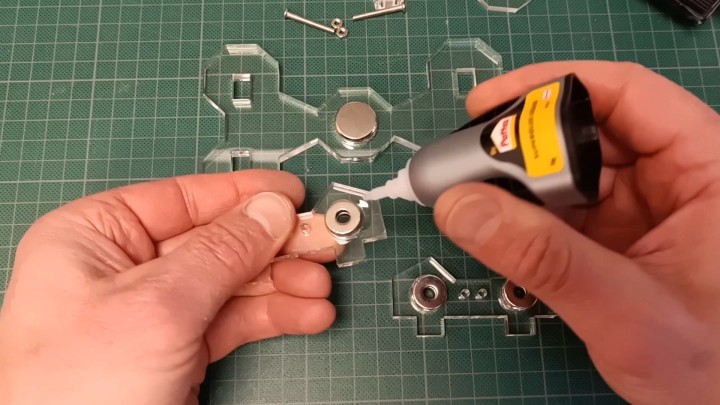
The magnets must be firmly fixed in the holes of the bearing supports so the stator or rotor magnets can’t push or pull them out. You can do this with liquid superglue*. Make sure not to glue everything to your bench.
Mount the end stop on one of the bearing assemblies. Stick the bearing assemblies in the baseplate. The end stop should be on the outside.
Assemble the Rotor
Carefully stick the shaft through the rotor barrel without breaking any of the wires inside. The barrel needs to be somewhere in the middle of the shaft, but we will adjust its position later.
The holes of the magnets that go on the shaft are a bit too large. Use some transparent adhesive tape to thicken up the shaft ends. The magnets should be allowed to slide, but not easily. They must be oriented in the same way as the magnets in the bearing assembly below them. The two bearing assemblies should repel each other.
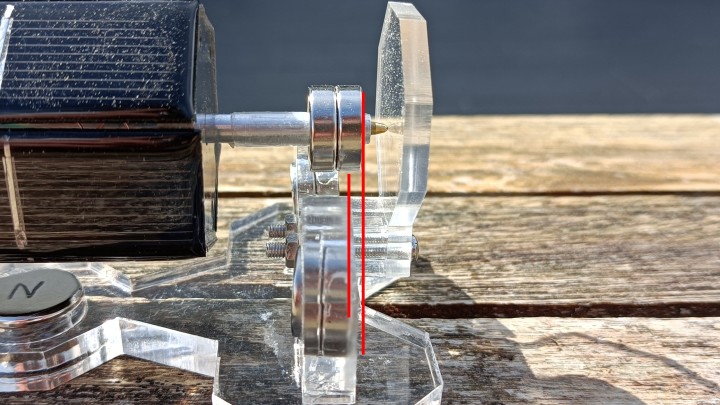
The rotor magnets must be slightly misaligned with respect to the bearing magnets.
Try Levitation
You can now test the levitating part of the motor. Put the rotor magnets on the shaft in such a way that the assembly is pushed against the end stop. This means that the magnets must be slightly misaligned with the magnets below them. The magnet at the end-stop side must be a bit closer to the end stop than the magnets below it. The same is true for the magnet on the other end of the shaft.
Carefully place the rotor assembly on the bearings. Let the magnetic field guide you. Adjust the rotor magnets if needed. When it is levitating, you can adjust the horizontal level by sliding the barrel left or right. Ideally, it should be dead center above the stator magnet, but the position of the rotor magnets makes this difficult to achieve.
Add the Stator Magnet
The next step is placing the stator magnet. The side facing upwards should repel both bearing assemblies, so try that. I found it practical to mark one face of the magnet. Remove the rotor and put it aside. Slide the large magnet in its hole with the right side up. Then carefully replace the rotor on its magnetic bearing. This is now a little bit more difficult as the stator magnet interacts with the rotor magnets. The bearing magnets must be fixed firmly, so the other magnets cannot push them away.
Make Your Mendocino Motor Spin
When everything is in place, the motor is ready to spin. This works best in bright sunlight, but with a strong lamp it should be possible too. Chances are that you must kick-start the motor by carefully giving it a spin manually. If all is well, the motor continues spinning.
The rotor will probably wobble a bit depending on how well you managed to balance it. If it wobbles a lot, it may jump out of the bearings after a while, so be careful.
When you are satisfied with the way the rotor levitates and spins, you can glue the rotor magnets and the barrel to the shaft, so they will stay in place. Also, glue the bearing assemblies to the baseplate.
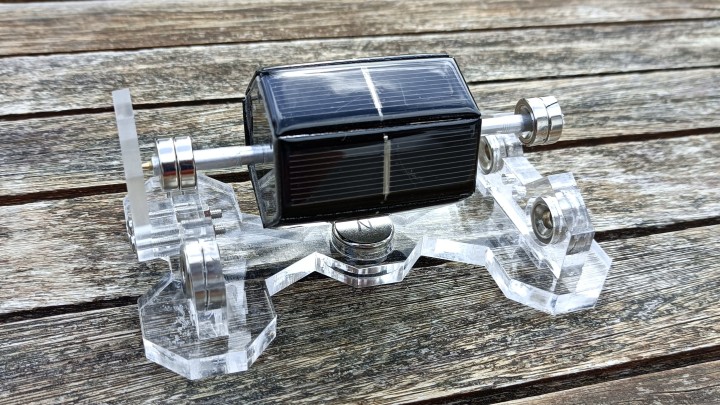
Well Done!
Enjoy your Mendocino motor. Ready to spin, well done!
* Many glues can be dissolved with acetone. The acrylic parts of the kit appear to be insensitive to acetone, so you can correct gluing mistakes up to some level.
Elektor Magazine has been one of the leading sources of information on electronics for engineers, designers, start-ups and companies for 65 years. Our magazine is powered by an active community of electronics engineers – from students to professionals – who are passionate about designing and sharing innovative ideas.
For them, we publish hundreds of items a year, in formats such as articles, videos, webinars, and other learning formats. Our mission is to share knowledge in every possible way and inspire readers with the latest developments within the electrical engineering sector.
Thank you for your vote!
Leave further comments in the fields below.
Thank you for your vote!
If you wish to leave a comment with your rating, please first use the login below. If not, just close this window.

Discussion (0 comments)