The Lilygo T-PicoC3 Combines RP2040 and ESP32-C3 with Full Color TFT Display (Review)
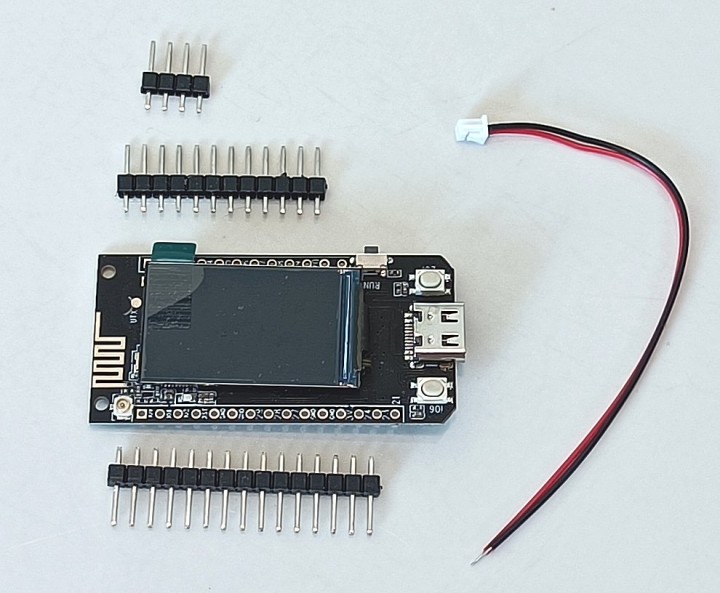
The Lilygo T-PicoC3 module is a compact development board combining a Raspberry Pi RP2040 with an ESP32-C3 microcontroller. It features Wi-Fi and Bluetooth, a 1.14-inch 135 by 240 pixels full-color IPS TFT display, USB-C, two push buttons and a battery connector with Li-ion charger. A little cable to connect a battery to the tiny battery connector is included. Also included are pin headers for the extension ports.
The Lilygo T-PicoC3 module is a compact development board combining a Raspberry Pi RP2040 with an ESP32-C3 microcontroller. It features Wi-Fi and Bluetooth, a 1.14-inch 135 by 240 pixels full-color IPS TFT display, USB-C, two push buttons and a battery connector with Li-ion charger. The kit includes a little cable to connect a battery to the tiny battery connector together with pin headers for the extension ports.
The Lilygo T-PicoC3 is Raspberry Pi Pico Compatible
Even though the module sports two powerful MCUs, you should think of it as an RP2040 board with Wi-Fi and Bluetooth extension that happens to be an ESP32-C3. The RP2040 drives the SPI display, as are the two push buttons and most of the pins of the extension connectors. The RP2040 talks to the ESP32-C3 over a serial port; the ESP32-C3 functions as a kind of AT modem.
Except for the display, the bottom side of the board contains the RP2040 microcontroller and its memory. The ESP32-C3 and its supporting components are on the top side, hidden by the display. This makes the board look a bit like two MCU boards rolled into one. The USB-C connector that does some magic further accentuates this.
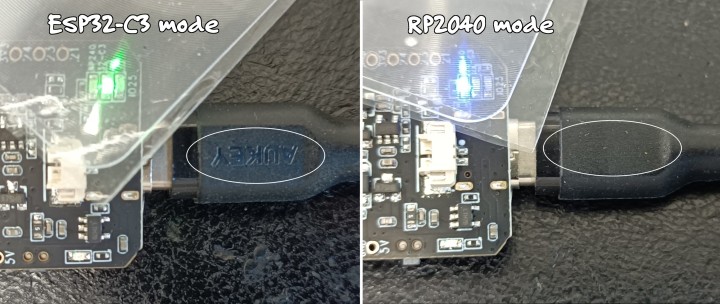
Neat USB-C Trick
The operating mode of the T-PicoC3 board depends on how you plug in the USB-C cable...
The USB-C cable plugged in one way, the board is identified (by Windows 10) as a USB/JTAG/serial debug unit and as a USB Serial Device (COM12 in my case). A green LED lights up on the bottom side. This is ESP32-C3 mode.
Plugging in the USB-C cable rotated 180 degrees, the LED at the bottom turns blue. Windows 10 detects a USB Serial Device (COM13 in my case). This is RP2040 mode. This is quite surprising as USB-C is supposed to be symmetrical.
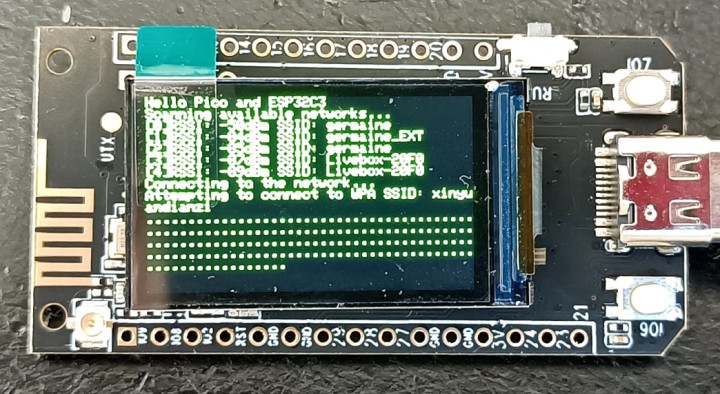
In both cases, the display shows the splash screen and then starts looking for a Wi-Fi connection. Out of the box, the Lilygo T-PicoC3 tries to connect to a Wi-Fi network that most probably is not available near you.
Software Development for the Lilygo T-PicoC3
Writing applications for the board can be done in a variety of ways. For the RP2040, the one I am most familiar with is using the Arduino IDE with Earl Philhower’s RP2040 Boards Package. If you don’t have it yet, instructions on how to install it are given on the T-PicoC3 module GitHub page. (And even if you already have it, you must visit that page anyway to download the TFT display libraries.) The board to use in the IDE is simply the Raspberry Pi Pico.
If you prefer, you can use PlatformIO too.
MicroPython
As the T-PicoC3 is compatible with the Raspberry Pi Pico, you can also program it in MicroPython, and they suggest using Thonny for that. Refer to the official Raspberry Pi Pico documentation for more information.
The ESP32-C3 can be used as an independent MCU. Writing applications for it is similar to the Arduino way for the RP2040. Now you must first install the official espressif ESP32 Boards Package. As board you must select the ESP32C3 Dev Module. The way to upload an executable to the ESP32-C3 depends on how the USB-C cable is plugged in. Again, all the details are available on the T-PicoC3 module GitHub page.
Conclusion
Overall, the Lilygo T-PicoC3 module is a nice compact RP2040 development board with full-color TFT display, wireless capabilities that can run from a battery. It is great for IoT and smart home applications, while its two MCUs make it a versatile and powerful tool for a wide range of other projects. Additionally, its ease of use and comprehensive documentation make it a great choice for both novice and experienced users alike. The contents of the Lilygo T-PicoC3 Kit.
Elektor Magazine has been one of the leading sources of information on electronics for engineers, designers, start-ups and companies for 65 years. Our magazine is powered by an active community of electronics engineers – from students to professionals – who are passionate about designing and sharing innovative ideas.
For them, we publish hundreds of items a year, in formats such as articles, videos, webinars, and other learning formats. Our mission is to share knowledge in every possible way and inspire readers with the latest developments within the electrical engineering sector.
Thank you for your vote!
Leave further comments in the fields below.
Thank you for your vote!
If you wish to leave a comment with your rating, please first use the login below. If not, just close this window.


Discussion (0 comments)