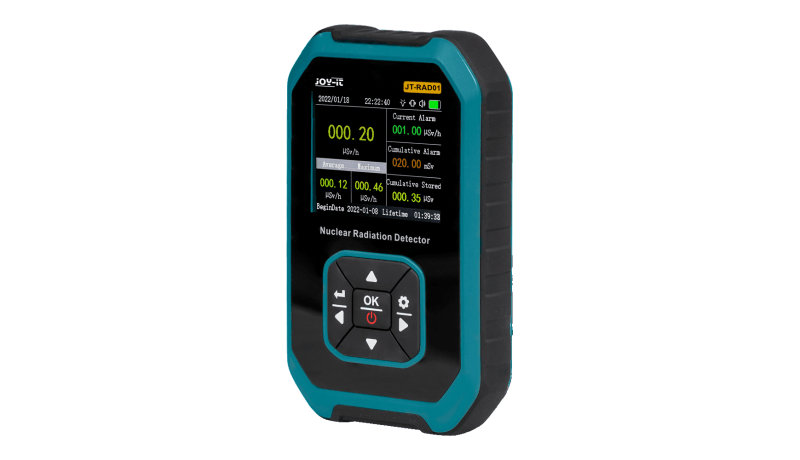
Seeing how our world is currently evolving, I thought it might be a good idea to get a nuclear radiation detector. I used to have a MightyOhm Geiger Counter, but it no longer works after I accidentally dropped it. The Joy-It Nuclear Radiation Detector JT-RAD01 looks way more robust in its strong plastic case with protective rubber band.
Seeing how our world is currently evolving, I thought it might be a good idea to get me a nuclear radiation detector. I used to have a MightyOhm Geiger Counter, but it no longer works after I accidentally dropped it on the floor, destroying its Geiger tube. The Joy-It Nuclear Radiation Detector JT-RAD01 looks way more robust in its strong plastic case with protective rubber band.
In the Box
It comes in a small box together with a USB-C charging cable and a printed manual in English and German. It is powered by a built-in Li-ion battery which came fully charged in my case, so the detector immediately switched on when I pressed the power button. The way it does this is a bit surprising, as it vibrates too.
A Crowded Display
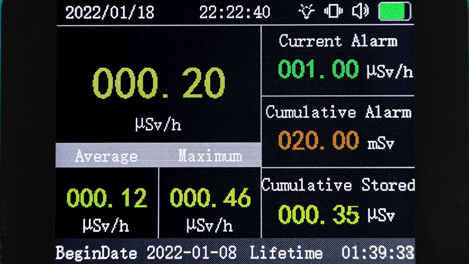
When switched on, the device shows six different radiation values at the same time, which is a bit confusing. The main value, printed largest, is the actual value. But the display also shows average and maximum values, two alarm values and a Cumulative Stored value. I don’t really understand why all this has to be visible all the time on the main screen.
A lot of information on the disply.
Pressing the left or right arrow button will bring up a second screen showing a history graph of the last 200 seconds. I didn’t find a way to adjust this period. Pressing the left or right arrow button again takes you back to the first screen.
Nuclear Radiation Detector Units
By default, the displayed radiation values are in µSv, but you can change this in de settings menu. Press the right arrow for a few seconds to open it. Here you can choose between microsievert (µSv), microgray (µGy), microröntgen (mR), counts per second (cps) and counts per minute (cpm). Press the left arrow for a few seconds to go back to normal mode.
Besides the radiation values, the display also has a status bar at the top showing the date and time, if the backlight, vibrator & beeper are active or not, and the battery level. A status bar at the bottom shows how long the device has been running. I didn’t find a way to reset these values.
The display text can be in German or English, you select this also in the settings menu. While you’re there, you can set the date and time too.
Setting Alarms
The radiation alarm levels are also set in the parameter menu. Note that there are two entries here, one for the limits, which are the actual alarm levels, and one for the type of alarm: LED, vibration and sound. The status bar reminds you of the alarm type you selected.
Sensitivity
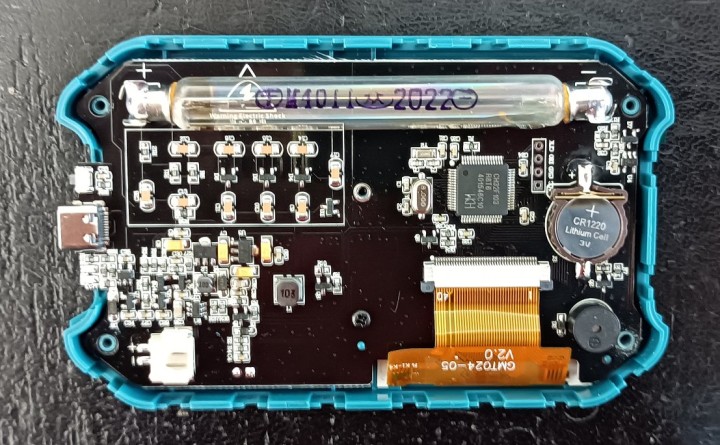
Some words on the sensitivity of the Nuclear Radiation Detector. The instrument is capable of detecting gamma, beta and X-rays. For Caesium-137 (CS-137), it detects particles in the energy range from 48 keV up to 1.5 MeV. Its Cobalt-60 (Co-60) sensitivity is 80 cpm. The sensor is a glass Geiger tube, so don’t throw the detector around.
Looking inside the joy-It JT-RAD01 Nuclear Radiation Detector reveals a tiny
pushbutton next to the USB connector. Removing the button cell
battery does not reset the total uptime value.
To save battery power, the display changes to low brightness after 250 seconds when idle. Pressing a button restores normal brightness. Brightness can be adjusted manually, but not enough to my taste, as the display at maximum brightness is somewhat hard to read in normal daylight.
Do You Need a Nuclear Radiation Detector?
Using the Joy-It Nuclear Radiation Detector JT-RAD01 is intuitive and easy. It is sturdy, yet it only weighs 150 grams. The instrument measures about 8 cm by 12.5 cm, and so it fits easily in most hands.
The JT-RAD01 is a nice device. However, if you need one is up to you to decide. According to the manual, it is neither medical nor protective equipment, and it should not be used to assess whether there is danger from radiation. The values it displays should be taken as informative only.
Elektor Magazine has been one of the leading sources of information on electronics for engineers, designers, start-ups and companies for 65 years. Our magazine is powered by an active community of electronics engineers – from students to professionals – who are passionate about designing and sharing innovative ideas.
For them, we publish hundreds of items a year, in formats such as articles, videos, webinars, and other learning formats. Our mission is to share knowledge in every possible way and inspire readers with the latest developments within the electrical engineering sector.
Thank you for your vote!
Leave further comments in the fields below.
Thank you for your vote!
If you wish to leave a comment with your rating, please first use the login below. If not, just close this window.

Discussion (5 comments)