
PiJuice — Uninterruptable Power Supply for Raspberry Pi
Software
The installation of the software is very easy using the following command, entered from the terminal window of the Raspberry Pi:
Once the installation has completed, a restart of the RPi is required, after which the PiJuice icon is available under “Preferences”.
For a ‘headless’ application there is also a Lite version available that runs without a graphical shell:
Pushbutton configuration
The PiJuice comes with three switches. SW1 is configured as the on/off switch for the Raspberry Pi, but can be assigned a different function from the software. SW2 and 3 are also user configurable.
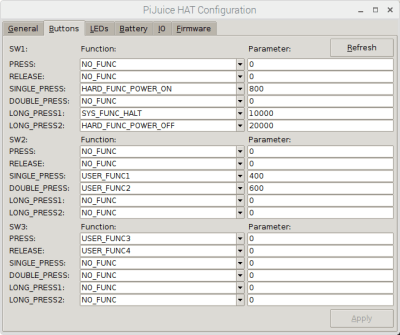
In the image above you can see that SW1 has been configured such that a single pushbutton press of at least 800 ms has the function HARD_FUNC_POWER_ON, which essentially means “turn the Raspberry Pi on”. When SW1 is pushed for at least 10,000 milliseconds, the PiJuice sends the command SYS_FUNC_HALT to the Raspberry Pi — a software version of “switch off”. A button push of at least 20,000 ms switches the Raspberry Pi off “hard”. This functionality is easily changed to your specific requirements using the user interface.
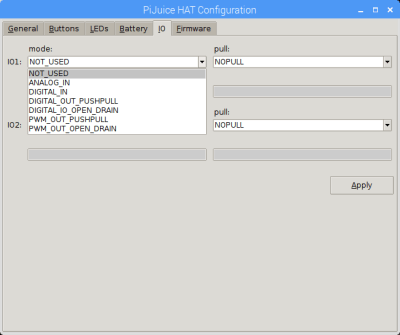
Extra IO
The PiJuice comes with two IO lines, which are also fully configurable through the software. The image below gives an impression of this. Both analogue and digital functionality are available. Also a pull-up or pull-down can be configured via the drop-down menu “pull”.
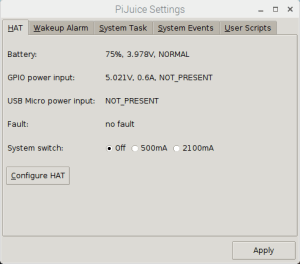
Setting and reading of parameters
In the ‘main window’ all kinds of information about the HAT itself are displayed. Under the tab “HAT” we see, for example, the actual charge remaining, the battery voltage and the state of the GPIO power input (that is, the magnitude of voltage across the power supply pins of the GPIO header, how much current the PiJuice is supplying to the Raspberry Pi — this is negative when, for example, a power supply is connected to the RPi and the PiJuice is charging the battery from this power supply, and whether a power supply is connected to the micro-USB connector of the Raspberry Pi). At USB Micro power input you can read whether there is a voltage at the micro-USB connection of the PiJuice and under Fault any errors are indicated. The parameter System Switch lets you set the maximum current that output VSYS (J3, a standard 2-pin header — pitch 2.54 mm — that makes it easy to power sensors or such) will supply.
A very extensive description of all the features can be found in the software description at GitHub.
And you can, of course, find out more about the hardware too: https://github.com/PiSupply/PiJuice/tree/master/Hardware. It is a good idea to thoroughly read all the documentation before getting started with the PiJuice. For example, you will read that the maximum current that the PiJuice with the supplied BP7Z battery can supply to the GPIO header is 1.1 A and that for 2.5 A you will need a battery rated at least 3500 mAh. But also how you have to set the DIP switch when using other batteries.
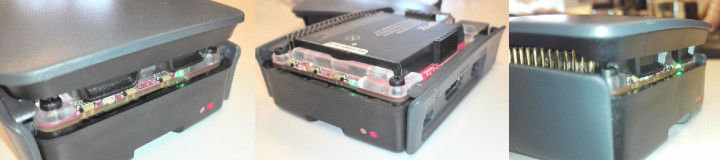
Conclusion
All-up, the PiJuice is a very comprehensive and thought-out product that will certainly find applications and is very user-friendly in its operation. The installation is easy and the software offers extensive features. It is only a pity that the entire assembly just fails to fit in a standard enclosure for the Raspberry Pi 3.
Discussion (0 comments)