
Review: Elektor’s "candle2light" Peltier lamp kit
The reactor core
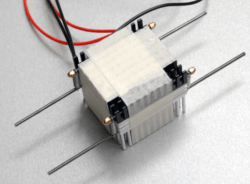
Everything is well set out in the instructions, but here are some complementary remarks which I hope will be useful when you assemble the heart of your mini ‘Thermal Generator’ while following the instructions scrupulously.
Don’t try to grab the springs along the shaft – you risk deforming them. Grasp them by one of their ends with a good pair of tweezers – they must be in good condition so their jaws hold onto their prey!
Other small points

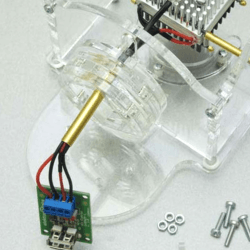
You will find that the manual preparation of the fan requires some dexterity and a 3 mm drill bit. The last by preference new or at least well sharpened; this was not the case with mine and because of that, the operation took me some time – but it was nevertheless better than breaking a blade or fixing lug of the mini- fan.
The fixing of the fan is not conventional, but it’s very clever.
Peeling the Plexiglas panels
In the course of this somewhat tedious operation, you should occupy your mind. For example by an appreciation of the clean laser-cutting of the panels. The precision of the finish of their contours is impressive, especially the chamfers. For sure, it is not by hurrying this operation that the people who prepared these pieces of Plexiglas got this high quality result. Hats off to them!If, like me, you have low vision, it may happen that you don’t notice the presence of a protective film on the two faces of the transparent panels. On one, the film is tinted and you can’t miss it, but on the other side it is crystal clear and may pass unnoticed.
'This is the trickiest part of the assembly'
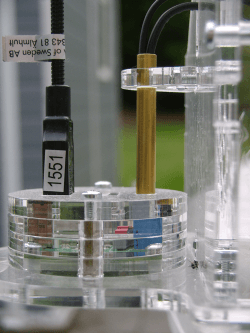 You will almost have finished the assembly when, in the last lines of the instructions, you will read that “... You are entering a delicate phase”. It’s a case of assembling a good ten pieces that all make up the holder of the PCB, the socket for the lamp and the connection to the thermal block, all on a few square centimetres:
- The brass tube that carried the 4 connecting wires between the thermal block and the PCB;
- the PCB itself with its screws, nuts, washers and spacers;
- The triangular bracket for mounting the tube, and its screw and its nut;
- The four elements that form the holder for the PCB and the USB lamp socket, their four screws and spacers…..
I hope I haven’t forgotten anything.
Oh yes! Big reserves of calm and patience.
 The operation is well covered in the instructions. But if you don’t have a clear idea of the end result, you can easily trip up on one detail or another. I know what I’m talking about here…
I had the misfortune to not notice that the end of the brass tube of my kit was not deburred. In consequence, the end of the tube, although perfectly adjusted, would not fit, at the top, in its triangular mounting bracket. In the photo above, the tube fits properly, which it did not do for me. Because of this, final assembly appeared impossible.
To resolve this problem took only three strokes of a small file at the end of the brass tube, but I stupidly wasted time because I did not look well at the photos. That won’t happen to you!
Read full article
Hide full article
Discussion (1 comment)