Atmel’s family of microcontrollers based on the ARM Cortex-M0+ core is powerful, economical, versatile, and, at least according to the manufacturer, easy to use. So why not take the plunge now and explore the world of 32-bit microcontrollers? Our course, designed for those with a little experience of 8-bit devices, will help you on the way.
Atmel’s family of microcontrollers based on the ARM Cortex-M0+ core is powerful, economical, versatile, and, at least according to the manufacturer, easy to use. So why not take the plunge now and explore the world of 32-bit microcontrollers? Our course, designed for those with a little experience of 8-bit devices, will help you on the way.
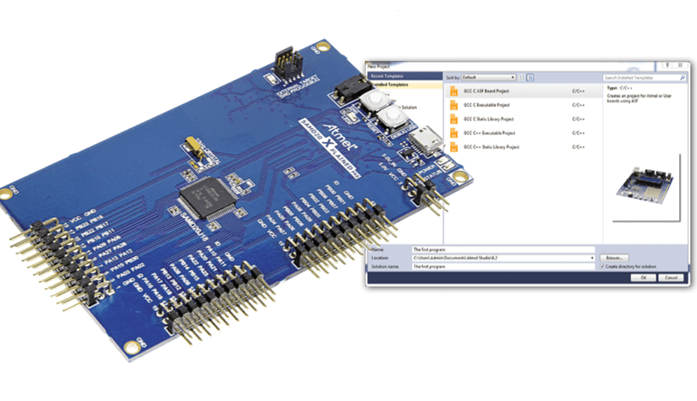
This programming course will introduce you to the world of ARM Cortex-M0+ microcontrollers, and, as always at Elektor, our emphasis is on practice rather than theory. Many free development environments and low-cost development boards are available: for our course we have chosen the ‘SAM D20 Xplained Pro’, which is based around the SAM D20 low power microcontroller. Thanks to support from the manufacturer Atmel, we are able to make a thousand of these boards available to interested readers at a reduced price: see the text box for more details. The course will start with a brief overview of the board and the microcontroller device, followed by the installation of Atmel Studio 6.2. Then, for a little bit of instant gratification, we will build our first project. We will compare the device with eight-bit microcontrollers, to which it is similar in many ways. Then, in the next installment we will describe the main peripheral elements and how they can be used in simple projects.
About the author
At fifteen years of age, Viacheslav Gromov is one of the youngest ever Elektor authors, but nevertheless has been working with analog and digital electronics for several years, mostly from his well-equipped basement workshop. He has already had a few short articles published in Elektor, and has written books, including books about ARM Cortex microcontrollers. He would like to take this opportunity to thank his family for their support of his hobby, as well as Andreas Riedenauer of Ineltek Mitte GmbH for supplying information and boards.
The board
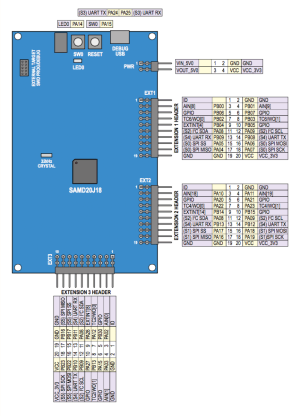
The block diagram of the board (Figure 1) might not look too exciting at first glance. As you can see, most of the 64 pins of the microcontroller are brought out to headers, and tables are provided giving the pinouts of these headers and the other connectors.
Power can be supplied to the board at 5 V using either the USB socket or the PWR header. If USB power is selected then the PWR header can supply power to an external circuit at either 5 V or 3.3 V; if, on the other hand, power is applied at PWR, the EDBG on-board debugger (see text box) is automatically switched off to reduce current consumption.
Figure 1 (click to enlarge image)
It is nevertheless recommended to use a power supply capable of delivering at least 500 mA, whichever power input is used. Headers EXT1 to EXT3 also carry power at 3.3 V to supply expansion boards. On each extension header pin 1 (called ‘ID’) is reserved for the connection of an ID chip on the expansion board. The ID is used by the EDBG to determine what type of expansion board has been plugged in, and this information can be displayed on the screen of the PC running the development environment software.
The board also includes a 32 kHz quartz crystal (which forms one of the clock sources for the main microcontroller), the DEBUG USB connection for an external debugger, buttons labeled RESET and SW0, and LED0, a yellow LED. SW0 and LED0 are connected to PA15 and PA14 respectively and may be used freely by the developer. The jumper next to SW0 connects the output of the on-board voltage regulator to the microcontroller: the current consumption of the device can be measured by removing the jumper and connecting an ammeter between the pins. The power and status LEDs (not shown) next to the USB socket are both connected to the EDBG circuit. The power LED lights when the board is supplied with power, and the status LED flashes when the main SAM D20 microcontroller is being debugged over the EDBG or is in some other special state. Both LEDs flash simultaneously when the debugger’s firmware is updated. The user manual for the board can be downloaded from Atmel's website (.pdf).
Elektor Magazine has been one of the leading sources of information on electronics for engineers, designers, start-ups and companies for 65 years. Our magazine is powered by an active community of electronics engineers – from students to professionals – who are passionate about designing and sharing innovative ideas.
For them, we publish hundreds of items a year, in formats such as articles, videos, webinars, and other learning formats. Our mission is to share knowledge in every possible way and inspire readers with the latest developments within the electrical engineering sector.
Thank you for your vote!
Leave further comments in the fields below.
Thank you for your vote!
If you wish to leave a comment with your rating, please first use the login below. If not, just close this window.

 About the author
Discussion (0 comments)