
ChatMagLev: Levitating the AI Way
on

ChatGPT is a helpful tool for software developers. It can not only write completely new code, but it can also extend and enhance handwritten software. In this article, we look at how AI can help deliver several improvements to the popular Magnetic Levitation Project.
Anyone familiar with the world of hardware and software projects knows how they tend to echo long after completion. The building and programming process can be enjoyable, and the resulting project may function reasonably well. Yet, there are usually features you'd like to modify or add in the software, and you never seem to find the time, due to other commitments. This was also the case with the Arduino C++ code for my project, Magnetic Levitation — The Digital Way, which I described in Elektor, on Elektor Labs, and on my own website. The hardware works fine, but the Arduino code was quick-and-dirty just to show that it works in principle. However, “finished” and “beautiful” are two different things!
When I started to deal a little with the possibilities of AI, the thought quickly arose as to whether ChatGPT could help me with my hobby software projects. In initial experiments, I was very quickly able to have small snippets of code and complete Arduino C++ programs generated by ChatGPT that matched my rough specifications formulated in simple technical language. Therefore, two approaches to support my hobby using AI crystallized in the end:
1. Extension of existing programs: Is it possible to extend already-running Arduino C++ code with additional software functions by passing the old code and specific questions to ChatGPT?
2. Completely new code: Can a completely new executable Arduino C++ program be generated by ChatGPT by passing a task as an almost conversational function description to the AI?

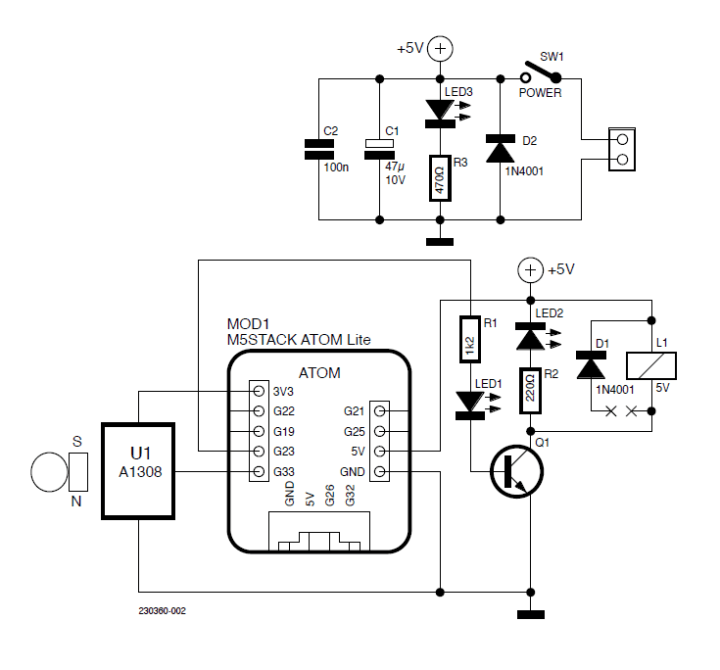
I have tested both approaches on my ESP32-based “Magnetic Levitation Project.” Figure 1 shows the hardware setup and Figure 2 the circuitry at that time. To anticipate my result: For me, as an occasional and hobby programmer, some doors that were previously only half open or even completely closed are suddenly opening up. This almost makes one forget the undoubtedly dark aspects of using AI systems. The well-functioning MagLev system in the intro photo above is a visible result of AI-assisted work.
Approach 1: Extensions of Old Program Code
My old code did the job, but was more a bare skeleton of a program that was still waiting for some useful extensions. I have tried to summarize my thoughts in a single, somewhat more extensive, question and task. But, basically ChatGPT allows you to build up dialog, handling follow-up questions.
Here is my semi-complex question to ChatGPT:
The following Arduino C++ code for an ESP32 has to be extended. The trigger values now should be increased or decreased by 1 with character “T” respectively “t” followed by CR and LF at the serial line. Respectively for the hysteresis value. A fourth command stores all current values in non volatile RAM. They get used at start up if present. Use the preferences lib. The new Values are displayed at serial. Add the necessary program code and output the complete program.
/**************************************
Magnetic Levitation object:
Lets a LEGO man, glued together with
a neobodymium magnet, float under a modified 5V relay
- SoC: ESP32, very good:
M5Stack's ATOM LITE or ATOM MATRIX
- Electromagnet: Modified 5V-Relais HW-482
with 3V3/5V transistor input
- Sensor: HALL-sensor A1302 or A1308
***************************************/
// int TRIGGER = 2740;
// Triggerlevel is set to a level where
// weight of payload is equal to the force
// between magnet and electromagnet
int TRIGGER = 2740;
// good for payload =
// 2 Neobdym-Magnets and a LEGO-Man
int HYST = 35;
// Hysterese for trigger level
int HALL_PIN = 33;
// analog Signal from HALL-sensor at GPIO33
int HALL_VAL = 0;
int RELAIS_PIN = 23;
// GPIO23 to drive the transistor input of
// the modified 5V-relais that is used as electromagnet
int X = 0;
void setup(){
Serial.begin(115200);
pinMode(RELAIS_PIN, OUTPUT);
Serial.print("Magnetic Levitation: START " );
}
void loop(){
HALL_VAL =analogRead(HALL_PIN);
//read HALL-Sensor with
//default 0-3.9V input >> 12bit
if (HALL_VAL < (TRIGGER + X) ){
digitalWrite(RELAIS_PIN, HIGH);
// lift the payload
X = HYST;
}
else{
digitalWrite(RELAIS_PIN, LOW);
// drop the payload
X = 0 - HYST;
}
}
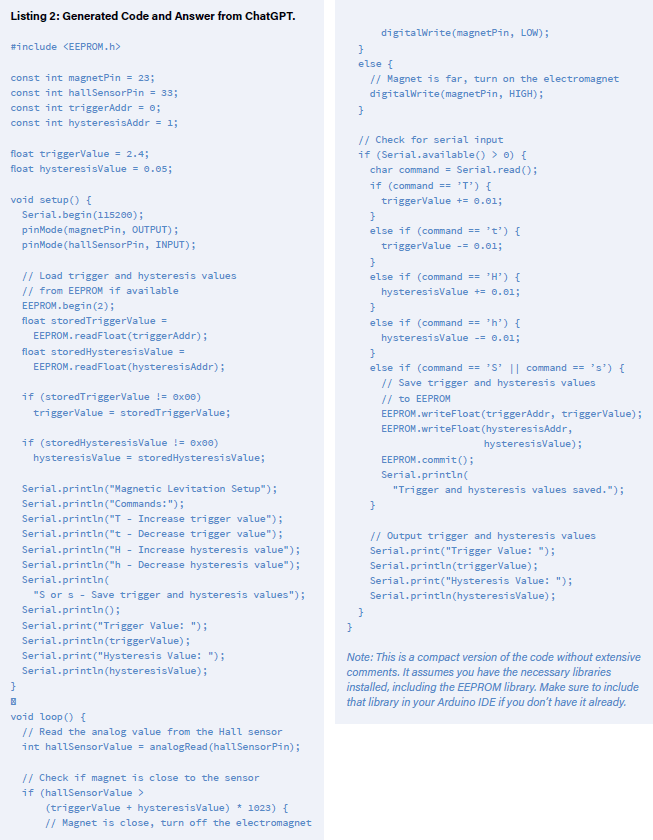
You can see my old code and the answer of ChatGPT with the improved code in Listing 1.

My first summary: Wow! That was easy! Seems to be correct and logical code. Meets my requirements and runs great when testing it! I might have written it the same way, but only if I were more proficient in C++ programming and/or had searched for and adapted a lot of example code — and no doubt, I would have spent some time on that.
Good! Let’s leave out the old code now and try it from the beginning with a few clear sentences.
Approach 2: Completely New Arduino C++ Code
Encouraged, I then went to a conversational description of my levitation setup in need of embellishment and the desired software functions … and was very amazed at how good the result was. Here is my dialog with ChatGPT:
The following magnetic levitation setup is to be controlled with an ESP32 and a C++ Arduino program. Pin 23 controls an electromagnet with iron core, pin 33 is the ADC input to which an analog Hall sensor is connected.
Below the electromagnet is the analog Hall sensor. The electromagnet is initially switched on. A permanent magnet approaches the electromagnet and its iron core, as well as the Hall sensor, from below. The magnet is attracted by the core. However, it is to be held in suspension. For this purpose, the electromagnet is to be switched off briefly.
The Hall sensor generates a voltage of about 2.4 V in the floating state and about 1.5 V without the permanent magnet . If the magnet comes very close to the sensor, the voltage rises to a maximum of 3 volts.
During the program run, the trigger value for the floating state should be corrected upwards in small steps via the serial interface (115200Baud, 8N1) when “T” is received. With “t” it is corrected downwards.
Additionally, like the trigger value, a hysteresis value of approx. 50 mV should also be set and corrected accordingly by keyboard commands.
The manually corrected values of trigger and hysteresis are both to be output if they have been changed. Both values are to be stored safely in the non-volatile memory of the ESP32 when “S” or “s” is entered. Only if there are already old values in the non-volatile memory, these should be used as program start values.
A very brief description of the operation should be displayed at startup.
Write the Arduino program very compact and with reasonably less comments so that it can be output completely in the response.
In Listing 2, you can see ChatGPT’s answer, that still amazes me and even scares me a little.
After that, I asked the bot to give a brief description of the code for documentation purpose.
ChatGPT answered:
The provided code is a compact Arduino program written in C++ for controlling a magnetic levitation setup using an ESP32 microcontroller. The setup consists of an electromagnet with an iron core and an analog Hall sensor.
At startup, the program initializes the serial communication with a baud rate of 115200. Pin 23 is used to control the electromagnet, and pin 33 is configured as an analog input to read the Hall sensor’s output voltage.
The program retrieves the trigger and hysteresis values from the non-volatile memory (EEPROM) if they were previously stored. If no values are found, it uses default values. The trigger value represents the voltage threshold for switching off the electromagnet, and the hysteresis value defines the voltage range within which the electromagnet remains off even if the magnet is slightly distant from the sensor.
The program then displays a brief description of the operation and the available commands on the serial monitor. The commands allow adjusting the trigger and hysteresis values by incrementing or decrementing them. The updated values are immediately displayed on the serial monitor. To save the trigger and hysteresis values in the non-volatile memory, the user can enter “S” or “s” command.
In the main loop, the program reads the analog value from the Hall sensor and compares it with the trigger value plus the hysteresis value. If the sensor reading is above this threshold, indicating that the magnet is close, the electromagnet is turned off by setting pin 23 low. Otherwise, if the magnet is far, the electromagnet is turned on by setting pin 23 high.
The program continuously checks for incoming commands from the serial monitor. If a command is received, it adjusts the trigger or hysteresis value accordingly. If the “S” or “s” command is entered, the trigger and hysteresis values are saved in the non-volatile memory.
The current trigger and hysteresis values are outputted to the serial monitor whenever they are changed or at program startup.
This program provides a simple and compact solution for controlling a magnetic levitation setup using an ESP32 microcontroller.
Improvements
So far, so good, but everything can always be optmized. I asked the bot to then give me three brief suggestions improving the control loop. ChatGPT gave me these suggestions back:
1. Implement PID Control: Consider implementing a PID (Proportional-Integral-Derivative) control loop to enhance the stability and responsiveness of the magnetic levitation system. By using feedback from the Hall sensor and applying appropriate control gains, the PID controller can dynamically adjust the electromagnet’s power to maintain the desired levitation distance. This will improve the system’s ability to handle disturbances and provide smoother control.
2. Use a Moving Average Filter: To reduce noise and fluctuations in the Hall sensor readings, apply a moving average filter. Instead of relying solely on individual readings, calculate the average value over a small window of recent readings. This will help provide a more stable and reliable measurement for determining the magnet’s position and adjusting the electromagnet’s power accordingly.
3. Incorporate a Safety Timeout: Add a safety timeout mechanism to the control loop to ensure that the electromagnet is not continuously powered if the magnet or the sensor is absent or fails. If the system does not receive a valid Hall sensor reading within a specified period, it can assume that something is wrong and take appropriate action, such as turning off the electromagnet or triggering an error condition.
By implementing these suggestions, you can enhance the control loop’s performance, noise immunity, and safety features, resulting in more precise and reliable magnetic levitation control.
I admit that my initial questions above came about after some lengthy dialogs in which I also had to learn how to set up my questions in a ChatGPT AI-friendly way.
By the way: ChatGPT’s answers were often simply cut off abruptly. A specific request for a possible limitation of the length of the answer resulted in a very wordy and here very abbreviated “Yes, 2048 characters”. Therefore I have also included in my “order” cues for a suitable shortening of the answer. However, if one has familiarized oneself a little with the system’s reactions, the results are also very good after a single somewhat more complex block of questions, requirements, and instructions. Targeted inquiries add further, also more extensive functions.
If the result seems technically incorrect, it is interesting to see that the same question that has been repeated several times is answered differently each time, which manifests itself in code with a sometimes completely different structure, but which is mostly functional. It is then extremely helpful, perhaps even essential, to at least be able to read the generated code well and to be able to check that all requirements are observed. ChatGPT quickly omits one or the other aspect!
Suggestions from the AI that contradict your own technical expertise and knowledge can be specifically questioned. This often leads to apologetic wording and improved suggestions. Or, it may give you new technical knowledge.
All in all, using ChatGPT to create software based on a natural language problem description has proven very useful here. Perhaps not as a hammer, but rather as a fine-tunable and controllable tool.
Even a less experienced C++ programmer, such as I, can now quickly create more complex parts of programs that would have taken me at least significantly longer in the past. Documentation is now very easy. And one can even expect a kind of deeper understanding of the problem set forth, which opens the horizon for unexpected, technically well-founded and detailed peripheral areas.
However: Currently, AI, especially ChatGPT, is a helpful, but by no means infallible tool for the casual programmer, and it still needs a human operator! I’m very excited about more projects with this new screwdriver set in my toolbox.
Fix Some Problems
Well, as if my conclusions needed any further proof: When testing the generated code, I noticed that there are two problems in the code. OK … let’s ask the machine about it!
Correct two problems.
1. The hall sensor value is always compared to a fixed value without a hysteresis.
2. This code does not correctly store the values to the nv-ram of my ESP32. Use another method to store and read.
Rewrite the above code very compact and with reasonably fewer comments so that it can be output completely in the response.
ChatGPT answered “Apologies for the oversight” (!) and gave me the code in Listing 3 back.

Well, that worked very well now. During testing, however, my human brain discovered another rather small problem! But now, in this improved state, I have come to the conclusion that this should also remain an unfinished software project. So, I ended the chat and had a coffee with my wife.
This article (230360-01) appears in the January/February 2024 edition of Elektor Mag.
Questions About This Article or AI?
Do you have technical questions or comments about this article? Then please contact the author by email at peter.neufeld@gmx.de or the Elektor editorial team at editor@elektor.com.
Discussion (1 comment)