
Review: The Waveshare 2.9” ePaper Display
November 07, 2019
on
on
Since they were first introduced I’ve been a big fan of e-book devices, I find them easy to use and like the display crispness along with the added functionality provided by menu options. I’m an avid reader so it’s useful to have all the books I’m reading on the one device rather than lugging a pile of books around with me. The display readability is excellent even in bright sun, perfect for chilling out on the beach!
The technology on which these screens rely is called electrophoretic displays (keyword: eInk / ePaper), electrophoresis is the motion of dispersed particles relative to a fluid under the influence of a spatially uniform electric field. Charged beads drift in a fluid and are drawn to the viewing surface when a voltage is applied. Each bead represents a pixel and each contains a positively charged white pigment particle and a negatively charged black pigment particle.
In addition to high contrast and virtually no viewing angle dependence, this type of display has several other advantages: electricity only flows when the displayed information needs to be changed, the image remains without any external electrical input so overall the energy consumption is very low. The display also does not show any burn-in tendency when the same image is displayed for extended periods.
There are also disadvantages: Since the image change is on a microscopic level and relies on the mechanical movement of tiny beads, pixel change is much slower than with LCDs or OLEDs. It often takes several seconds to refresh an image, making it impossible to stream videos; it is more suitable for applications where information display is static or changes slowly. Tricks such as the use of ‘partial refresh’ speed up the process a bit and sacrifice contrast and sharpness to allow faster switching for some scrolling operations.
All in all these novel displays have many useful attributes making them an ideal display solution for certain niche applications. They are not difficult to use and are ideal for beginners wanting to see results quickly. New trends such as electronic ‘shelf labeling’, being introduced in some supermarkets, display product pricing on small e-ink displays. With the increased uptake of this type of display, it is likely that prices will fall thanks to cost savings through mass-production.

Unfortunately, no grayscale or shades of red can be displayed. Also, the long refresh time when changing the image of up to 15 s with three-colour representations and the lack of partial image refreshing (partial refresh) certainly indicates that the main application field intended for this display model is as an in-store digital shelf price tag indicator. Product prices do not need to be changed so fast (yet) and the red display option would be useful to show special discounts or offers.
This small screen is quite cheap and offers hobbyists a good introduction to the technology.
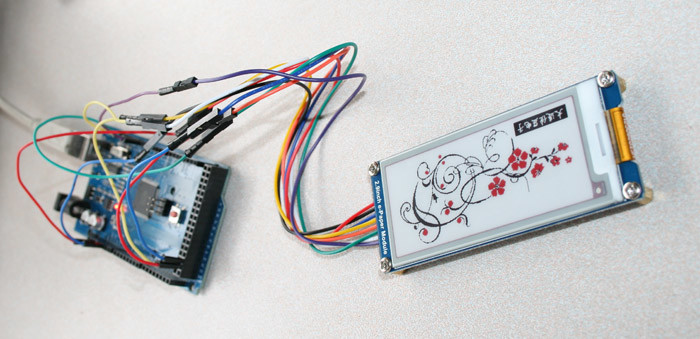
The display is supplied as a finished module, with leads that just need to be connected to the correct signal lines. When used with an Arduino you can quickly be up and running the demo code in no time. Another great advantage of the module is its flexibility; although the small display is designed for 3.3 V operation, it can withstand 5 V thanks to the on-board voltage regulator.
Also here are links to the demo code and Github page, a link to a forum post is conveniently listed, in which ZinggJM, (a keen player in the Arduino community) shares much more information about Waveshare and other displays. Particularly interesting is his self-written GxEPD library, which supports, among other things, the display presented here. Its library of libraries is based on an Adafruit library and makes programming a microcontroller for display control very easy. The associated Github page includes everything you need for operation.
Although I didn’t have a lot of success getting the Waveshare demo code up and running, there was no such problem using ZinggJM’s library after installing it in the Arduino environment. The example ran straight away.
the developer also includes the correct wiring layout. All his code is well commented so it’s easy to make any changes necessary to use it for your own particular application.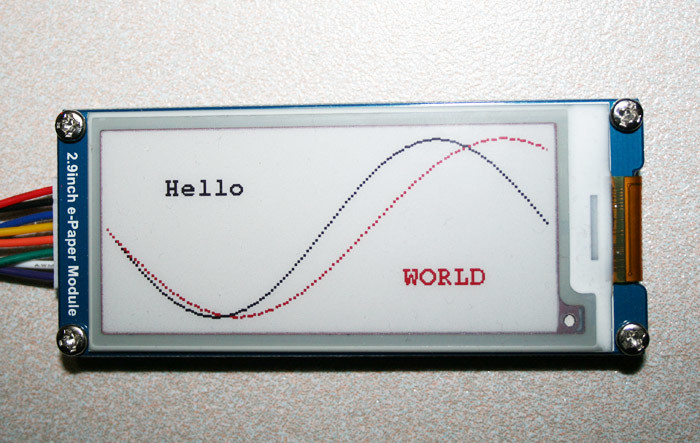
After some trial and error, I found out how the function works best; you simply write everything you want to represent in a separate function and then call it up via drawPaged () in the main program. Incidentally, the image display doesn’t noticeably slow down.
In the end, the display was put to use in my off-grid camper van. I spent a lot of time in the trailer this summer. It is powered by a 200-watt solar panel and uses a separate car battery for storage, thereby making me independent of the grid. Using a shunt resistor and an Arduino, I measure the power generated by the panel and can see the yield over the last hour or the entire day.
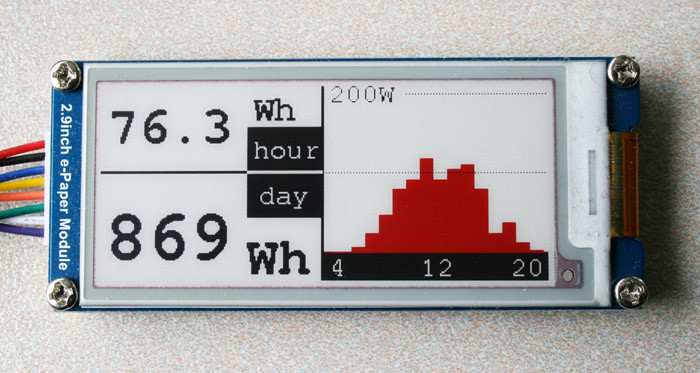
In the evening this information lets me estimate how much energy is available. A simple charge-status indicator alone for a lead-acid battery is not very accurate. A switch to lithium-ion batteries is being planned. The charge status should then be displayed on the display. The real-time electricity generation display allows me to optimize the solar panel orientation during a sunny week.
Using an ePaper display means very little energy is lost, which is especially important during cloudy periods. In the end, every watt hour counts, mustn’t let my phone go uncharged… Furthermore, the display still shows the remaining charge level of the battery even after switching off the measuring electronics, so that you can still read in the winter how much energy you have left after weeks without sunshine.
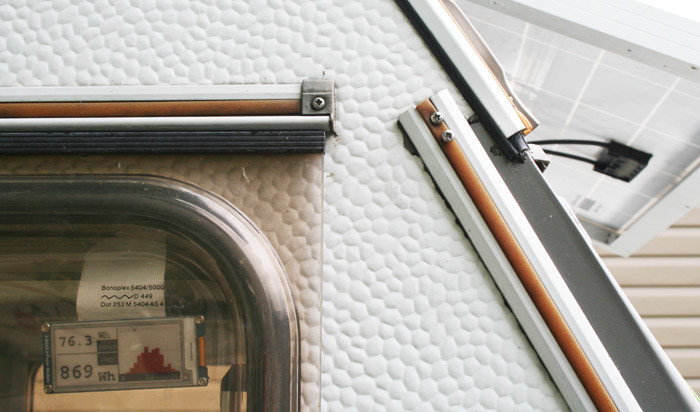
The display readability in sunlight means I could also attach the display to a window, so I conveniently view the readings and keep tabs on all that free energy coming my way.
All in all, this small display has lots to offer for many niche applications. The display is easy to implement even for beginners and compatible with a wide range of microcontroller environments.
The technology on which these screens rely is called electrophoretic displays (keyword: eInk / ePaper), electrophoresis is the motion of dispersed particles relative to a fluid under the influence of a spatially uniform electric field. Charged beads drift in a fluid and are drawn to the viewing surface when a voltage is applied. Each bead represents a pixel and each contains a positively charged white pigment particle and a negatively charged black pigment particle.
In addition to high contrast and virtually no viewing angle dependence, this type of display has several other advantages: electricity only flows when the displayed information needs to be changed, the image remains without any external electrical input so overall the energy consumption is very low. The display also does not show any burn-in tendency when the same image is displayed for extended periods.
There are also disadvantages: Since the image change is on a microscopic level and relies on the mechanical movement of tiny beads, pixel change is much slower than with LCDs or OLEDs. It often takes several seconds to refresh an image, making it impossible to stream videos; it is more suitable for applications where information display is static or changes slowly. Tricks such as the use of ‘partial refresh’ speed up the process a bit and sacrifice contrast and sharpness to allow faster switching for some scrolling operations.
All in all these novel displays have many useful attributes making them an ideal display solution for certain niche applications. They are not difficult to use and are ideal for beginners wanting to see results quickly. New trends such as electronic ‘shelf labeling’, being introduced in some supermarkets, display product pricing on small e-ink displays. With the increased uptake of this type of display, it is likely that prices will fall thanks to cost savings through mass-production.
The Waveshare ePaper display
The display on review here is perfect this application field. It has a 2.9" screen size and offers a resolution of 296 x 128 pixels with a pixel density of 112 dpi. As a 3-colour display, each dot can be assigned as black, white or red.Unfortunately, no grayscale or shades of red can be displayed. Also, the long refresh time when changing the image of up to 15 s with three-colour representations and the lack of partial image refreshing (partial refresh) certainly indicates that the main application field intended for this display model is as an in-store digital shelf price tag indicator. Product prices do not need to be changed so fast (yet) and the red display option would be useful to show special discounts or offers.
This small screen is quite cheap and offers hobbyists a good introduction to the technology.
The display is supplied as a finished module, with leads that just need to be connected to the correct signal lines. When used with an Arduino you can quickly be up and running the demo code in no time. Another great advantage of the module is its flexibility; although the small display is designed for 3.3 V operation, it can withstand 5 V thanks to the on-board voltage regulator.
Getting Started
The manufacturer Waveshare operates its own wiki page for its products. This clearly summarizes all the relevant information and includes the operating instructions. The most common questions and any problems you are likely to encounter should be covered here.Also here are links to the demo code and Github page, a link to a forum post is conveniently listed, in which ZinggJM, (a keen player in the Arduino community) shares much more information about Waveshare and other displays. Particularly interesting is his self-written GxEPD library, which supports, among other things, the display presented here. Its library of libraries is based on an Adafruit library and makes programming a microcontroller for display control very easy. The associated Github page includes everything you need for operation.
Although I didn’t have a lot of success getting the Waveshare demo code up and running, there was no such problem using ZinggJM’s library after installing it in the Arduino environment. The example ran straight away.
the developer also includes the correct wiring layout. All his code is well commented so it’s easy to make any changes necessary to use it for your own particular application.
The drawPaged function
One important library function deserves a special mention: The Arduino RAM space is actually too small to store the entire screen content. At 2 bits per pixel it uses up around 10 kB of memory, which clearly overloads a Uno running an Atmega328 with its 2 kB RAM space and even the 8 kB available in an ATmega2560. Using a UNO this would only be enough for about an eight of the screen. This is where the drawPaged function is useful: it breaks up the image into segments, which it then processes one after the other and sends to the display. The subdivision of the image can be defined in code but I had no problems with the default value of 8.After some trial and error, I found out how the function works best; you simply write everything you want to represent in a separate function and then call it up via drawPaged () in the main program. Incidentally, the image display doesn’t noticeably slow down.
An Off-grid energy Display
When I first saw the small eInk display, I started to think what sort of project it would be good for. It would be good for battery-powered IoT apps that only display new content sporadically. For example a small weather station measuring sunlight and ambient temperature.In the end, the display was put to use in my off-grid camper van. I spent a lot of time in the trailer this summer. It is powered by a 200-watt solar panel and uses a separate car battery for storage, thereby making me independent of the grid. Using a shunt resistor and an Arduino, I measure the power generated by the panel and can see the yield over the last hour or the entire day.
In the evening this information lets me estimate how much energy is available. A simple charge-status indicator alone for a lead-acid battery is not very accurate. A switch to lithium-ion batteries is being planned. The charge status should then be displayed on the display. The real-time electricity generation display allows me to optimize the solar panel orientation during a sunny week.
Using an ePaper display means very little energy is lost, which is especially important during cloudy periods. In the end, every watt hour counts, mustn’t let my phone go uncharged… Furthermore, the display still shows the remaining charge level of the battery even after switching off the measuring electronics, so that you can still read in the winter how much energy you have left after weeks without sunshine.
The display readability in sunlight means I could also attach the display to a window, so I conveniently view the readings and keep tabs on all that free energy coming my way.
All in all, this small display has lots to offer for many niche applications. The display is easy to implement even for beginners and compatible with a wide range of microcontroller environments.
Read full article
Hide full article
Discussion (0 comments)