Good soldering skills and practices are a requisite for pro engineers or makers alike. In this article, we cover soldering essentials, from helpful tool recommendations to safety tips to details about smart soldering practices.
For anybody interested in electronics, soldering is one of the most important skills to master. Whether you are connecting wires, building circuits, or working on Arduino- and Raspberry Pi-based designs, good soldering skills are instrumental to your success. In this guide, we'll provide essential soldering-related tips that will help ensure a safe, efficient and effective outcome at your electronics workbench.
Soldering Safety
All soldering equipment should always be handled with care. Soldering involves extreme temperatures and hazardous chemicals. Here are some simple safety precautions to get you started:
Solder (non-ROHS) contains lead. Lead is poisonous. Remember to always wash your hands having handled solder.
Safety gear is an absolute must. You'll want to wear both safety glasses and heatproof gloves if possible.
Never put your soldering iron to a live wire of any kind.
Ventilation: Believe it or not, flux is the biggest concern here, and it can be highly irritating to your lungs. Fortunately, lead does not tend to vaporise at soldering temperatures. Always ensure the good ventilation of your work area when using solder.
Never touch the element or tip of your iron. Soldering irons operate at temperatures in excess of 400°C (750°F) and can cause serious burns.
Always return your iron to its holder whether switched off or on. A hot iron can cause serious damage to your work area and beyond.
Tools of the Trade
There are many shapes, sizes, and types of soldering iron. The two most important factors in choosing an iron are your planned use for it and how often you plan to use it. The very fact you're reading this most likely means you have at least some hobby-level electronics experience, and consequently you’re likely to want to use a soldering iron for purposes beyond simple repair jobs.
Therefore, consider using an adjustable temperature soldering station. Most new stations have a digital display for showing the iron’s exact temperature. Consider that the higher the power, the quicker the speed of the iron.
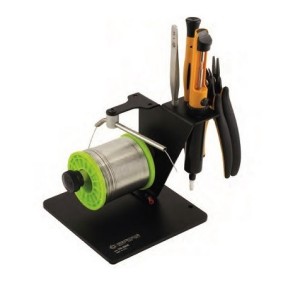
To get you started, take a look at Elektor's diverse range of digital soldering stations. We also stock a handy solder spool stand which comes with a variety of tools. An excellent addition to your bench, this will help keep your work area tidy, reduce waste and will limit your handling of solder through its handy guiding tube.
Solder dispenser with a guiding tube
that keeps the working area tidy and
reduces solder waste.
Soldering Supplies
Traditional solder tends to be a mix of lead and tin in differing proportions. The majority of solders used in electronics tend to be comprised of 40% lead and 60% tin. There is a modern lead-free (ROHS) alternative, but this tends to have different physical properties than traditional solder, requiring specific soldering skills and experience. The core material of solder is flux, which is an acidic chemical used to remove oxidisation from the metals to be joined. The most common type of flux is rosin. You could also use a standalone rosin-based soldering flux paste to help make better contact between your solder and board.
A solder sucker/vacuum will be adequate to correct most mistakes. However, solder braid is particularly useful for a thorough desoldering and clean up. Usually copper and flux-based, this will act as a wick for your solder, taking it away from the joint you wish to desolder.
Preparation
It will typically take a few minutes for your soldering iron to get up to temperature. So, plug it in, switch it on, and start preparing by taking the following steps:
Dampen your soldering sponge under a cold tap. Give it a good squeeze to remove any excess water.
Give the tip of your iron a thorough wipe on your wet sponge or metal wool. This will remove any residue left over from your previous soldering sessions.
Melt a small amount of solder on your soldering iron's tip. “Tinning” (named after the component of solder, tin) only needs to be performed when you clean your iron's tip using your sponge: it reduces oxidisation, and consequently increases heat flow from your iron to your soldering joint.
Through-Hole
Make sure your soldering iron is up to the correct operating temperature. You should always start at the lowest possible temperature and work up from there. Running it too hot can easily damage components and delaminate your board. Heat is rarely the answer: if your solder isn't playing ball, don't be too tempted to crank it up. If anything, lower it!
‘Cleanliness (of the joint to be soldered) is next to godliness'. Any grease from fingerprints on a circuit board may result in a bad joint. If this is suspected then first clean away grease using a clean cloth with a small patch of isopropanol (careful with that stuff also – it's highly flammable)
Solder flows to the hottest part of a would-be joint. Wherever this is, this is where your solder will gravitate. Therefore, try to make equal contact between the soldering iron tip, pin and copper eye.
Feed your solder from the opposite side from the soldering tip. Remove the solder and then the iron. You are looking for a shiny, pyramid-shaped finish.
Consider the use of heat sinks, or even simple metal crocodile clips to dissipate heat away from your more fragile components.
When you're unable to use a solder sucker, use copper braid to remove any excess solder. Think of this as a sponge for solder. The solder will flow up the braid and away from your board.
Use a solderless breadboard to arrange your header pins below your board. This will help keep your pins straight ready for soldering.
Wire-to-Wire
Overlap your wires and then manually twist them together between your index finger and thumb. Place your iron on the joint and feed your solder into the joint on the opposite side to the iron tip.
When your joint is complete, consider covering it with heat shrink. Slide the heat shrink tube over the joint, then simply use a heat gun or cigarette lighter to make it taut against the joint. This will both improve the mechanical strength of the joint and also provide electrical insulation.
Design, Build, & Sell Electronics
Don't let the high temperatures, specialist equipment, and hazardous materials deter you: soldering isn't a particularly difficult skill to master, but practice always makes perfect. With a steady hand and the right equipment, you'll quickly be showing off your soldering skills to be the envy of all your friends and colleagues.
When you've finished soldering your projects, be sure to share and discuss them with the Elektor Labs community by signing up for a free Elektor Labs account.
Read full article
Hide full article
Add a rating to this article
★★★★★
★★★★★
Page 1 / 1
Login
No account yet?Register for free!
Forgot password?
Please enter your email address. Instructions for resetting the password will be emailed to you now.

Discussion (0 comments)