
My journey into the Cloud (6): control from a smartphone
April 21, 2016
on
on
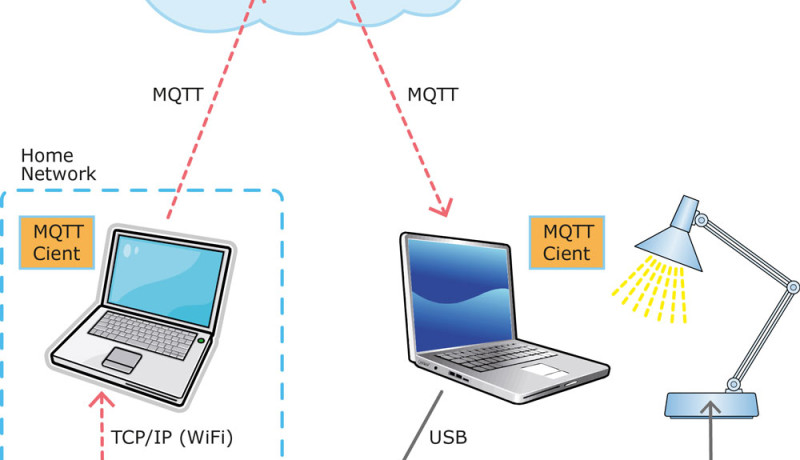
In the previous instalment of this series I finally succeeded in providing control of hardware via the internet using IoT-specific protocols. To recap, the system uses a cloud-based MQTT client (programmed in C#) to allow two PCs based anywhere in the world to exchange messages via a cloud-based MQTT test server. I then added a feature to the client so that received messages would be automatically sent out of a selectable (virtual) COM port from the PC. The next step was to add another board to the setup which could interpret the commands and provide control, preferably wirelessly. I chose an Atmel SAM-D20 board together with a relay expansion board and an off-the-shelf remote-controlled mains outlet socket. Now with everything hooked up I was able to control the desk lamp in my study from anywhere in the world (see instalment 5).
Sending the commands from a PC is not too convenient; a better input device would be a smartphone. I set out to provide control via my Android smartphone (Galaxy S6). An app was required to send the messages to control a relay remotely. The simplest solution seemed to be if I simply sent the commands from a smartphone via TCP/IP to a PC somewhere in the same WLAN. The necessary routines to send TCP/IP messages from Android/Java and to receive them (using a C# routine) on a PC are widely available on the web. Apart from their use here, the routines are sure to be useful in upcoming Elektor projects.
No sooner said than done; I modified my MQTT client so that any incoming TCP/IP message is retransmitted over MQTT (see below to download the source code and .exe file). Operation is really simple; first off you need to define an MQTT topic such as ‘Lamp’ for example to which messages can be published (see instalment 4). You can at the same time subscribe to the topic so that you can confirm what was actually sent over MQTT. Next enter the IP address of the computer in your home network (for example ‘192.168.0.10’, a tool such as ‘Network Scanner’ from SoftPerfect is useful here). Finally click on the ‘TCP Listen’ button. You can then create another instance of a MOTT client on a remote computer to which you can attach your own electronics to control. Alternatively you can try it out on a single PC. In the corresponding MQTT-Client you can enter the COM port number to which your SAM board or Arduino etc. is connected.
Now I needed an app able to send TCP/IP messages. After a long lay off, my Android programming skills were a little rusty, the first task was to install ‘Android Studio’ on my new laptop. I was reminded again what a powerful and secure development environment Android and the IDE is for the experienced developer. For noobs the learning curve is pretty steep. You need patience, a strong nerve and the commitment to invest the necessary time. For those who prefer not to program directly in Android/Java there are many alternative methods to achieve control via a smartphone. We will come back to this topic again both in Elektor and later in this series.
My tiny app is now able to send TCP/IP messages to any IP address in my home network, the address and message are entered in text boxes and then the send button is pressed. There wasn’t enough time to expand the app with a menu for the setting options or to include a timeout feature. The screen freezes when the PC doesn’t receive the message because either the TCP listener in the MQTT client has not been initiated or the address is invalid. It’s an unwanted feature but overall, for a first attempt, I’m happy with the result and hopefully you will find the code useful to control something connected to your own PC.
Using commands such as ‘R 0 1 +’ and ‘R 0 1 –’ I can now control my remote-controlled desk lamp from a smartphone. The text entry is a bit clumsy and the system uses a lot of hardware. I think this design is crying out for some optimization!
Read full article
Hide full article
Discussion (3 comments)