Review: YARD Stick One Sub-1 GHz Wireless Test Tool
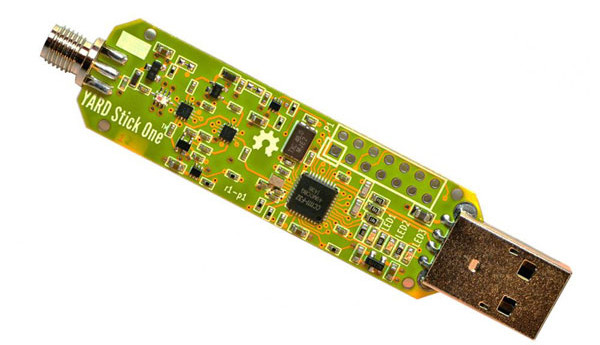
The YARD Stick One is a compact “Hardware Defined Radio” that can send and receive in the UHF band. It is a sort of break-out board with a USB interface to enable its use on hosts such as PCs and Raspberry Pies. The YARD Stick One is delivered with USB software preloaded in its 8051 core. The radio is controlled by writing a few dozen configuration registers, but the Python middleware can abstract many details.
The YARD Stick One is a compact “Hardware Defined Radio” that can send and receive in the UHF band. It can be seen as a kind of break-out board (BoB), but with a USB interface to enable the use on biggish hosts such as PCs and Raspberry Pies. The Yard Stick One is delivered with USB software preloaded in its 8051 core. The radio is controlled by writing a few dozen configuration registers, but the Python middleware can abstract many details.
YARD Stick One Supports Sending and Receiving
The main advantage of the YARD Stick One is that it is one of the cheaper devices (compared to the HackRF or LimeSDR) that can also transmit and works more or less “plug and play”. The common, low cost, devices such as the RTL SDR dongles can only receive.
As all low-level functions are implemented by a CC1111 chip, using the radio is a matter of writing the configuration registers correctly. The CC1111 is targeted for complex layer 2 protocols, with features such as sync words, framing, interleave and scrambling. As the CC1111 is designed as a SoC for commercial RF applications, the use of the YARD Stick One for signal analysis is very limited. Unless the system under test uses a similar SoC, it is less frustrating and cheaper to use an SDR.
The YARD Stick One is only supported by rfcat, a Python-based middleware that abstracts the most used options in a sort of descriptive methods. For fine-tuning, rfcat also offers raw register access.
As delivered, the device is a bare board, and must be treated with the suitable care. Third-party enclosures are available.
The term “Sub 1 GHz” is a bit broad; the YARD Stick One is limited by the TI CC1111 radio, which covers the lower UHF ISM bands: 300-928 MHz. Notably, the 13.56 MHz band, used for RFID is not covered.
The YARD Stick One works slightly more stable on Linux than on Windows 10. Windows often does not recognize the device at all, but Linux gets away with repeatedly unplugging and reinserting the device.
Installing the Software
Using the YARD Stick One requires a good understanding of the OSI layers 1 and 2. Some Python knowledge and familiarity with the intended OS is also beneficial to iron out installation issues. The software recommended in the Elektor shop was installed on Windows 10, Kali, and Ubuntu 18.
Installation of rfcat on Linux with Python 3.10 worked well. The only difference with the documentation was that rfcat must be started with
./rfcat
In case of an “Error in resetup()”, unplug and reinsert the device.
Windows 10: do not install Python via the appstore, as it messes up the file permissions, but install manually for all users. Additionally:
pip install Cython
Install with admin privileges (see where the Linux instructions require sudo). And have a VC >14 installed.
Required tweak if you get an error message about “collections not callable”: add .abc in C:\Program Files\Python310\Lib\site-packages\pyreadline\py3k_compat.py line 8:
return isinstance(x, collections.abc.Callable)
pyreadline is said to be only required for Windows.
Install the libusb-win32 driver; the easiest way is probably using “Zadig”, which usually comes with SDR#. If the device is absent, you get the “No Dongle Found” exception from rfcat.
In case of a “ChipconUsbTimeoutException”, unplug and reinsert the device.
All in all, installation and use on Windows 10 is a bit more finicky than on Linux.
The controller used in the CC1111 is a MCS51 variant and needs an SDCC compiler version 3.5 or lower. This needs some manual work in the installation, as the current version is 4.x. However, many users will just be using the rfcat firmware.
Using the YARD Stick One
The CC1111 radio does all the low-level work, adding and removing pre- and post-ambles, sync words, CRC, plus modulation and demodulation. The radio must be fully configured before use, as the reset configuration is useless. Writing a small Python program as outlined in [5] saves a lot of typing and errors.
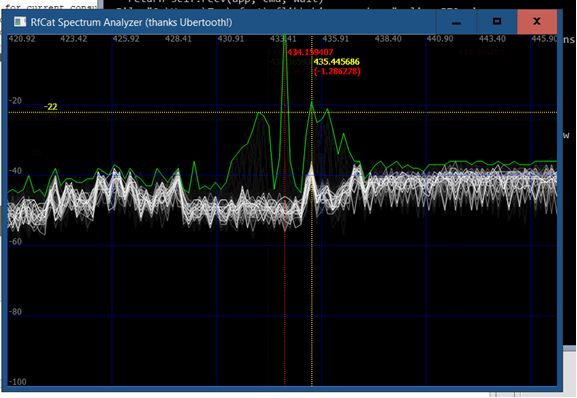
Figure 1: Rfcat spectrum display. Rfcat comes with a spectrum display as well. Calling it “analyser” is a bit too much of a claim. Most of the simple devices have a limited bandwidth and dynamic range, unlike the boat anchors such as the HP141 or HP181 that can display 1 GHz width at an 80 dB dynamic range.
To use the YARD Stick One as a receiver, the layer 1 and layer 2 properties must be configured correctly, or the radio will ignore the packet. To analyze an unknown signal, an additional SDR is needed, the cheapest hardware for which are the RTL dongles. Besides using GNU Radio and Audacity as shown in [3], the Universal Radio Hacker provides a more integrated workflow for signal analysis and replay.
Alternatively, the setting of the peer’s radio chip can be sniffed from the hardware interface if the type of chip is known, as shown in [1].
Using the YARD Stick One as a generic receiver is rather awkward: when using too generic settings a lot of noise is received, with too tight settings everything is filtered out. It might work with a variable attenuator at the input, but I did not have one at hand.
To help with the configuration of the many registers of the CC1111, the utility SmartRF Studio from TI helps. The calculated values can be written to the YARD Stick One with the appropriate setXxx(value) function.
The firmware as delivered with the YARD Stick One in the Elektor shop acts as a bridge between the CC1111 registers and the USB interface.
After a Python exception, the YARD Stick One must be unplugged and reinserted; otherwise rflib does not find it anymore.
Example
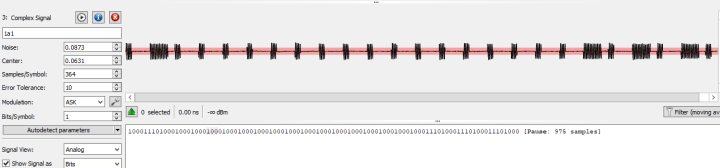
The following example shows a PWM signal with ASK modulation, which is very common for simple remotes. The screenshots are from URH.
Figure2: Symbol view.
Each data bit consists of four symbols, a 0 is transmitted as 1000 and a 1 is transmitted as 1110, so this must be sent to the YARD Stick One as 8e88888888888888888e8e8e8. One symbol is 0.484 ms, so the baud rate must be set to 2744.
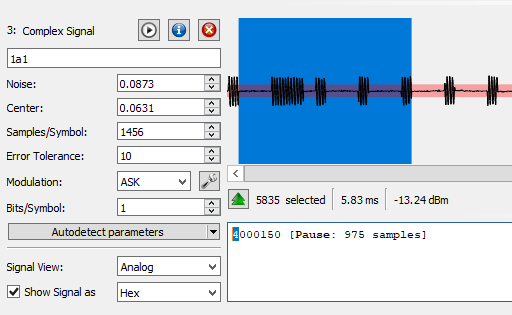
Figure 3: Data view.
Documentation
The documentation pointed to by the Elektor shop is very sparse. The forum indicated by Great Scott Gadgets is of limited use. The rfcat git repository gives a lot of information on building and downloading the YARD Stick One firmware.
There are some tutorials on the Internet, see for example [3] and [4]. Please adapt to the local rules for the ISM band.
Verdict
The YARD Stick One is not cheap for what it offers and has a rather steep learning curve. The software is unstable and insufficiently documented. For analysis only, a simple SDR receiver is a much better choice. For transmitting, you have a generic SDR transceiver for €150 more (e.g. HackRF One or Adalm Pluto).
The YARD Stick One might be of use when you concentrate on the specific protocols supported by this family of radio SoCs (See [1] and also the IM-Me as mentioned on the Elektor site. For dedicated applications, one could consider a CC111x breakout board from China connected to an Arduino, which avoids the awkward USB communication.
Elektor Magazine has been one of the leading sources of information on electronics for engineers, designers, start-ups and companies for 65 years. Our magazine is powered by an active community of electronics engineers – from students to professionals – who are passionate about designing and sharing innovative ideas.
For them, we publish hundreds of items a year, in formats such as articles, videos, webinars, and other learning formats. Our mission is to share knowledge in every possible way and inspire readers with the latest developments within the electrical engineering sector.
Thank you for your vote!
Leave further comments in the fields below.
Thank you for your vote!
If you wish to leave a comment with your rating, please first use the login below. If not, just close this window.

Discussion (0 comments)