Like 3D printers and laser engraving machines, CNC machines have become more mainstream too. Where they used to cost thousands of euros in the past, today entry-level CNC machines like the Anet 4540 can be found for under a thousand euros. Of course, these machines do not come with all the features of a professional-quality CNC machine, but they are useful for milling soft materials like wood, acrylic and aluminum. Some are even precise enough to mill printed circuit boards.
Like 3D printers and laser engraving machines, CNC machines have become more mainstream too. Where they used to cost thousands of euros in the past, today entry-level CNC machines like the Anet 4540 can be found for under a thousand euros. Of course, these machines do not come with all the features of a professional-quality CNC machine, but they are useful for milling soft materials like wood, acrylic and aluminum. Some are even precise enough to mill printed circuit boards.
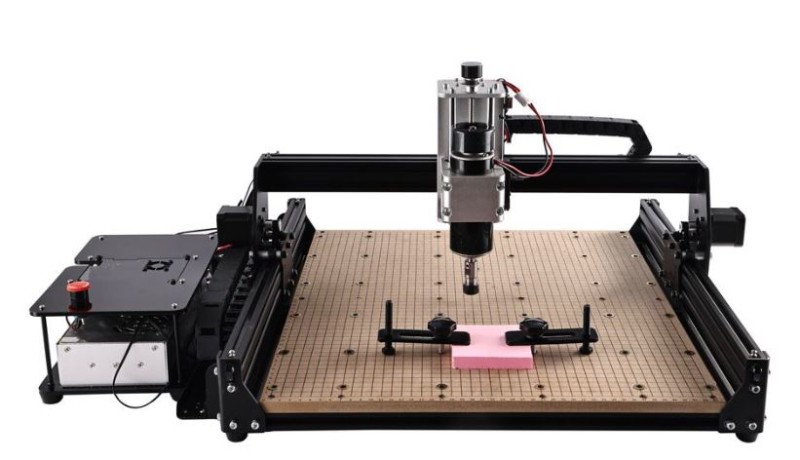
The Anet 4540 desktop CNC machine is such an affordable machine. It is large enough to allow milling useful objects instead of only tiny decorative objects, yet it is small enough (and lightweight, 11.5 kg) to be stored away in a corner when you don’t need it.
The Anet 4540 Features a Large Workspace
It’s useful working area (or volume) is specified as 430 mm × 390 mm × 90 mm (XYZ). The machine without power supply and controller occupies a surface of about 600 mm × 600 mm. The power supply/controller unit is not fixed to the machine’s frame, so it can be placed next to, behind, or even under the machine. The workspace of the Anet 4540 has a grid printed on it and threaded holes for attaching clamps.
The spindle motor is a 500-W model, air-cooled, with a maximum speed of 11,000 rpm. Unfortunately, no other technical details like torque, vibration or noise level are provided.
USB and Remote Control
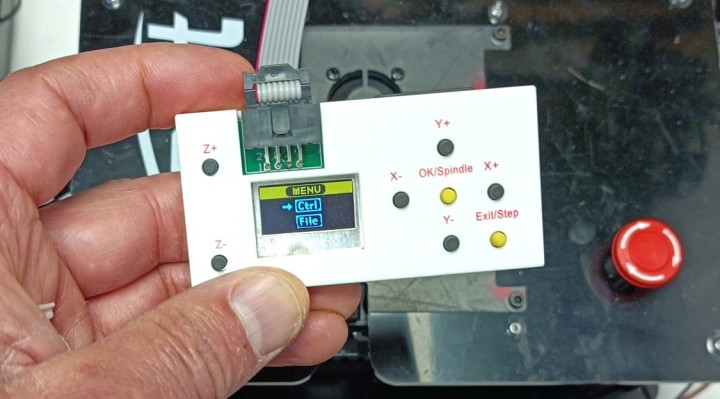
A computer can control the machine over USB with e.g. the open-source tool Candle (included on the USB pen drive in the kit). Stand-alone operation is possible too, thanks to its small (tethered) remote control that can read and execute G-code programs from an SD card (included). The power supply is equipped with an emergency stop button.
A Stiff Aluminum Frame
The machine itself consists of a strong and stiff aluminum frame with a 12-mm thick wooden (MDF) plate mounted on it. The Y-axis guides sit on the left and the right side on the frame. The X-axis guide bridges the two Y-axis guides. The spindle with motor and Z-axis control is mounted on the X-axis. The X-axis guide is a square aluminum profile with 40 mm sides, ensuring it is stiff. Both the X and Y axes have proper drag chain cable guides, keeping the motor and end-stop-switch wires out of the way.
The work surface has a grid printed on it with a resolution of 10 mm × 10 mm, which is practical for aligning objects. It also has threaded holes (M6) sprinkled over it, intended for fixing clamps to hold down the object that is being milled.
Subscribe
Tag alert: Subscribe to the tag CNC and you will receive an e-mail as soon as a new item about it is published on our website!
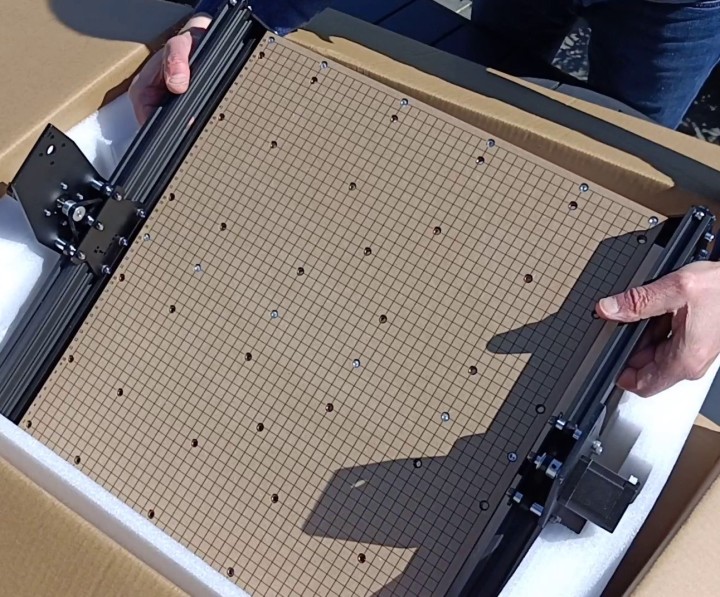
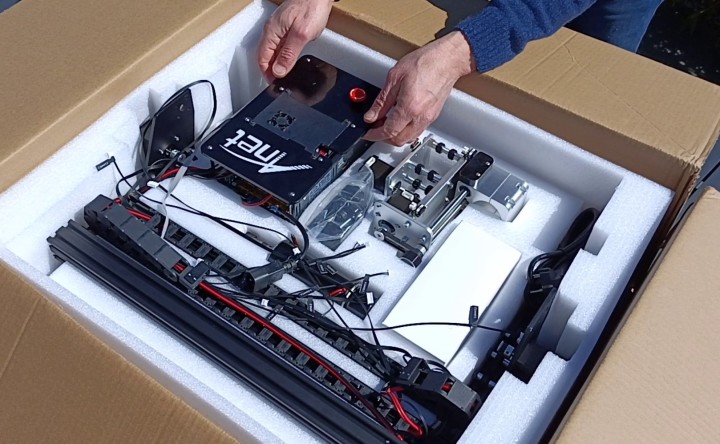
Assembling the Anet 4540
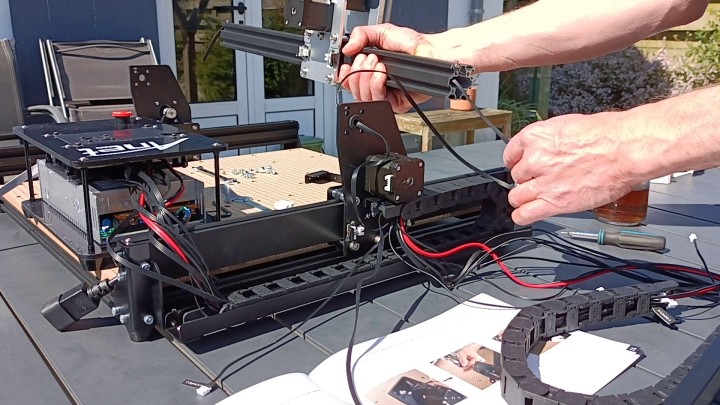
The Anet 4540 comes partly assembled; it is up to the user to finish it. Although this is not rocket science and doesn’t require special tools, it must be done with care and attention. The manual is succinct, and the images are small and not always clear. The Anet 4540 comes as a partly-assembled kit. The red button near my left hand is the emergency stop.
The origin is at (near) point ‘0’ on the baseplate; the X-axis is in front of you and runs from left to right. The Y-axis runs away from you. The spindle points towards you.
The T-nuts used to attach several parts can be somewhat annoying as they won't always rotate into position, making things fiddly.
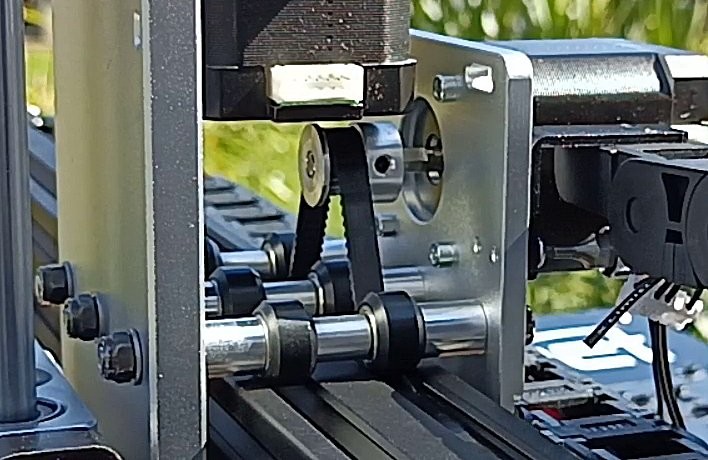
Inserting the Synchronous Belt
Stick the synchronous belt from inside the spindle Z-assembly to the outside. Make sure it passes over the cog wheel on the X-axis stepper motor. The ends of the belt may stick out as they can pass through special holes in the vertical X-axis supports. Connecting the Z-axis cables is easier if you remove the cable guide first (or connect the cables before mounting the cable guide).
The synchronous belt runs over the X-axis motor's cog wheel.
Changing Tool is Complicated
I found fitting the collet into the spindle cap a.k.a. collet nut with a burin and then screwing it on the drill to be really tough. This might very well be the weakest point of the CNC machine. Maybe it will become easier when the machine gets used? Be very careful when you do this, as the ten included pointy cutters are razor-sharp.
Tighten all the nuts and bolts as much as possible to get rid of any slack there may be. Don’t overtighten, though, as the spindle and X-axis should be allowed to move with as little friction as possible. Running cables through the X-axis.
Superfluous Parts
After assembling the machine, I was left with a few acrylic parts that do not appear in the parts list nor in the manual. The Anet website mentions optional laser engraving heads, maybe that’s what these parts are for?
Maiden Run of the Anet 4540
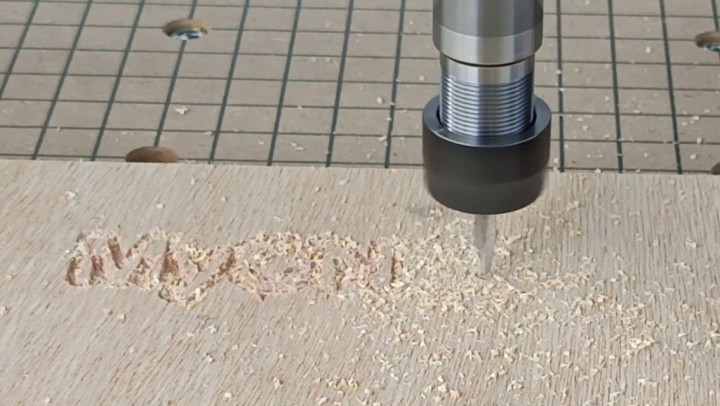
Once you have finished assembling the CNC machine, you want, of course, to try it immediately. This is entirely possible as the SD card plugged in the remote control contains four G-code test programs (also included on the USB stick). I highly recommend the program MyCNC.nc as it is short and doesn’t require a lot of material (66 mm × 21 mm). It engraves the text “MyCNC” with a depth of 2 mm, perfectly doable in a piece of scrap wood or plastic. Execution in progress of the G-code example MyCNC.nc.
Do not launch the program PCB.nc as it runs for about one hour and will not produce anything satisfactory. More on PCB engraving below.
Don’t Forget the Martyr
First place another sheet of wood, the martyr, on the baseplate and place the object on top of that. The martyr serves to prevent accidental damage to the baseplate if Z happens to go deeper than intended. Screw two clamps in the baseplate to the object firmly in place. Make sure the spindle can move around freely without bumping into clamps or other things that you forgot to remove from the baseplate.
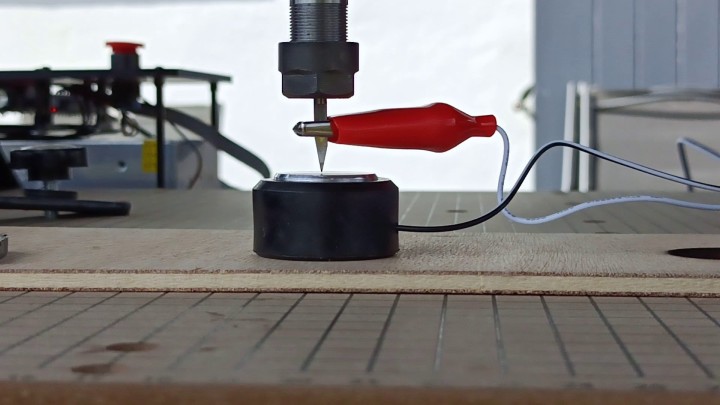
Aligning the Spindle
Move the spindle to the left-bottom corner of the space you reserved for the engraving. The G-code program will start engraving from this point. The head will engrave up to 66 mm to the right and up to 21 mm away from you. Lower the head (with a cutter in it, of course) so that the cutter just hovers above the surface. Ideally, it should not be possible to slide a piece of thin (news or cigarette) paper or film under it, yet the cutter should not touch the surface either. The G-code program will use this height as Z=0.
The Anet 4540 Can Work Stand-Alone
Plug in the power supply and switch it on, then wait until the remote control shows a menu. Use the Y- and Y+ buttons to select the File option and press OK/Spindle. Select MYCNC.NC and press OK. Press OK once more to start engraving. The job takes about 80 seconds to complete. The remote control has an SD card slot at the top side.
The Anet 4540 Has an Emergency Button
If something goes wrong, press the big red emergency stop button on the power supply or press Exit/Step on the remote control.
CNC Ain’t Easy
If you made it this far, you are ready to go even further. Doing so is, however, not easy. The problem is not the Anet 4540, but your lack of CNC and G-code skills. CNC-ing is not easy. Obtaining good results requires patience and experience. It is not simply a matter of pulling a CNC model from a website and “printing” it. You will have to invest time. Also, install the machine on a stable, horizontal, and flat, vibration-absorbing surface to keep shaking to a minimum.
Besides investing time, you also want to buy other burins and cutters. Due to their V-shape, the included cutters are good for engraving only (even though I did manage to do some wood cutting with them). Also, I made better clamps, as repositioning the screw-on clamps is laborious.
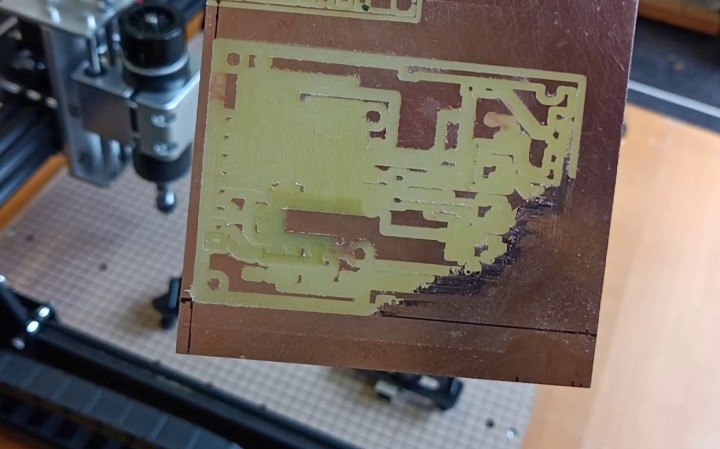
Engraving PCBs Ain’t Easy Either
Create a height map to avoid PCB engraving disasters like this.
As promised, a word on PCB engraving. This is a particularly difficult task as it requires a perfectly aligned target, 100% horizontal in the plane in which the cutter moves. Even though the Anet 4540 is a stable and well-built machine, it is not perfect. The baseplate is not perfectly horizontal, and the cutter tip doesn’t move in a perfectly horizontal plane. The X- and Y-axis are not perfectly aligned either. Candle can compensate for the Z-axis imperfections thanks to its height map function. It takes a bit of time to make it, but it will save you some disappointments. Serious PCB-engraving programs feature a function to create a leveling support that slides under the PCB to compensate for this.
Besides the imperfections of the CNC machine, PCB material too introduces issues, the most important being a lack of flatness. Good clamping is needed to flatten it as much as possible, but you cannot clamp in the middle of your future board.
Use the Z-Probe Often
Changing the burin or drill on the Anet 4540 is manual and complicated, and the Z-origin must be recalibrated (luckily, the machine comes with a Z-probe or use the PCB itself as Z-probe). Manually repositioning the spindle at the origin after a tool change is impossible. Therefore, always use the machine’s origin as reference for your board to ensure that the holes get drilled there where they should be. Use the Z-probe to precisely define the vertical zero.
Similarly, flipping the board over in case of a double-sided board is difficult, as it is complicated to realign it exactly as it was before. Therefore, I highly recommend starting your PCB engraving experiments with low-pitch, low-density, single-sided, SMT-only designs.
Conclusion
The Anet 4540 desktop CNC machine is a low-cost machine that doesn’t take up too much space. It is easy to assemble and install, and, thanks to its remote control, it doesn’t need a computer next to it. Although it appears to be targeted at engraving - it even supports laser engraving heads - it can also be used to cut, drill, and mill softer material like wood and acrylic by using other milling tools.
The machine is strong, solid, stiff, and robust, and it is heavy enough to stay in place. To me, its weakest point is the difficulty of changing the burin, cutter or drill bit as the collet is too tight. Also, I recommend making other clamps, as the screw-on clamps are laborious to use.
Learn New Skills to Get the Most Out of Your Anet 4540
The Anet 4540 desktop CNC machine provides an affordable entry point into the fascinating world of CNC milling and engraving. However, before you take this step, make sure you are willing and able to invest the time and effort to learn G-code programming and 3D modeling. If not, the only thing you will get out of this nice machine - or any other CNC machine for that matter - is frustration and disappointment.
Subscribe
Tag alert: Subscribe to the tag Review and you will receive an e-mail as soon as a new item about it is published on our website!
Read full article
Hide full article
Add a rating to this article
★★★★★
★★★★★
Page 1 / 1
Login
No account yet?Register for free!
Forgot password?
Please enter your email address. Instructions for resetting the password will be emailed to you now.

Discussion (4 comments)