
First Steps With Arduino/Genuino 101
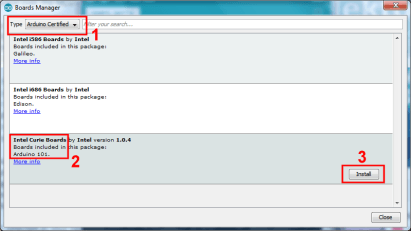
In the IDE on the other hand you won't notice many differences. You must have version 1.6.7 or higher from arduino.cc (but not 1.7.x from arduino.org), otherwise you can't download & install the compiler and other tools needed for writing sketches. You do this by opening the Boards Manager (Files -> Board) and then scroll through the list until you find the entry 'Intel Curie Boards'. Click on it and then click the Install button. This will download some 250 MB and when done you are ready to sketch. If you are curious, you can find it at {your user path}\AppData\Local\Arduino15\packages\Intel\
In the IDE select the board and the serial port that was created for it by the drivers. Open the blinky example, click upload and watch the (tiny) LED blink. Exactly as on a Uno. When you activate verbose messages for compiling and uploading you will see differences, however. An empty sketch for instance compiles to almost 30 KB (15% of available program space). For a Uno this is 450 bytes and 1%. Programming is different too, with a real progress indicator.
When you have the 101 selected as your board, new, special Curie examples appear under File -> Examples. On the arduino.cc page the CurieBLEHeartRateMonitor is mentioned, but it was not available in my IDE. You can, however, copy the code from the tutorial page and have a play. It works fine, but is more a kind of oscilloscope than a heartrate monitor. For this example to work you must install the nRF Toolbox from Nordic on your Android or iOS device. True, this app is a handy BLE app, but I would have expected an Intel or Arduino app.
Another example to try is the RawImuDataSerial (File -> Examples -> CurieImu -> RawImuDataSerial). Unfortunately, this sketch spits out data at a rate too fast to follow for a human being. But, since we are using the IDE 1.6.7 we have a new tool called Serial Plotter (on the Tools menu), so why don't we use it instead? To do so only a small change has to be applied to the function loop: comment out the line 'Serial.print("a/g:\t");' (line 124 in my example code), like this:
// Serial.print("a/g:\t");
Compile the sketch. For some reason you must wait a few seconds before you can open the Serial Plotter. Once opened, wait again a few seconds and then data will appear. Rotate and shake the board to influence the graphs.

When the sketch starts a calibration sequence is executed first. For this the board must lie flat on its back without moving. The USB cable may be a bit in the way, so place a weight like a (empty) coffee mug on the board during the first five seconds or so. Remove the weight before you start shaking the board.
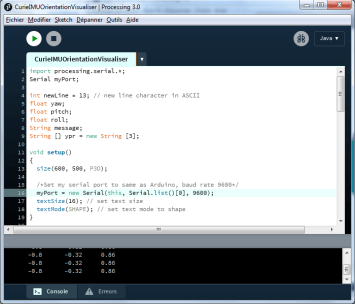
On the arduino.cc website is another IMU example that involves Processing. The tutorial suggests that you install the Madgwick library from the Library Manager (Sketch -> Include Libraries -> Manage Libraries...) but I couldn't find it there. I downloaded it from GitHub instead and then used the Sketch -> Include Libraries -> Add .ZIP Library option. I copied the Arduino code into the Arduino IDE, the Processing code went into the Processing IDE and then, Tadaaah! ... nothing.
Just an error message saying "Method "glClearDepthf" not available". Googling for a solution I found that you must not use the current version of Processing (3.0.1, 23 October 2015) but an older one.
Installing Processing 3.0 (30 September 2015) indeed solved the glClearDepthf problem, but gave me an array index out of bounds exception on my COM port number, which was 34. I could solve this by forcing the port number in Windows to 2. After disconnecting and reconnecting the 101 the Arduino IDE was happy again on COM2 and Processing was happy too, but it was still not working. Using the Serial Monitor I could get data from the 101 by sending 's' to it, but Processing only received zeroes. Debugging this further showed that setting the COM port number in the Processing sketch is a bit more involved than the tutorial makes you believe and I strongly recommend that you run the serial port number example first. It turned out that in my case I had to set the number to zero, the index of COM2 in the list on my computer. Now I finally got it working.
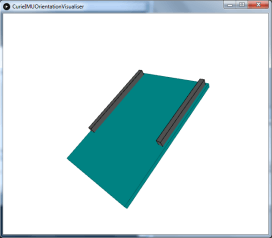
Rotating the board rotates the board's image in Processing too. Cool. The resemblance is not perfect, but you get the idea.
This completed my first day of experimenting with the new Genuino 101.
Sounding off we can say that, with the Curie RTOS still unpublished (scheduled for March 2016) and inaccessible, the Genuino 101 is a nice Arduino-compatible board with Bluetooth 4.0 and a 6-axis IMU sensor. It is not 100% compatible and a bit more expensive, but you get more features in return. Programming sketches is as easy as for a Uno, but without having full access to the hardware. Let's hope that the real power of the board will soon be unleashed.
In the IDE select the board and the serial port that was created for it by the drivers. Open the blinky example, click upload and watch the (tiny) LED blink. Exactly as on a Uno. When you activate verbose messages for compiling and uploading you will see differences, however. An empty sketch for instance compiles to almost 30 KB (15% of available program space). For a Uno this is 450 bytes and 1%. Programming is different too, with a real progress indicator.
When you have the 101 selected as your board, new, special Curie examples appear under File -> Examples. On the arduino.cc page the CurieBLEHeartRateMonitor is mentioned, but it was not available in my IDE. You can, however, copy the code from the tutorial page and have a play. It works fine, but is more a kind of oscilloscope than a heartrate monitor. For this example to work you must install the nRF Toolbox from Nordic on your Android or iOS device. True, this app is a handy BLE app, but I would have expected an Intel or Arduino app.
Another example to try is the RawImuDataSerial (File -> Examples -> CurieImu -> RawImuDataSerial). Unfortunately, this sketch spits out data at a rate too fast to follow for a human being. But, since we are using the IDE 1.6.7 we have a new tool called Serial Plotter (on the Tools menu), so why don't we use it instead? To do so only a small change has to be applied to the function loop: comment out the line 'Serial.print("a/g:\t");' (line 124 in my example code), like this:
// Serial.print("a/g:\t");
Compile the sketch. For some reason you must wait a few seconds before you can open the Serial Plotter. Once opened, wait again a few seconds and then data will appear. Rotate and shake the board to influence the graphs.
When the sketch starts a calibration sequence is executed first. For this the board must lie flat on its back without moving. The USB cable may be a bit in the way, so place a weight like a (empty) coffee mug on the board during the first five seconds or so. Remove the weight before you start shaking the board.
On the arduino.cc website is another IMU example that involves Processing. The tutorial suggests that you install the Madgwick library from the Library Manager (Sketch -> Include Libraries -> Manage Libraries...) but I couldn't find it there. I downloaded it from GitHub instead and then used the Sketch -> Include Libraries -> Add .ZIP Library option. I copied the Arduino code into the Arduino IDE, the Processing code went into the Processing IDE and then, Tadaaah! ... nothing.
Just an error message saying "Method "glClearDepthf" not available". Googling for a solution I found that you must not use the current version of Processing (3.0.1, 23 October 2015) but an older one.
Installing Processing 3.0 (30 September 2015) indeed solved the glClearDepthf problem, but gave me an array index out of bounds exception on my COM port number, which was 34. I could solve this by forcing the port number in Windows to 2. After disconnecting and reconnecting the 101 the Arduino IDE was happy again on COM2 and Processing was happy too, but it was still not working. Using the Serial Monitor I could get data from the 101 by sending 's' to it, but Processing only received zeroes. Debugging this further showed that setting the COM port number in the Processing sketch is a bit more involved than the tutorial makes you believe and I strongly recommend that you run the serial port number example first. It turned out that in my case I had to set the number to zero, the index of COM2 in the list on my computer. Now I finally got it working.
Rotating the board rotates the board's image in Processing too. Cool. The resemblance is not perfect, but you get the idea.
This completed my first day of experimenting with the new Genuino 101.
Sounding off we can say that, with the Curie RTOS still unpublished (scheduled for March 2016) and inaccessible, the Genuino 101 is a nice Arduino-compatible board with Bluetooth 4.0 and a 6-axis IMU sensor. It is not 100% compatible and a bit more expensive, but you get more features in return. Programming sketches is as easy as for a Uno, but without having full access to the hardware. Let's hope that the real power of the board will soon be unleashed.
Read full article
Hide full article
Discussion (0 comments)