
Review & Raffle: pi-top 3 turns Raspberry Pi into STEAM engine
Expansion bus
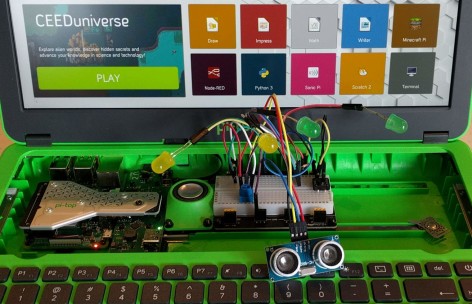
Besides turning an RPi into a laptop, the pi-top also offers an expansion bus, the “Modular Rail”, for adding boards and modules. Modules are daisy-chained on the bus and have magnets to stick to the two metal expansion rails. RPi hats can be used too but are not piggybacked on the RPi but on the pi-topPROTO instead.The Modular Rail and rest of the guts of the pi-top are accessible by sliding the keyboard down (towards the user). The battery is mounted under the keyboard and remains hidden all the time.
Inventor's kit
Included with the pi-top is a small cardboard box containing electronic components like LEDs, resistors and pushbuttons and a breadboard plus jumper wires. This is the Inventor Kit. The breadboard (pi-topPROTO+), when placed on the Modular Rail, connects to the RPi’s extension connector through the pi-topHUB and the heat sink.A booklet has examples of what to do with all this using pi-topCODER. There are three so-called Inventor’s Journeys: Music Maker, Space Race and Smart Robot.
Music Maker journey
To do a project you first build the proposed circuit on the breadboard and connect it to the pi-topHUB on the Modular Rail, then copy the code into the Python editor and run it. I started with the first journey but got stuck in the end as the final project ‘Sonic Synth’ could not be found. I did find a project called ‘Music Maker’ so I tried that instead.This is quite a fun project and the result is a 4-track sample player for the would-be DJ. While doing this project I found that to make sound work reliably, you must connect the pi-topSPEAKER before powering the RPi. If you don’t, sound testing may work, but for some reason the program won’t make any music. Another thing to be aware of is that due to musical multi-measure delays in the example program you may have to wait a while before you will hear anything or before a track is switched off. No sound when there should be after say half a minute means there is a problem.
Cardboard cut-out kits
With the Music Maker project up & running, I turned my attention to the three cardboard cut-out kits included in the pi-top box. The manuals do not mention what to do with these sheets so I set out on my own to build the one labelled ‘Music Maker’. Folding it into the target object requires (a lot of) patience and dexterity, and is probably impossible without having seen the drawing of the target object at least once.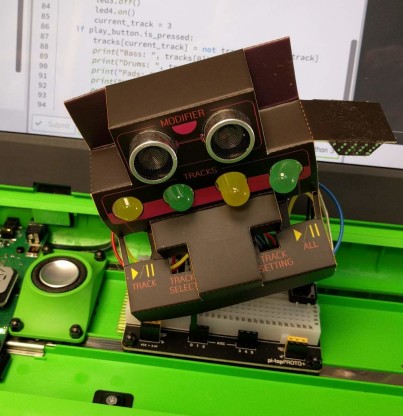
What you are supposed to end up with is a kind of cover to be placed over the breadboard. The LEDs and ultrasonic transducer can be mounted inside the holes of the cover and if you placed the trimmers and pushbuttons exactly at the right position on the breadboard they will be accessible too. The long wires to the LEDs and ultrasonic transducer do not make this any easier. The other two sheets are simpler so you may want to start with one of them to get a feel for it.
Read full article
Hide full article
Discussion (0 comments)