
Review: SunFounder Smart Video Car Kit for Raspberry Pi
Improving the steering assembly
Testing the car starts by calibrating the servos and this is where I ran into a serious problem: the steering didn’t work. The steering servo buzzed, but nothing happened. After some research the problem turned out to be the two copper standoffs next to the front wheels. They have the exact same length as the height of the acrylic parts you mounted earlier inside the front wheels. Now, when you tighten their nuts too much, the wheels get stuck. I solved this problem by adding a 0.5-mm spacer on either side of each standoff (four spacers in total). After this improvement the front wheels wiggled freely and steering worked properly.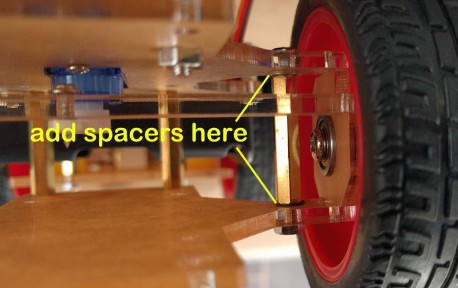
When calibration is done make sure to click the ‘Confirm’ button to store the offset values on the RPi.
That’s it, or, as the manual says: Get on the road! This all worked for me right away so I won’t spend any words on it.
Android app
Source code for an experimental Android App is included in the GitHub repository, to be compiled with App Inventor. A compiled app can be downloaded from the Google Play Store (search for Sunfounder). To use it on the RPi you must first install ‘pip’ and then ‘Django’. Instructions can be found on GitHub (they mention an http_server, but that should be html_server). Unfortunately, the app didn’t work on my phone (Nexus 5X with Android 8.1.0).Conclusion
This Sunfounder Smart Video Car Kit for Raspberry Pi is very well done. The parts fit perfectly, the manual is great and the software just works. Of course, there are some minor issues, but nothing that you can’t solve easily. There are enough nuts and bolts included to allow you to lose one or two. Tubing and tie wraps are included to help you get wires out of the way.
If I had to build another one, I would do it in this order:
- install the host remote control software on the PC;
- prepare the RPi software and setup the RPi;
- test the camera;
- test the complete electrical circuit before fixing it to the car so you know everything works;
- assemble the car (pass servo cables under the RPi, keep enough slack for pan & tilt servos);
- test the car.
Power consumption
Since the user must provide the li-ion batteries, I did some power consumption measurements:- Motors running full speed, no camera installed: 600 mA @ 7 V
- Motors running full speed, with camera: 700 mA @ 7 V
- Idle with camera: 450 mA @ 7 V
- RPi off: 100 mA @ 7 V (you might want to add a power switch)
Read full article
Hide full article
Discussion (1 comment)