
Review: Build a smart-looking GUI in minutes with Workshop4 IDE
Add an Arduino host
As a next step try out the Arduino host example described in application note 4D-AN-00017. You will need the adapter board with the pin header on it together with some wires to connect the display to the Arduino board. An Arduino adapter shield is available to make this easier.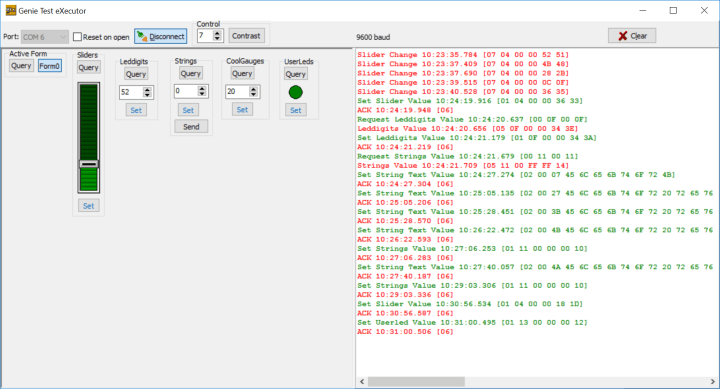
Things to keep in mind
The example is straightforward, but you may run into one or two difficulties:- Swapping the programming cable for the serial cable is a bit tedious; therefore make sure the GUI works well before connecting the Arduino host. Use the ‘Genie Test eXecutor’ (GTX) from the Tools tab to test it thoroughly. With GTX you can query and set elements and you can inspect the messages flying around. (Note that you can reorder the controls by dragging them.) With one of the terminals (also on the Tools tab) you can send self-composed (hexadecimal) messages to see if they work as intended.
- Don’t forget to use identical communication speeds on the display and in the Arduino sketch. The sketch uses 200 kbps, the ViS Genie project defaults to 9600 bps. Set the ‘Comms speed’ on the Project tab to fix this.
- Power can be a problem, especially when a computer’s USB port is providing it. Such problems may make it impossible for the display to boot. Therefore use either a USB hub with external power supply or power the Arduino board from an external supply. It is also possible to connect a five-volt supply to the adapter board.
- Two digits are used for displaying the slider’s value making it impossible to show its maximum value of 100. Set the slider’s maximum value to 99 or add a digit to correct this.
Going deeper with Workshop4 IDE
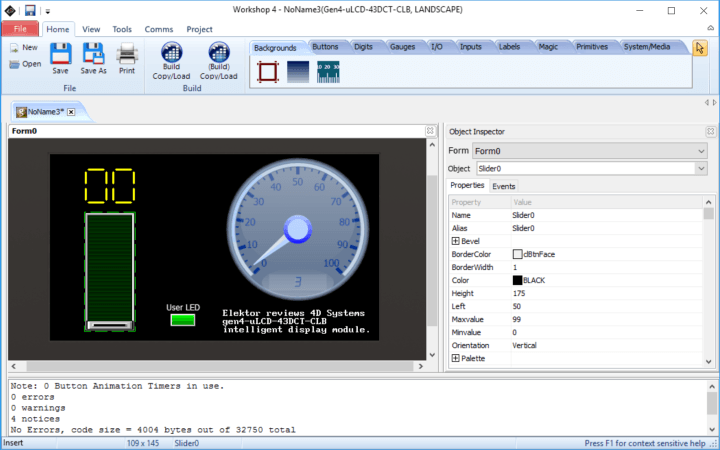
Exploring the IDE will reveal many useful tools, like for instance a microSD card partition wizard, making it a one-stop programming shop. Once you have become familiar with the module’s and Workshop4 IDE’s capabilities, you can go a step deeper. You may want to try the ViSi (without Genie) or Serial environments too. Seasoned and expert users will probably end up in the Designer environment where they have full control over the display.Smart Widgets
Although the Workshop4 IDE includes many built-in GUI objects, you are not limited to these. Indeed, the Smart Widget editor, which comes with the Pro version of the software, allows the creation of elaborate, possibly animated custom widgets (gauges, sliders, menu items, etc.) with up to six layers.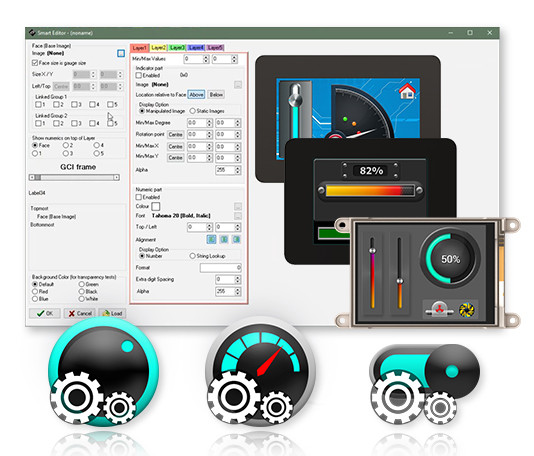
Sounding off
Designing a nice GUI with the ViSi-Genie environment from the Workshop4 IDE for a gen4-µLCD-43DCT-CLB module by 4D Systems really is easy. Time otherwise spent on creating and drawing touch-capable graphical elements before integrating them into the application can now be spent on other important tasks like drinking coffee. Projects will be finished faster, will look nicer and may even have more possibilities.More information
4D Systems offers plenty of application notes and videos, and a user forum to help new and existing users. A project gallery where you can find inspiration or post your own projects exists as well.
Read full article
Hide full article
Discussion (0 comments)