
My Journey into the Cloud (19): A simple web server using the ESP32
October 12, 2017
on
on
In the last episode of this series, we used the MQTT protocol to pass messages containing measurement values and commands between different clients. Using an ESP32 DevKitC board (available in the Elektor shop) we were able to implement an actuator and a sensor node. Using the ESP32, the board contains a powerful, Wi-Fi-capable microcontroller, which can be easily programmed using versatile library routines via the Arduino IDE.
In the last few installments, we've come to understand how the lightweight MQTT protocol works: using a TCP / IP connection a few bytes flit backwards and forwards between the client (our ESP32 board) and the server (the MQTT test broker somewhere outside in the cloud). In this installment, we are going to use another protocol also based on TCP / IP, namely HTTP (Hypertext Transfer Protocol). This is where we switch things round: our ESP32 hardware now becomes the TCP / IP server, and a PC hooked up to the same local Wi-Fi network, takes over the role of the TCP / IP client. As far as the PC is concerned there is no need to develop any additional software, we can just use a normal web browser. Reading these words, you are of course already using HTTP protocol: You entered the browser line www.elektor.com and received the corresponding Web page from the Elektor server as the payload in HTTP protocol. This is HTML-coded: In addition to text, there are many other elements transferred such as buttons, weblinks and images.
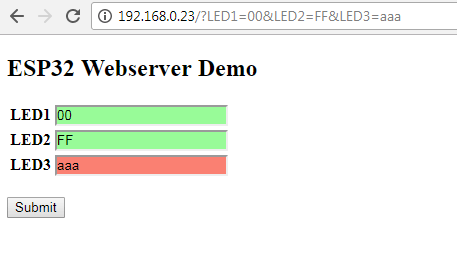
The ESP32 can also output web pages that can be displayed in a browser running on a PC. For example, a web page can contain a form where we can input configuration values and send them back to the ESP32 by pressing a button. You can probably already guess where we are going here: so far we’ve had to hardcode all the board settings into an Arduino sketch. It would be better if we could configure our board hardware via Wi-Fi; PC monitor, mouse and keyboard using a convenient user interface. In order to learn how to use the ESP32 as a simple web server, I decided first to try a simpler application: the ESP32 should send a web page containing a small form when requested by a browser (see screenshot). In the first text field next to ‘LED1’, we can then enter ‘00’ or ‘FF’ to switch the red LED on or off (which we connected to the ESP32 board in part 17 of this series). We also use the RGB LED as before: it confirms successful login to our home Wi-Fi.
a TCP / IP server is prompted to listen for requests from a client. This could come from a browser running on a PC or from a smartphone or tablet, which gives you a neat mobile remote control function.
All the interesting stuff takes place in the loop function. When a request is received from the client, the microcontroller analyzes the incoming (via TCP / IP) characters. HTTP is the protocol used for the request. All the characters are also output via the serial monitor so you can see just how chatty HTTP is compared to MQTT. One advantage is that all the bytes have ASCII values; this allows you to apply Arduino string functions to the character stream. The line feed separator divides the request stream into lines (see screenshot).

The first line beginning with ‘GET’ evaluates the data. In the simplest case, the User enters the local address of the ESP32 (for example, ‘192.168.0.23’) in the address line of his web browser and presses ‘enter’ to start the request. It is also possible to add a forward slash to this address and send additional ASCII characters to the server. When surfing the web, for example, this is used to specify subpages that you want to visit, but you can also use this feature to send control commands to a web server. In the application that I used as a template, a URL like "192.168.0.23/H" is used to turn on an LED. In the data stream of the request, the "/ H" appears directly after "GET" and a space. Since there is still another space after that, the control command from the Arduino code can be easily extracted and the LED switched.
For my own application, I use another mechanism built into every browser. A web form can be constructed using HTML controls, a very useful one has the following form:
The browser displays the element as a button, in this case with the label ‘Submit’. When the user clicks on it, the browser sends a new request to the web server; all data in the form (for example the text in the text fields) are attached to the address as a so-called parameter. Take for example, "Germany" is in the text field called "Country" and "Aachen" in a second text field "City", then the browser would send the following request to our web server in the local network:
Everything from the "/" appears again in the TCP / IP request data stream; the separators '=' and '&' make it easy to evaluate.
The first function only contains the command server.begin(), which is called in the setup function. The second function is Interesting; it must be executed cyclically without delays. If there is no request, it simply returns an empty string. When a client submits a request, the HTTP lines are processed. If the user enters a simple address such as ‘192.168.0.23’, the function returns the string ‘-‘. When it is a request such as ‘192.168.0.23/?Country=Germany&City=Aachen’, then the expression after the question mark is returned. After a client request, the connection is left open. Now we can send an HTML page using the third function shown above.
To prepare for the next configuration application, I have defined a few arrays, each with 8 elements (one for each setting option). ConfigName[x] is the setting option name, ConfigValue[x] is the corresponding value and ConfigStatus[x] indicates whether the value is undefined (0), valid (1) or invalid (-1). In the demo application ‘00’ and ‘FF’ are valid values.
The main loop executes the following tasks cyclically:
Stand by for the next episode!
In the last few installments, we've come to understand how the lightweight MQTT protocol works: using a TCP / IP connection a few bytes flit backwards and forwards between the client (our ESP32 board) and the server (the MQTT test broker somewhere outside in the cloud). In this installment, we are going to use another protocol also based on TCP / IP, namely HTTP (Hypertext Transfer Protocol). This is where we switch things round: our ESP32 hardware now becomes the TCP / IP server, and a PC hooked up to the same local Wi-Fi network, takes over the role of the TCP / IP client. As far as the PC is concerned there is no need to develop any additional software, we can just use a normal web browser. Reading these words, you are of course already using HTTP protocol: You entered the browser line www.elektor.com and received the corresponding Web page from the Elektor server as the payload in HTTP protocol. This is HTML-coded: In addition to text, there are many other elements transferred such as buttons, weblinks and images.
The ESP32 can also output web pages that can be displayed in a browser running on a PC. For example, a web page can contain a form where we can input configuration values and send them back to the ESP32 by pressing a button. You can probably already guess where we are going here: so far we’ve had to hardcode all the board settings into an Arduino sketch. It would be better if we could configure our board hardware via Wi-Fi; PC monitor, mouse and keyboard using a convenient user interface. In order to learn how to use the ESP32 as a simple web server, I decided first to try a simpler application: the ESP32 should send a web page containing a small form when requested by a browser (see screenshot). In the first text field next to ‘LED1’, we can then enter ‘00’ or ‘FF’ to switch the red LED on or off (which we connected to the ESP32 board in part 17 of this series). We also use the RGB LED as before: it confirms successful login to our home Wi-Fi.
Web server code for the ESP32
When programming the web server, I was of course keen not to reinvent the wheel. A simple google search using "esp32 web server Arduino" hits up this brilliant Arduino sketch. We are already familiar with the setup function: The ESP32 logs into the Wi-Fi and then outputs on the serial monitor the address that it is assigned in the local network; we will need that later. One line is new to us: Withserver.begin();
a TCP / IP server is prompted to listen for requests from a client. This could come from a browser running on a PC or from a smartphone or tablet, which gives you a neat mobile remote control function.
All the interesting stuff takes place in the loop function. When a request is received from the client, the microcontroller analyzes the incoming (via TCP / IP) characters. HTTP is the protocol used for the request. All the characters are also output via the serial monitor so you can see just how chatty HTTP is compared to MQTT. One advantage is that all the bytes have ASCII values; this allows you to apply Arduino string functions to the character stream. The line feed separator divides the request stream into lines (see screenshot).
The first line beginning with ‘GET’ evaluates the data. In the simplest case, the User enters the local address of the ESP32 (for example, ‘192.168.0.23’) in the address line of his web browser and presses ‘enter’ to start the request. It is also possible to add a forward slash to this address and send additional ASCII characters to the server. When surfing the web, for example, this is used to specify subpages that you want to visit, but you can also use this feature to send control commands to a web server. In the application that I used as a template, a URL like "192.168.0.23/H" is used to turn on an LED. In the data stream of the request, the "/ H" appears directly after "GET" and a space. Since there is still another space after that, the control command from the Arduino code can be easily extracted and the LED switched.
For my own application, I use another mechanism built into every browser. A web form can be constructed using HTML controls, a very useful one has the following form:
<input type="submit" value="Submit" />
The browser displays the element as a button, in this case with the label ‘Submit’. When the user clicks on it, the browser sends a new request to the web server; all data in the form (for example the text in the text fields) are attached to the address as a so-called parameter. Take for example, "Germany" is in the text field called "Country" and "Aachen" in a second text field "City", then the browser would send the following request to our web server in the local network:
192.168.0.23/?Country=Germany&City=Aachen
Everything from the "/" appears again in the TCP / IP request data stream; the separators '=' and '&' make it easy to evaluate.
A small Web server library
Now I have assembled all the components to program a web server application; you can download the result below. I deliberately decided not to abstract or optimize everything down to the last detail, that way it’s easier to see what’s going on and the error handling is still rudimentary. My small web server library consists of the functionsvoid Webserver_Start()
String Webserver_GetRequestGETParameter()
void Webserver_SendHTMLPage(String HTMLPage)
String Webserver_GetRequestGETParameter()
void Webserver_SendHTMLPage(String HTMLPage)
The first function only contains the command server.begin(), which is called in the setup function. The second function is Interesting; it must be executed cyclically without delays. If there is no request, it simply returns an empty string. When a client submits a request, the HTTP lines are processed. If the user enters a simple address such as ‘192.168.0.23’, the function returns the string ‘-‘. When it is a request such as ‘192.168.0.23/?Country=Germany&City=Aachen’, then the expression after the question mark is returned. After a client request, the connection is left open. Now we can send an HTML page using the third function shown above.
To prepare for the next configuration application, I have defined a few arrays, each with 8 elements (one for each setting option). ConfigName[x] is the setting option name, ConfigValue[x] is the corresponding value and ConfigStatus[x] indicates whether the value is undefined (0), valid (1) or invalid (-1). In the demo application ‘00’ and ‘FF’ are valid values.
The main loop executes the following tasks cyclically:
- The function Webserver_GetRequestGETParameter is called and it checks whether an HTTP-Request from the web browser is received. If so, the web browser (Client) connection is kept open and the characters are evaluated. The function returns a "-" or the GET-parameter after the ‘?’.
- If it is more than one character, we assume that the user has pressed the ‘Submit’ button and the form data is incoming (theoretically, the system can be defeated by manually typing characters into the address line).
- The GET parameter is extracted and the corresponding values of ConfigValue[x] are configured (the order of the parameter values is significant).
- In the ProcessAndValidateConfigValues(…) function, the values of ConfigValue[x] are checked. ConfigStatus[x] is set accordingly; in addition, the red LED is switched according to the value in the first text field. This function is highly application-specific and is therefore positioned in the sketch directly before the loop function.
- Finally, the (new) web page is constructed from the HTML elements. The form is now redrawn, with the current configuration values in the text fields. The background colors green and red symbolize valid and invalid values. The web page is then provided with an HTTP-Header (HTTP-Response) and sent. The connection with the client is then closed.
- And repeat.
Stand by for the next episode!
Read full article
Hide full article
Discussion (1 comment)