
Free New Article: A 3-Dollar Tiny Wi-Fi Switch That Works
on
Out of curiosity I ordered a tiny ESP8266 relay switch board from aliexpress.com, for next to nothing. Blissfully unaware, then, of the struggle ahead to make the thing work as advertised. I survived and conquered — here’s the story.
By Somnath Bera
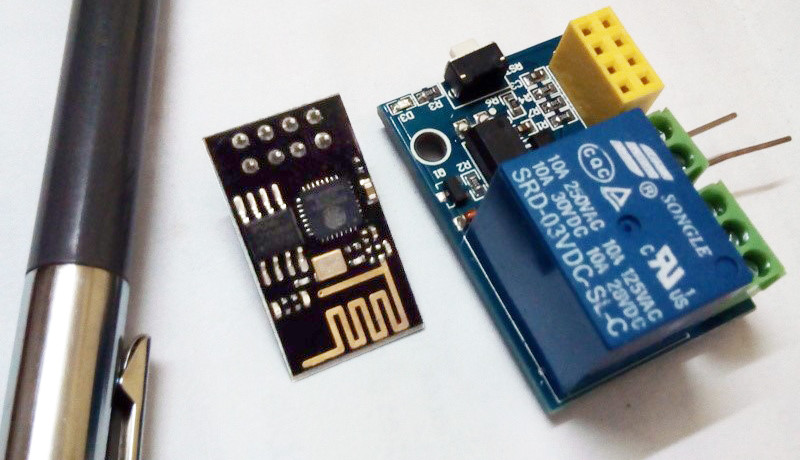
The little gizmo pictured in Figure 1 was stated by the vendor(s) to contain an inbuilt switching program, so all I had to do is “use some Android phone to control it”. Sadly, despite several attempts using various Chinese and English-language Android apps, nothing ever happened! Sure, the device gets connected with the Wi-Fi of my PC or laptop as a server and it also allocates the dynamic IP address — but nothing happens after that. No server page etc. opens anywhere! Utterly frustrated, one day I decided to develop and install my own program into its dumb head!
Starting out
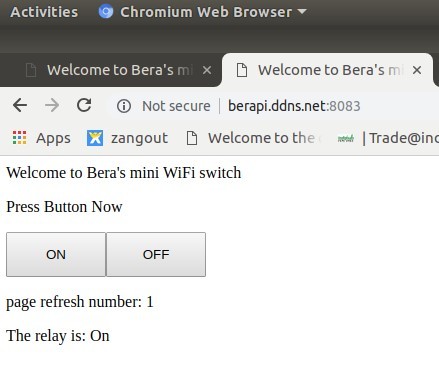
I reprogrammed the switch to connect to my Wi-Fi router with a fixed IP address and a fixed port like these: 192.168.1.99 and port 8083. Once connected the board behaved as a webserver at http://192.168.1.99:8083 and the ‘switch’ was visible in the browser. Pressing the On or Off button made it act accordingly. For simplicity, I added a refresh counter and a relay status to have a readout for the state of the relay (that being, on or off).
Strategy
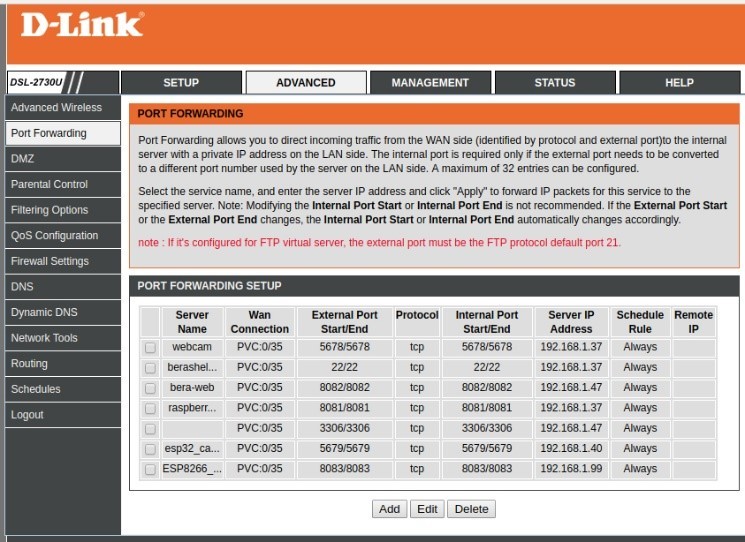
Next, in my DSL router I set up ‘port forwarding’ of the 8083 port to the 8083 port of the “192.168.1.99” computer (i.e. the relay board) which gets connected to it. Once you know the external IP address of your router, you can connect to it from the other side of the universe! So easy! But the question is, how to know the external IP address of your router? Simple, you ask your son, daughter or your spouse to open the router’s admin page, go to the Status tab and locate the IP address of the router — it’s a common feature of most DSL router modems out there. When your laptop, desktop, or mobile phone gets connected to your Wi-Fi network, it gets an IP address as the identity of that device on the Wi-Fi network. Likewise, your DSL router gets an IP address when it gets connected to Internet, and that’s the address you have to know.
But there is no dearth of problems in Bera’s world of electronics! The external IP address of any router changes quite often — up to 10 times per is not uncommon. So really, you’d need a permanent valet near the modem to shout numbers 10 times a day … you’d wish you could train your pet to do this work there and then!
But where there is a problem there is solution! At least in the world of electronics this is so true. When you can formulate and then simplify a problem, you are actually pushing towards the solution. Fortunately, most run of the mill DSL modem haves an inbuilt DDNS (Dynamic DNS) tracking facility. You just supply the DNS host server’s name, the DNS name and the remaining authorization details, and the Modem will track the changes of the external address on its own. You just need to remember the DNS name you have registered with the DNS host server’s site and the port you are forwarding in the modem — in my case it’s berapi.ddns.net:8083 from noip.com. See Figures 2a and 2b for my setups.

Architecture
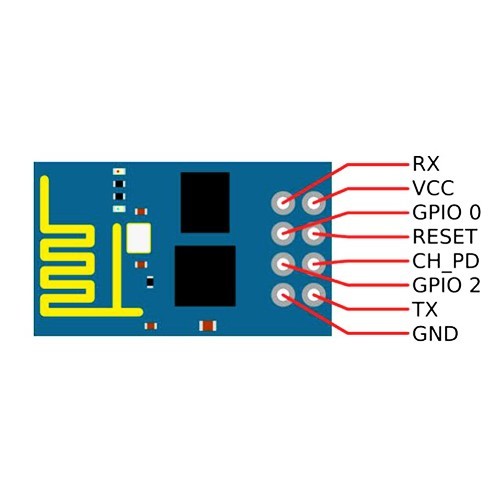
The basic ESP8266 — also called ESP-01 — has 8 pins coming out of the chip board (Figure 3). But if you look carefully, the chip has total of 32 pins. That means for simplicity, on this board the other pins are not used by the manufacturer. The 5-volt relay is connected to GPIO0 pin through a switching transistor. When the GPIO0 drops Low, the relay is actuated and conversely, it’s deactuated when GPIO0 goes High. The board has a common 3.3-V regulator chip installed and happily accepts 7–9 VDC on its Vcc pin.
Programmer
This is really the easiest part of the project. You just need a programmer to program this tiny little wonder! The programmer is just another way to transfer the Arduino sketch from the computer’s USB port to the ESP8266’s ‘chip brains’. FTDI’s CP2102 board is available at aliexpress for $1.02 only. In case you have a working Arduino UNO board available around, you can also use it to upload your sketch to the little wonder. The connections for either type are shown in Figures 4 and 5. In fact, when you tie the Arduino’s Reset pin to ground you are just making the Arduino UNO board act as an USB-to-serial uploader like the FTDI CP2120!
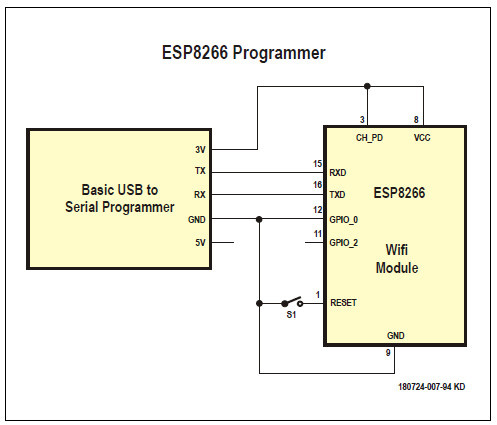
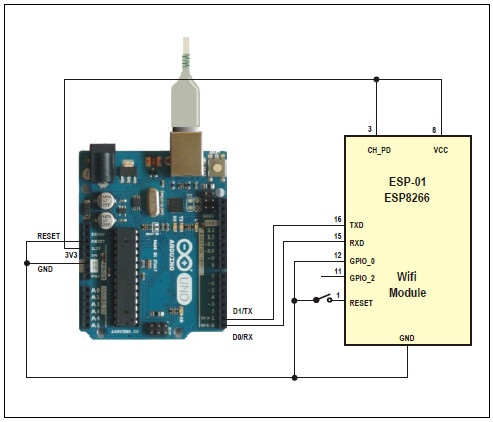
We have provided a Push-to-On switch in both cases, which needs to be depressed for about 10 seconds while uploading the sketch. After 10 seconds, release it and the sketch will upload in another 60 seconds. All the lights on the FTDI board will blink while the sketch is uploading.
Program output
The program sketch is available as a free download below (ATTACHMENT) and from the Elektor magazine website. Replace the Wi-Fi ID and password with your Wi-Fi ID and password and then upload the sketch by pressing the ‘Upload’ command within the Arduino IDE (go to Sketch Upload).
Figure 6 shows the output of this little wonder, when the sketch got uploaded and the DDNS & port forwarding was done properly. By calling this url in any browser window be it on an Android or Apple phone, anywhere of the world, the relay will behave as per the button press.
A Bill of Materials, and prices
Prices from aliexpress.com and correct at the time of writing.
FTDI USB to Serial, CD2120: $1.02 (optional)
WiFi ESP8266 Relay: $1.85
Grand Total: <$3.00 (excl. 5-V power supply)
Aftermath
The only thing left to now is to make the connection secure, otherwise anyone aware of the switch URL will be able to operate the relay, with dire consequences. I know you will start to explore that right now. Best of luck.
Want more great Elektor content like this?
--> Take out an Elektor membership today and never miss an article, project, or tutorial.
Discussion (2 comments)