
My Journey into the Cloud (25): ESP32 and Amazon Web Services – send data to the Cloud securely
May 17, 2018
on
on
In the previous instalment to this series, we implemented an IoT device using the ESP32 Pico Kit plus a little additional circuitry which sends sensor values to the cloud and is also controllable from there. For the cloud platform we used the Maker-variant of AllThingsTalk. Once you have registered to this free resource it includes several websites for the User themselves to configure. Here you can display sensor measurement values as diagrams or graphs and also define areas to create a small control interface.
One thing to be aware of in advance: Getting started with the AWS and programming a corresponding sensor board takes a little effort. First off you need to create an AWS account. Here you not only register with your e-mail address and provide a password, but also are required to provide a postal address, credit card number for billing and a telephone number. The latter is even verified: You are called by a bot and asked to enter on the phone a four-digit number displayed on your PC screen. Make sure when you register to enter the telephone details correctly, you need the complete telephone number (including the country code) without spaces otherwise you will not be called.
Once you have registered it's best to follow the Getting Started with AWS IoT tutorial. It takes a while to become familiar with some of the terms used in the ‘AWS language’. Some important terms include: Registry which refers to the huge AWS database where your devices will be registered. A Device and a Thing are more or less identical (a Thing is actually a virtual representation of a real device in the cloud).
Once the client and server have agreed to use TLS, they negotiate a stateful connection by using a handshaking procedure. The protocols use a handshake with an asymmetric cipher to establish not only cipher settings but also a session-specific shared key with which further communication is encrypted using a symmetric cipher. During this handshake, the client and server agree on various parameters used to establish the connection's security:
In order for a board to communicate with the AWS over TLS-protected TCP / IP, we need to use three specific character strings for the purposes of encryption and message security which are later integrated into the device firmware:
Instead of ‘my/topic/here ’ you should use the topic
‘$aws/things/<DEVICENAME>/shadow/update’ and enter it in this field:
The 'ACCOUNTID' can be found by clicking on the username in the upper right corner of the AWS IoT Management Console and selecting ‘My Account’. This web access handles everything that has to do with your own AWS account. After completing all the steps outlined in the tutorial, the Management Console was configured as shown in the screenshot below.
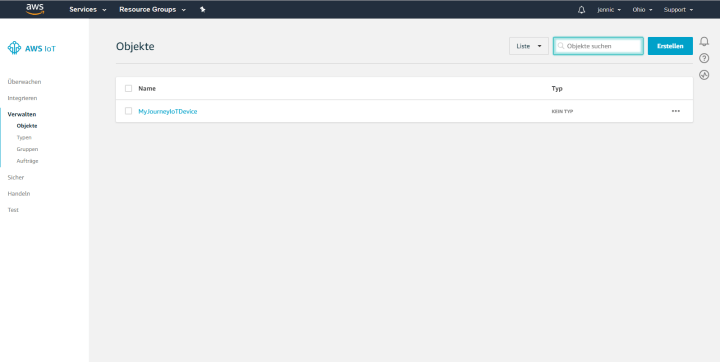
You can see that I named my first AWS device 'MyJourneyIoTDevice'. You can still see that the menu uses the language based on your location (I must apologize to international readers for not being able to display English screenshots). Finally, as you can see, I forgot to change the region from ‘Ohio’ to ‘EU (Frankfurt)’ where I am located. The <REGION> field in the above expression is therefore = ‘us-east-2’
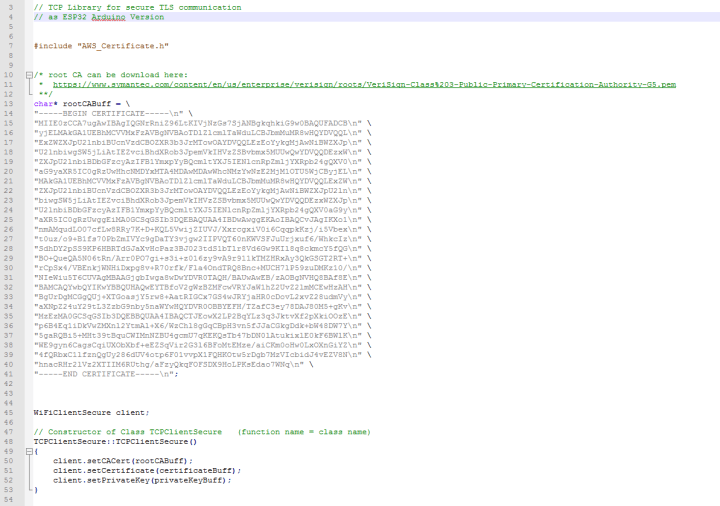
In the object constructor, the compiler is informed of the three character strings mentioned above necessary for TLS communication. They can be hard-coded in the program, each 64-character block must be separated by a \n separator (i.e. the carriage return character). I can show the Root Certificate here without risk of a security breach - it's always the same anyway. For the other two strings, I've created their own AWS_Certificate.h file name. Each file is incorporated by using an include-statement in TCPClientSecure.cpp. You will find a template for these files in the download, but of course you have to fill it with your certificate or, if necessary, your key
Since the MQTT-Library expects an object of the type TCPClient but I only need an object of the type TCPClientSecure I have also duplicated the MQTT library and again just appended 'Secure' to file names and classes. So there is now two versions of the TCP/IP and MQTT libraries; one version is for normal operation and one for TLS protected communication use.
(see screenshot).
What is a shadow (object) again? A shadow is nothing more than a representation of states of an IoT node (sensor or actuator), in the form of JSON documents. If you remember we also used the JSON notation to send measurements to AllThingsTalk. Here at AWS, for example, a valid JSON document looks like this:
I have saved this document in the JSON editor on the device-website under the menu item ‘Schatten’ or ‘shadow’ in English (see screenshot) to define which measurement value my sensor board can send.
For test purposes, I periodically send a different value (which increments from 10 to 40) to act as my ‘temperature value’ to the AWS (see the commented sketch). As a bonus for my efforts, I was able to see that after sending an MQTT message that a new ‘temperature’ value appeared when the shadow display was refreshed. Incidentally the system seems quite robust; it was running for hours and I didn’t notice a single drop out.
More on my journey into the cloud!
Amazon Web Services
There are, of course, many other cloud platforms. Many of the IoT solutions you see at trade shows like Embedded World use Amazon Web Services (AWS). This platform is very powerful, robust and secure and therefore has become a kind of 'industry standard'. The Dropbox file hosting service started out using AWS before they switched to their own network. Amazon has developed 'AWS IoT Core' specifically for Internet of Things applications. Businesses and private users can theoretically register millions of sensor boards, storing the resulting torrent of data in a database while applying big-data analytics and implementing operational processes as system rules plus much more. Billing is worked out on per-million call minutes and million messages basis. If, like me you just want to try it out you can get a free quota of 500,000 messages for a period of 12 months.One thing to be aware of in advance: Getting started with the AWS and programming a corresponding sensor board takes a little effort. First off you need to create an AWS account. Here you not only register with your e-mail address and provide a password, but also are required to provide a postal address, credit card number for billing and a telephone number. The latter is even verified: You are called by a bot and asked to enter on the phone a four-digit number displayed on your PC screen. Make sure when you register to enter the telephone details correctly, you need the complete telephone number (including the country code) without spaces otherwise you will not be called.
Once you have registered it's best to follow the Getting Started with AWS IoT tutorial. It takes a while to become familiar with some of the terms used in the ‘AWS language’. Some important terms include: Registry which refers to the huge AWS database where your devices will be registered. A Device and a Thing are more or less identical (a Thing is actually a virtual representation of a real device in the cloud).
Subscribe
Tag alert: Subscribe to the tag IoT and you will receive an e-mail as soon as a new item about it is published on our website! Security above all
Much thought has been invested in the topic of security. All boards, smartphones and computers in the world communicating with the AWS, always employ encryption using the Transport Layer Security (TLS) protocol, which runs on TCP/IP. This passage is taken from Wikipedia, and describes TLS communication setup really well:Once the client and server have agreed to use TLS, they negotiate a stateful connection by using a handshaking procedure. The protocols use a handshake with an asymmetric cipher to establish not only cipher settings but also a session-specific shared key with which further communication is encrypted using a symmetric cipher. During this handshake, the client and server agree on various parameters used to establish the connection's security:
- The handshake begins when a client connects to a TLS-enabled server requesting a secure connection and the client presents a list of supported cipher suites (ciphers and hash functions).
- From this list, the server picks a cipher and hash function that it also supports and notifies the client of the decision.
- The server usually then provides identification in the form of a digital certificate. The certificate contains the server name, the trusted certificate authority (CA) that vouches for the authenticity of the certificate, and the server's public encryption key.
- The client confirms the validity of the certificate before proceeding.
- To generate the session keys used for the secure connection, the client either:
- encrypts a random number with the server's public key and sends the result to the server (which only the server should be able to decrypt with its private key); both parties then use the random number to generate a unique session key for subsequent encryption and decryption of data during the session
- uses Diffie–Hellman key exchange to securely generate a random and unique session key for encryption and decryption that has the additional property of forward secrecy: if the server's private key is disclosed in future, it cannot be used to decrypt the current session, even if the session is intercepted and recorded by a third party.
In order for a board to communicate with the AWS over TLS-protected TCP / IP, we need to use three specific character strings for the purposes of encryption and message security which are later integrated into the device firmware:
- The Certificate
- The Private Key
- The Root Certificate
arn:aws:iot:us-east-1:123456789012:topic/
my/topic/hereInstead of ‘my/topic/here ’ you should use the topic
‘$aws/things/<DEVICENAME>/shadow/update’ and enter it in this field:
arn:aws:iot:<REGION>:<ACCOUNTID>:topic/$aws/things/<DEVICENAME>/shadow/update
The 'ACCOUNTID' can be found by clicking on the username in the upper right corner of the AWS IoT Management Console and selecting ‘My Account’. This web access handles everything that has to do with your own AWS account. After completing all the steps outlined in the tutorial, the Management Console was configured as shown in the screenshot below.
You can see that I named my first AWS device 'MyJourneyIoTDevice'. You can still see that the menu uses the language based on your location (I must apologize to international readers for not being able to display English screenshots). Finally, as you can see, I forgot to change the region from ‘Ohio’ to ‘EU (Frankfurt)’ where I am located. The <REGION> field in the above expression is therefore = ‘us-east-2’
The ESP32 learns TLS
Well that was at least half the battle. Now I need to teach my board how to communicate with the AWS. I turned to google and after much experimentation I was able to modify my TCP / IP library so that I can use secure TLS over TCP/IP instead of ‘normal’ TCP/IP. You may remember that my TCP library is essentially a wrapper around the functions of the Arduino class WiFiClient which the developers at Espressif kindly implemented for the ESP32. On top of that there is also a WiFiClientclass, which takes care of TLS-protected TCP / IP operations. In order to try this out quickly, I just duplicated my TCP/IP library and appended 'Secure' to the file and class names. The actual changes in the code of the new TCPClientSecure- versus the original TCPClient-library are minimal, see screenshot.In the object constructor, the compiler is informed of the three character strings mentioned above necessary for TLS communication. They can be hard-coded in the program, each 64-character block must be separated by a \n separator (i.e. the carriage return character). I can show the Root Certificate here without risk of a security breach - it's always the same anyway. For the other two strings, I've created their own AWS_Certificate.h file name. Each file is incorporated by using an include-statement in TCPClientSecure.cpp. You will find a template for these files in the download, but of course you have to fill it with your certificate or, if necessary, your key
Since the MQTT-Library expects an object of the type TCPClient but I only need an object of the type TCPClientSecure I have also duplicated the MQTT library and again just appended 'Secure' to file names and classes. So there is now two versions of the TCP/IP and MQTT libraries; one version is for normal operation and one for TLS protected communication use.
Shadow Update
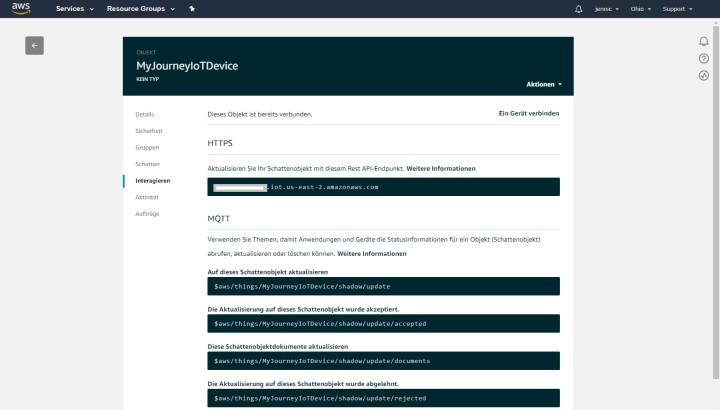
For a small demo I used the hardware and the main program from instalment 23 of this series as a starting point. Download the code and compare it with this new sketch, which you can download below. The parameters we need again of course are the SSID and the password of our Wi-Fi router. Also there is a Device ID (like working with AllThingsTalk), in my case it's called ‘MyJourneyIoTDevice’. In contrast there is no Device Token anymore and authentication is taken care of by the certificates. That is why the MQTT broker’s address is individual with AWS.For this, I adjusted the configuration web page so that the broker address is entered as the 5th text field. The broker’s server address can be found by clicking on the device in the Management Console and then clicking on ‘Interact’ (in German ‘interagieren’) in the Device menu. The server address is now displayed along the top of the window. In the next gray box, you'll see the topic to send measurements values to a shadow, for me that's:$aws/things/MyJourneyIoTDevice/shadow/update
(see screenshot).
What is a shadow (object) again? A shadow is nothing more than a representation of states of an IoT node (sensor or actuator), in the form of JSON documents. If you remember we also used the JSON notation to send measurements to AllThingsTalk. Here at AWS, for example, a valid JSON document looks like this:
{
"desired": {
"temp": "32"
}
}
"desired": {
"temp": "32"
}
}
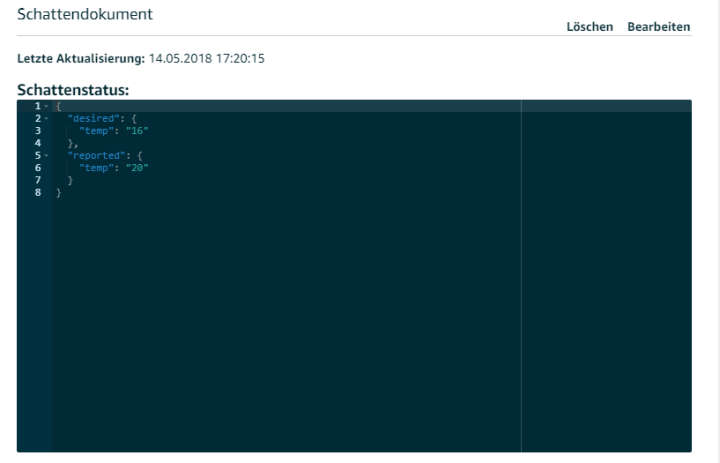
I have saved this document in the JSON editor on the device-website under the menu item ‘Schatten’ or ‘shadow’ in English (see screenshot) to define which measurement value my sensor board can send.
For test purposes, I periodically send a different value (which increments from 10 to 40) to act as my ‘temperature value’ to the AWS (see the commented sketch). As a bonus for my efforts, I was able to see that after sending an MQTT message that a new ‘temperature’ value appeared when the shadow display was refreshed. Incidentally the system seems quite robust; it was running for hours and I didn’t notice a single drop out.
More on my journey into the cloud!
Subscribe
Tag alert: Subscribe to the tag Journey into the Cloud — article series and you will receive an e-mail as soon as a new item about it is published on our website! Read full article
Hide full article
Discussion (0 comments)