
Review: Eurocircuits Panel Editor
Launching the Panel Editor
Now that we know what a panel is and why we would want one, let’s see how we can create one with the Panel Editor.Go to the Eurocircuits website, login, go to 'Calculate and order' and click 'Analyze your data'. Fill in the form, select your gerber files and validate the form. Wait for the PCB Visualizer to do its work (when the animated busy icon is replaced by something static, preferably a green checkmark), then open the Visualizer. In the top-left corner, select a panel as ‘Delivery format’ to make the ‘Panel’ section appear (right under the ‘Stencil’ section). Only for panels ‘by Eurocircuits’ (eC or customer) a ‘Panel’ button will show up too.
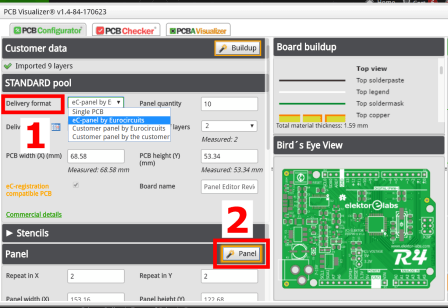
to make the Panel button appear.
An eC-panel is a panel compatible with Eurocircuits’ eC-stencil-mate or eC-stencil-fix tools. If you are not going to use one of these tools, you do not need an eC panel. Let’s continue with a ‘Customer panel by Eurocircuits’.
Enter panel parameters
A click on the ‘Panel’ button takes you to the Panel Editor. Before you get there, you are taken through a number of questions to specify:- Panel border: I chose ‘empty’ with a width of 10 mm (default).
- Separation method: I chose ‘Break routing’ (ie tab-routing) with a ‘PCB spacing’ of 2 mm (default & minimum).
- ‘Stepped PCB’ or ‘Stepped block’. A block is a rectangle made up out of multiple instances of the board (good for triangular, ‘L’- or ‘T’-shaped boards). I chose ‘Stepped PCB’.
- Number of boards: to specify in both X as Y direction. I entered ‘3’ for both and set ‘Rotation’ to 180° (just because it let me). Note that the maximum size of a panel is 580x425 mm.
After clicking ‘Finish’ the Panel Editor opens.
A shortcut
Why all these questions are asked is not clear to me as all these parameters can be modified in the Panel Editor anyway. As it turns out, a much quicker route to the editor is to start out with an ‘eC-panel by Eurocircuits’ and then click the ‘Advanced panel options’ button to open the editor’s tools menu.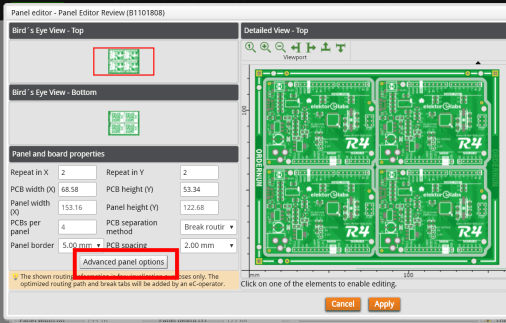
an eC-compatible panel into a customer panel.
The advantage of doing so is that fiducial marks are already placed on the border (so you won’t forget them) together with some text (that you should not forget either), eC-compatible only meaning four holes extra in the panel border that can be removed by unchecking the ‘eC-registration compatible panel’ checkbox.
Read full article
Hide full article
Discussion (0 comments)